ubuntu安装nvidia驱动后循环登陆/登陆界面卡住/无法启用nvidia显卡的解决办法 |
您所在的位置:网站首页 › ps用起来卡顿 › ubuntu安装nvidia驱动后循环登陆/登陆界面卡住/无法启用nvidia显卡的解决办法 |
ubuntu安装nvidia驱动后循环登陆/登陆界面卡住/无法启用nvidia显卡的解决办法
|
起因 因为 Ubuntu 自带的 Nouveau 太拉胯了,很多软件打不开或者用着用着花屏,实在忍不了;于是想着装一个 nvidia 的驱动把笔记本上的弱鸡显卡利用起来。在 nvidia 官网下了驱动后一顿回车,重启之后直接gg。出现循环登陆现象,一直卡在登陆界面进不去的现象。期间尝试过网上各种方法,包括但不限于卸载驱动并在英伟达官网下驱动手动安装,通过 Ubuntu 自带的安装软件重装驱动,从 Ubuntu 18.04 默认的 gdm3 切换到 lightdm 以及各种其他的 Display Manager 和期间无数次重启(PS:此处吐槽一句,中文互联网搜索出的解决办法10个里面9个一毛一样还不求甚解)。最后通过手动修改 xorg.conf 配置文件成功解决问题。附上一张成功驱动的截图,有兴趣的也可以去了解一下 xorg.conf 的配置写法:https://www.x.org/releases/current/doc/man/man5/xorg.conf.5.xhtml 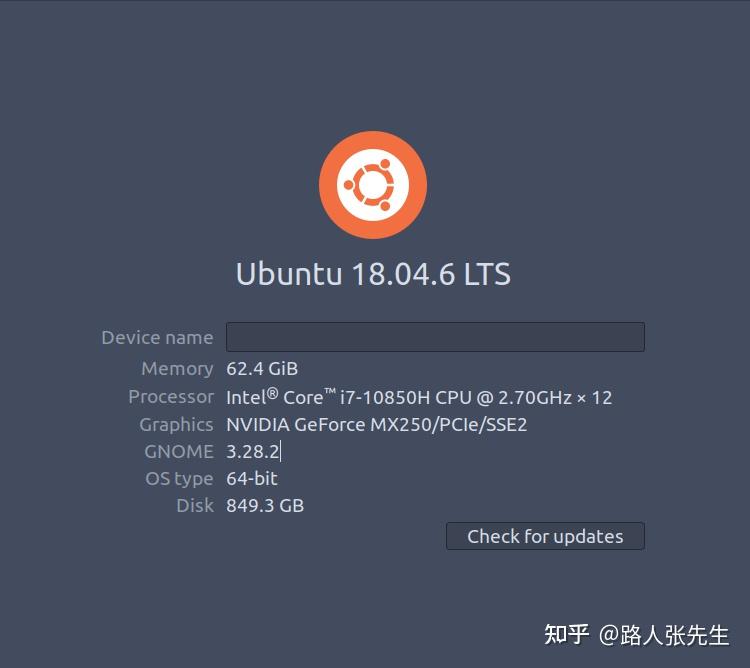 原因分析 原因分析起初碰到进不去系统的时候,我尝试了以下操作,发现可以进系统了,但是进系统后还是默认使用的 intel 的核显。 UBUNTU20.04 安装nvidia显卡驱动后进不去系统 经过一番折腾,我发现只要使用 prime-select 选择了 on-demand 或者 intel 之后就能进入系统。但是此时不管怎么配置,nvidia-smi 中都不会显示正在运行的程序,也就是说这两个模式下都是只用了核显,没有用到独显。 在通过 prime-select 切换成 nvidia 之后,系统就进不去了,会一直循环登陆。此时如果你恰巧执行了 nvidia-xconfig 命令,生成 /etc/X11/xorg.conf 之后,系统也还是进不去,但是不会再一直循环登陆,而是登陆之后直接就卡住了。 于是我估计问题十有八九出现在 X11 的配置文件上。经过一番搜索,发现答案就藏在这两个回答中: 稍微深入分析Ubuntu环境下安装NVIDIA驱动导致黑屏的原因_Edward_ed_liu的博客-CSDN博客_ubuntu安装nvidia驱动黑屏 Why black screen after run sudo nvidia-xconfig -a --cool-bits=31 大致意思就是讲: nvidia-xconfig 是只为英伟达的显卡设置 xorg 配置文件,在核显+独显的电脑上,这个配置文件是无效的。于是就会出现登陆后直接卡住的问题在没有 xorg.conf 的情况下,X server 会检测系统状态并且自动生成配置。但是自动生成的配置把独显的驱动检测成了 nouveau(对,就是 nvidia 驱动安装中一开始就要禁用掉的系统自带的驱动)。于是在这种情况下,如果使用了 prime-select 把默认显卡设置成了独显,系统会因为找不到驱动而一直启动失败,此时会造成循环登陆解决问题分析出结果之后问题就好解决了,手动在 nvidia-xconfig 生成的文件中添加对 intel 显卡的支持即可,相关配置如下 # nvidia-xconfig: X configuration file generated by nvidia-xconfig # nvidia-xconfig: version 470.161.03 Section "ServerLayout" Identifier "Layout0" Screen 0 "Screen0" InputDevice "Keyboard0" "CoreKeyboard" InputDevice "Mouse0" "CorePointer" EndSection Section "Files" EndSection Section "InputDevice" # generated from default Identifier "Mouse0" Driver "mouse" Option "Protocol" "auto" Option "Device" "/dev/psaux" Option "Emulate3Buttons" "no" Option "ZAxisMapping" "4 5" EndSection Section "InputDevice" # generated from default Identifier "Keyboard0" Driver "kbd" EndSection Section "Monitor" Identifier "Monitor0" VendorName "Unknown" ModelName "Unknown" Option "DPMS" EndSection Section "Device" Identifier "Device0" Driver "nvidia" VendorName "NVIDIA Corporation" # 添加显卡型号和总线id BoardName "NVIDIA GeForce MX250" BusID "PCI:1:0:0" EndSection # intel的显卡也得加上 Section "Device" Identifier "intel" Driver "modesetting" BusID "PCI:0:2:0" EndSection Section "Screen" Identifier "Screen0" Device "Device0" Monitor "Monitor0" DefaultDepth 24 SubSection "Display" Depth 24 EndSubSection EndSection其中总线 ID 可以用一下命令查看 lspci -k | grep -EA3 'VGA|3D|Display' 00:02.0 VGA compatible controller: Intel Corporation Device 9bc4 (rev 05) Subsystem: Dell Device 09c1 Kernel driver in use: i915 Kernel modules: i915 -- 01:00.0 3D controller: NVIDIA Corporation Device 1c90 (rev a1) Subsystem: Dell Device 09c1 Kernel driver in use: nvidia Kernel modules: nvidiafb, nouveau, nvidia_drm, nvidia |
【本文地址】