Processing粒子系统 |
您所在的位置:网站首页 › processing中map › Processing粒子系统 |
Processing粒子系统
|
Processing粒子系统-烟雾画出来的世界名画
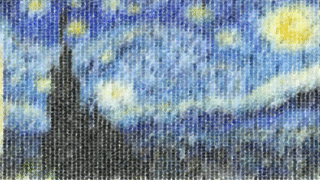
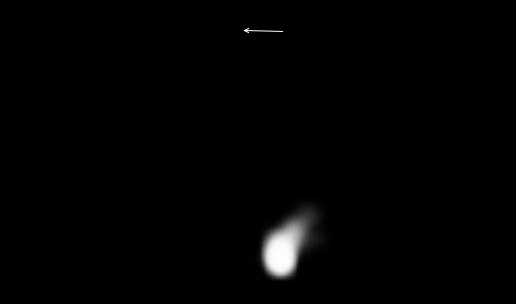
目录: 效果欣赏参考示例程序思想以及代码实现作者有话说 效果欣赏注:烟雾的的扩散方向随着鼠标位置的不同而不同,构成烟雾的基础图元可以是普通几何体,也可以是材质贴图。 鼠标位置出现的蓝色或者黄色的圆为录屏软件所添加,程序运行时并不会有显示。 注:本程序的参考案例均来自《代码本色》一书的第四章 参考案例一:4-02 ArrayList particles; void setup() { size(640, 360); particles = new ArrayList(); } void draw() { background(255); particles.add(new Particle(new PVector(width/2, 50))); // Looping through backwards to delete for (int i = particles.size()-1; i >= 0; i--) { Particle p = particles.get(i); p.run(); if (p.isDead()) { particles.remove(i); } } } // The Nature of Code // Daniel Shiffman // http://natureofcode.com // Simple Particle System class Particle { PVector position; PVector velocity; PVector acceleration; float lifespan; Particle(PVector l) { acceleration = new PVector(0, 0.05); velocity = new PVector(random(-1, 1), random(-2, 0)); position = l.copy(); lifespan = 255.0; } void run() { update(); display(); } // Method to update position void update() { velocity.add(acceleration); position.add(velocity); lifespan -= 2.0; } // Method to display void display() { stroke(0, lifespan); strokeWeight(2); fill(127, lifespan); ellipse(position.x, position.y, 12, 12); } // Is the particle still useful? boolean isDead() { if (lifespan < 0.0) { return true; } else { return false; } } }示例代码的运行效果如下: 示例代码的参考作用主要是熟悉绘制粒子系统的一个完整的流程(出生-更新-死亡)。在该示例中,每个粒子从出生起获得的向下加速度一定,但是初始速度不同,每一帧都在更新粒子的位置(update函数)直至粒子的生命值被消耗完,就移除粒子。 为了维持粒子系统的稳定,在移除粒子的同时不断往粒子系统里添加新的粒子,这就是一个简单粒子系统的思想。 参考示例二:4-08 // The Nature of Code // Daniel Shiffman // http://natureofcode.com // Smoke Particle System // A basic smoke effect using a particle system // Each particle is rendered as an alpha masked image /* @pjs preload="processingjs/chapter04/_4_08_ParticleSystemSmoke/data/texture.png"; */ ParticleSystem ps; void setup() { size(640,360); PImage img = loadImage("texture.png"); ps = new ParticleSystem(0,new PVector(width/2,height-75),img); } void draw() { background(0); // Calculate a "wind" force based on mouse horizontal position float dx = map(mouseX,0,width,-0.2,0.2); PVector wind = new PVector(dx,0); ps.applyForce(wind); ps.run(); for (int i = 0; i < 2; i++) { ps.addParticle(); } // Draw an arrow representing the wind force drawVector(wind, new PVector(width/2,50,0),500); } // Renders a vector object 'v' as an arrow and a position 'loc' void drawVector(PVector v, PVector pos, float scayl) { pushMatrix(); float arrowsize = 4; // Translate to position to render vector translate(pos.x,pos.y); stroke(255); // Call vector heading function to get direction (note that pointing up is a heading of 0) and rotate rotate(v.heading2D()); // Calculate length of vector & scale it to be bigger or smaller if necessary float len = v.mag()*scayl; // Draw three lines to make an arrow (draw pointing up since we've rotate to the proper direction) line(0,0,len,0); line(len,0,len-arrowsize,+arrowsize/2); line(len,0,len-arrowsize,-arrowsize/2); popMatrix(); } // The Nature of Code // Daniel Shiffman // http://natureofcode.com class Particle { PVector pos; PVector vel; PVector acc; float lifespan; PImage img; Particle(PVector l,PImage img_) { acc = new PVector(0,0); float vx = randomGaussian()*0.3; float vy = randomGaussian()*0.3 - 1.0; vel = new PVector(vx,vy); pos = l.get(); lifespan = 100.0; img = img_; } void run() { update(); render(); } // Method to apply a force vector to the Particle object // Note we are ignoring "mass" here void applyForce(PVector f) { acc.add(f); } // Method to update position void update() { vel.add(acc); pos.add(vel); lifespan -= 2.5; acc.mult(0); // clear Acceleration } // Method to display void render() { imageMode(CENTER); tint(255,lifespan); image(img,pos.x,pos.y); // Drawing a circle instead // fill(255,lifespan); // noStroke(); // ellipse(pos.x,pos.y,img.width,img.height); } // Is the particle still useful? boolean isDead() { if (lifespan = 0; i--) { Particle p = particles.get(i); p.run(); if (p.isDead()) { particles.remove(i); } } } // Method to add a force vector to all particles currently in the system void applyForce(PVector dir) { // Enhanced loop!!! for (Particle p: particles) { p.applyForce(dir); } } void addParticle() { particles.add(new Particle(origin, img)); } }示例的运行效果如下(鼠标位置的蓝色是录屏软件自动添加的,程序运行不带这个效果): 最后程序的运行结果是一个被被风吹动的烟雾。 程序思想以及代码实现在看到以上两个示例后,我灵感一现:如果把每个烟雾粒子系统当成一个小小的图元,图元的颜色来自给出的名画,烟雾的方向随着鼠标变化,那么就可以得到一幅动态的名画。 换成编程上的思想就是:根据读入的“名画”长宽,每间隔固定像素,生成一个个粒子系统,每个粒子系统的颜色来自对应位置名画的像素颜色。读取鼠标所在的位置,更改粒子系统受力的方向 参考根据上面的示例,我们需要一个粒子类,需要以下这些属性,其中颜色属性是特有的。 PVector pos;//粒子的位置 PVector vel;//速度 PVector acc;//加速度 float lifespan;//生命 PImage img;//图片 color mycolor;//颜色在初始化粒子的时候应该赋予粒子初始位置、速度、生命以及颜色(如果使用贴图的话还应该有图片)。 Particle(PVector l,PImage img_,color c) { acc = new PVector(0,0); float vx = randomGaussian()*0.3; //高斯噪声产生随机数 float vy = randomGaussian()*0.3 - 1.0; vel = new PVector(vx,vy); pos = l.get(); //位置 lifespan = 50.0; //生命周期 img = img_; mycolor=c; }在渲染粒子的时候,粒子的颜色应该随着粒子的生命衰减而变浅,这里采用的是降低透明度的方式来体现这一点。本程序中设定的图元为方形,也可以更改为圆形,三角或者用户自定义的图形或材质。 // 展示 选择材质贴图或者直接用简单几何 void render() { //imageMode(CENTER); //tint(mycolor,lifespan);//控制颜色以及透明度 //image(img,pos.x,pos.y); // Drawing a circle instead fill(mycolor,lifespan); noStroke(); rect(pos.x,pos.y,5,5); }接下来设定粒子系统,粒子系统首先得获取到颜色才能将颜色给粒子,为此有参数mycolor。 class ParticleSystem { ArrayList particles; // 粒子列表 PVector origin; // 粒子的出生点 PImage img; //材质 color mycolor; ParticleSystem(int num, PVector v, PImage img_,color c) { particles = new ArrayList(); // 初始化粒子列表 origin = v.get(); // 保存初始点 img = img_; mycolor=c; for (int i = 0; i < num; i++) { particles.add(new Particle(origin, img,mycolor)); // 为粒子系统添加添加num个粒子 } } //管理粒子的活动 void run() { for (int i = particles.size()-1; i >= 0; i--) { Particle p = particles.get(i); p.run(); if (p.isDead()) { particles.remove(i);//粒子死亡,移除 } } } //为粒子添加力 void applyForce(PVector dir) { for (Particle p: particles) { p.applyForce(dir); } } void addParticle() { particles.add(new Particle(origin, img,mycolor)); } }最后集合使用上述的类了。在此之前,我们先读入一张图片,作为目标“名画”,processing里面提供函数loadImage PImage myImage; myImage = loadImage("6.jpg");为了更好的视觉效果,将画布的尺寸调整为图片的大小(也可以再大一点)。 surface.setSize(myImage.width, myImage.height);用一个for循环遍历图片,初始化粒子系统,这里设置的像素间隔为8。 particlesS = new ArrayList(); // 初始化粒子系统 int temp=8; for (int i=0;i |


 该示例中将将多个粒子的管理封装成类,形成粒子系统类,在用这个类可以方便地对添加粒子、更改粒子受力以及销毁粒子,本例子里面粒子的受力除了重力外还有水平方向的力,具体的受力大小和方向由鼠标的位置来决定。
【本文地址】
今日新闻 |
推荐新闻 |