用Python体素化3D网格和点云 |
您所在的位置:网站首页 › pointnet点云归一化代码 › 用Python体素化3D网格和点云 |
用Python体素化3D网格和点云
|
推荐:用 NSDT设计器 快速搭建可编程3D场景。 3D 数据的持续学习正在成为机器学习和理解我们周围世界的越来越重要的部分。 随着新的 3D 数据提取硬件(如深度相机和 LiDAR)在闭路电视、相机和智能手机中变得司空见惯,越来越多的人正在使用它提供的额外维度。 此外,摄影测量和 Structure from Motion 正在成为 3D 重建和建模流程的正常组成部分,并且提取和处理大型 3D 数据集正在成为必需品。 3D 深度学习的非结构化数据可以有不同的表示: 点云 [3,4,11]体素和体素网格 [1, 8, 9]深度图 [2]图 [5, 10]这些远非所有可能的 3D 数据演示,还有其他的,如参数化 CAD 模型、多视图图像、体积等。要真正了解其中的一些内容,你可以阅读 Florent Paux 撰写的信息丰富的文章“如何表示 3D 数据?”。 在本文中,我们将专注于将 3D 数据表示为体素。 但首先什么是体素? 最简单的比较是体素是 3D 像素。 体素被排列成体素网格,这可以看作是图像有序结构的 3D 等价物。 当点云或网格变成体素表示时,它与体素网格相交。 点云或网格中的点然后落在某些体素中。 这些体素被留下,而所有其他不与任何点相交的体素要么被丢弃,要么被归零,我们剩下的是对象的雕刻表示。 体素化可以只是表面级别或整个网格/点云体积。 构建网格和点云的体素化表示是许多深度学习方法数据预处理的重要步骤。 体素化还广泛用于处理点云——子采样、特征提取和占用分析等。 最后,生成网格的体素表示对于创建游戏资产和简化模拟表面也很有用。 在本文中,我们将探讨四个 Python 库的体素化功能——Open3D、Trimesh、PyVista 和 pyntcloud。 我之所以选择这些库,是因为它们提供了相对简单的体素化功能,以及用于分析所创建体素的内置解决方案。 其他较小的库,如 PyVoxelizer、Voxelizer、simple-3dviz 和 DepthVisualizer 也提供体素化功能,但它们被认为过于有限。 另一个提供体素化功能的库是 Vedo,但在初步测试后,我发现它们是针对 3D 体积数据的,这限制了它们的使用。 如果你想了解更多有关如何使用这些库创建漂亮的可视化效果的信息以及更多内容,可以查看我之前关于“用于网格、点云和数据可视化的 Python 库”(第 1 部分和第 2 部分)的文章。 我们将使用的唯一一个之前没有讨论过的库是 pyntcloud,因此我们将更详细地介绍如何安装和设置它。 为了演示点云和网格上的体素化,我提供了两个对象。 首先是 .txt 格式的兔子雕像点云,其中包含每个点的 X、Y 和 Z 坐标,以及它们的 R、G 和 B 颜色,最后是 Nx、Ny 和 Nz 法线。 其次,.obj 格式的公鸡雕像网格,以及 .mat 文件和 .jpg 格式的纹理。 这两个对象都是使用 Structure from Motion photogrammetry 创建的,可以免费用于商业、非商业、公共和私人项目。 这些对象是更大数据集 [6] 的一部分,并已用于噪声检测和检查方法的开发 [7]。 要遵循教程,除了使用的库及其依赖项之外,你还需要 NumPy 和 SciPy。 所有代码都可以在 GitHub 存储库中找到。 1、使用 Open3D 进行体素化
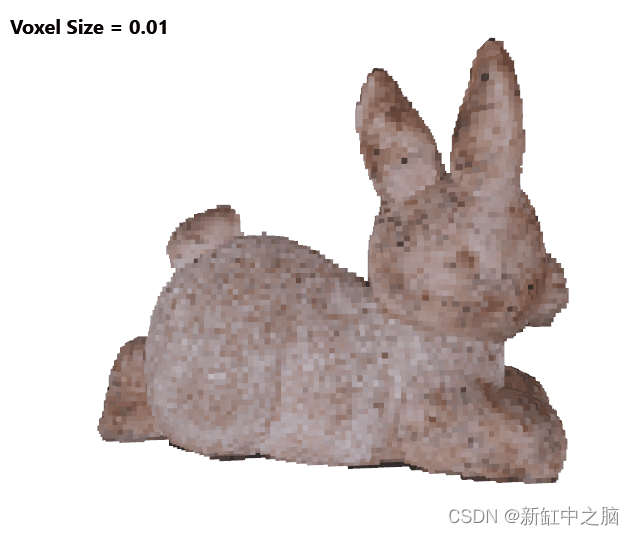
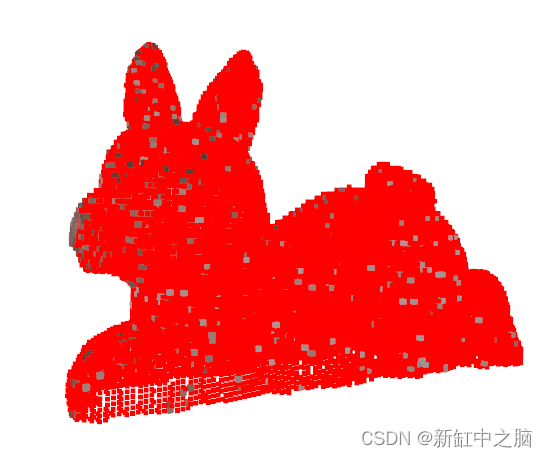
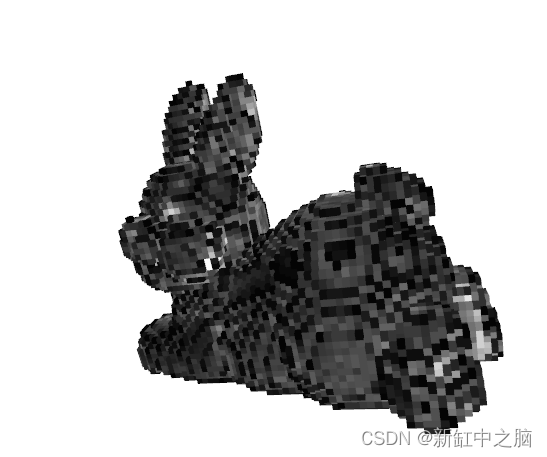
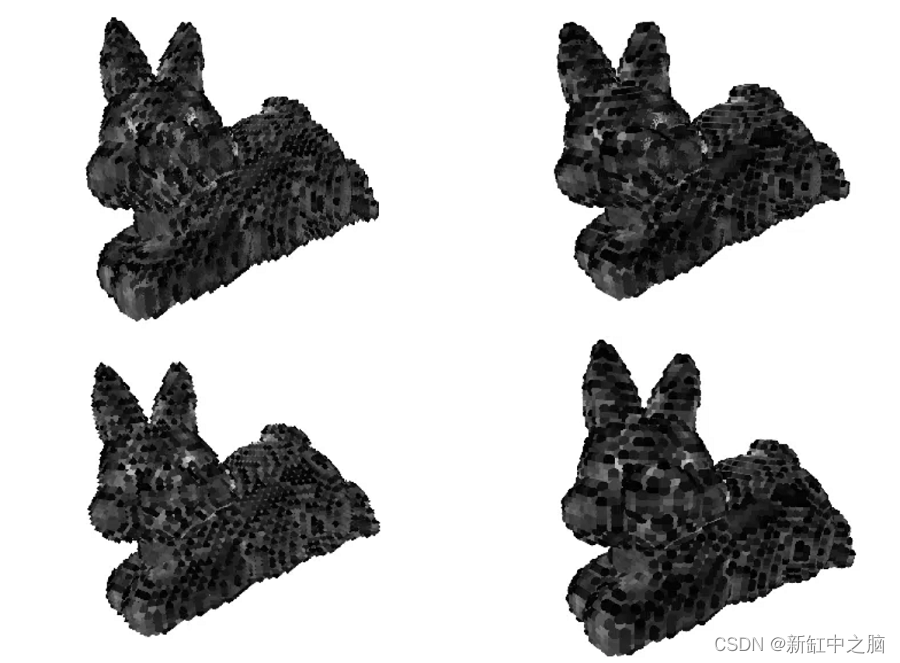
Open3D 是用于 3D 分析、网格和点云操作以及可视化的功能最丰富的 Python 库之一。 它包含用于从点云和网格生成体素的优秀工具。 该库还支持大量 3D 图元,如球体、立方体、圆柱体等,这使得从体素生成 3D 网格变得容易。 最后,体素网格也可用于对点云进行子采样并生成分割。 有关如何安装和使用 Open3D 的分步教程,你可以查看我之前的文章“用于网格、点云和数据可视化的 Python 库(第 1 部分)”。 我们将使用很多相同的代码来进行可视化和回调。 我想再次指出 Florent Poux 博士的精彩教程。 — “How to Automate Voxel Modeling of 3D Point Cloud with Python”,他在其中给出了使用 Open3D 从点云生成体素的良好概述和用例。 在我的文章中,我以教程中提供的信息为基础。 为了更好地理解体素化过程,我们将使用 Open3D 构建两个示例 - 一个可视化多个体素网格级别以及它们如何影响体素化模型,另一个显示体素化过程。 我们首先使用 NumPy 的 loadtxt() 函数加载兔子雕像点云。 我们将数组分成点、颜色和法线,并通过首先使用 Vector3dVector 函数将数组转换为向量来创建 Open3D 点云。 从这里通过调用 VoxelGrid.create_from_point_cloud() 并为其提供点云和体素大小参数来创建体素网格是微不足道的。 如果我们从网格开始,我们可以用 create_from_triangle_mesh() 做同样的事情。 如果我们使用体素网格来操作和分析 Open3D 中的点云/网格,我们可以到此为止。 我们还可以通过调用将体素网格作为几何图形添加到 Visualizer 对象来快速可视化体素网格。 下面给出了此代码。 # Read the bunny statue point cloud using numpy's loadtxt point_cloud_path = os.path.join('point_cloud','bunnyStatue.txt') point_cloud = np.loadtxt(point_cloud_path, delimiter=' ') # Separate the into points, colors and normals array points = point_cloud[:,:3] colors = point_cloud[:,3:6] normals = point_cloud[:,6:] # Initialize a point cloud object pcd = o3d.geometry.PointCloud() # Add the points, colors and normals as Vectors pcd.points = o3d.utility.Vector3dVector(points) pcd.colors = o3d.utility.Vector3dVector(colors) pcd.normals = o3d.utility.Vector3dVector(normals) # Create a voxel grid from the point cloud with a voxel_size of 0.01 voxel_grid=o3d.geometry.VoxelGrid.create_from_point_cloud(pcd,voxel_size=0.01) # Initialize a visualizer object vis = o3d.visualization.Visualizer() # Create a window, name it and scale it vis.create_window(window_name='Bunny Visualize', width=800, height=600) # Add the voxel grid to the visualizer vis.add_geometry(voxel_grid) # We run the visualizater vis.run() # Once the visualizer is closed destroy the window and clean up vis.destroy_window()我们还想继续处理体素网格并将其转换为网格,因为我们想用它创建动画,而在撰写本文时体素网格无法转换。 我们使用 Florent Poux 博士提出的方法。 我们通过调用 geometry.TriangleMesh() 创建一个空的三角形网格,然后我们通过调用 voxel_grid.get_voxels() 并获取创建的体素的真实大小从网格中提取所有体素。 这样我们就可以在每个体素位置创建一个 Open3D 框基元,将框缩放到体素的大小并通过调用 voxel_grid.get_voxel_center_coordinate() 将它们定位在体素中心。 我们最终将如此创建、缩放和定位的框添加到 TriangleMesh 对象。 为了演示不同的体素网格大小如何改变最终的体素输出并使示例更有趣一点,我们将在体素输出之间制作旋转过渡动画。 为此,我们通过调用 register_animation_callback() 向 Visualizer 注册一个新的回调。 在回调函数中,我们生成体素网格并从中创建体素网格我们将由此创建的网格旋转 360 度,破坏网格并使用不同大小的体素网格重复。 我们还利用一个小类来保存将在回调更新循环中更改的所有变量。 下面给出了完整旋转可视化的代码。 import numpy as np import open3d as o3d import os # Parameters class holding variables that change in the callback function class params(): # counter for the rotation counter = 0 # counter for selecting a new voxel size sizes_counter = 0 # array of voxel sizes between 0.01 and 0.1 voxel_sizes = np.arange(0.01,0.1,0.005) # empty TriangleMesh object that will contain the cubes vox_mesh = o3d.geometry.TriangleMesh() # boolean value used for initial initialization of the voxel mesh initialize = True # Callback function used to construct and rotate the voxel meshes def rotate_and_change(vis): # When the counter is 0 generate the voxel grid and construct the voxel mesh if params.counter == 0: # generate the voxel grid using the voxel sizes setup in the params class voxel_grid=o3d.geometry.VoxelGrid.create_from_point_cloud(pcd,voxel_size=params.voxel_sizes[params.sizes_counter]) # get all voxels in the voxel grid voxels_all= voxel_grid.get_voxels() # geth the calculated size of a voxel voxel_size = voxel_grid.voxel_size # loop through all the voxels for voxel in voxels_all: # create a cube mesh with a size 1x1x1 cube=o3d.geometry.TriangleMesh.create_box(width=1, height=1, depth=1) # paint it with the color of the current voxel cube.paint_uniform_color(voxel.color) # scale the box using the size of the voxel cube.scale(voxel_size, center=cube.get_center()) # get the center of the current voxel voxel_center = voxel_grid.get_voxel_center_coordinate(voxel.grid_index) # translate the box to the center of the voxel cube.translate(voxel_center, relative=False) # add the box to the TriangleMesh object params.vox_mesh+=cube # on the first run of the callback loop initialize the Triangle mesh by adding it to the Visualizer. In subsequent iterations just update the geometry if params.initialize: vis.add_geometry(params.vox_mesh) params.initialize = False else: vis.update_geometry(params.vox_mesh) # We create a 3D rotation matrix from x,y,z rotations, the rotations need to be given in radians R = params.vox_mesh.get_rotation_matrix_from_xyz((0, np.deg2rad(2), 0)) # The rotation matrix is applied to the specified object - in our case the voxel mesh. We can also specify the rotation pivot center params.vox_mesh.rotate(R, center=(0, 0, 0)) # tick the counter up params.counter+=1 # For the changes to be seen we need to update both the geometry that has been changed and to update the whole renderer connected to the visualizer vis.update_geometry(params.vox_mesh) vis.update_renderer() # When the counter gets to 180 we zero it out. This is done because we rotate the mesh by 2 degrees on an iteration if params.counter >= 180: params.counter=0 # we tick the voxel size counter params.sizes_counter +=1 # if the voxel size counter becomes equal to the size of the voxel sizes array, reset it if params.sizes_counter >= len(params.voxel_sizes): params.sizes_counter=0 # each time we clear the mesh. This is important, because without it we will just add more and more box primitives to the mesh object params.vox_mesh.clear() # Read the bunny statue point cloud using numpy's loadtxt point_cloud_path = os.path.join('point_cloud','bunnyStatue.txt') point_cloud = np.loadtxt(point_cloud_path, delimiter=' ') # Separate the into points, colors and normals array points = point_cloud[:,:3] colors = point_cloud[:,3:6] normals = point_cloud[:,6:] # Initialize a point cloud object pcd = o3d.geometry.PointCloud() # Add the points, colors and normals as Vectors pcd.points = o3d.utility.Vector3dVector(points) pcd.colors = o3d.utility.Vector3dVector(colors) pcd.normals = o3d.utility.Vector3dVector(normals) # Create a voxel grid from the point cloud with a voxel_size of 0.01 # voxel_grid=o3d.geometry.VoxelGrid.create_from_point_cloud(pcd,voxel_size=0.01) # Initialize a visualizer object vis = o3d.visualization.Visualizer() # Create a window, name it and scale it vis.create_window(window_name='Bunny Visualize', width=800, height=600) # Add the voxel grid to the visualizer # vis.add_geometry(voxel_grid) # Register the callback function vis.register_animation_callback(rotate_and_change) # We run the visualizater vis.run() # Once the visualizer is closed destroy the window and clean up vis.destroy_window()为了更好地理解创建体素和体素网格的过程,我们将通过动画将其可视化。 此可视化的代码与我们已经展示的代码非常相似,但这次我们通过添加每个新体素作为回调函数循环的一部分来可视化创建体素网格的过程。 为了得到兔子雕像的轮廓,我们还使用体素函数 get_voxel_center_coordinates 来提取体素中心并使用它们生成点云。 通过这种方式,我们以迂回的方式生成输入点云的二次采样和统一采样版本。 下面给出了整个可视化的代码。
Pyntcloud 是一个轻量级且功能强大的 Python 3 库,用于点云和网格的分析和预处理。 它包含用于体素化、特征提取、网格平滑和抽取、点云子采样、异常值检测等的工具。 它被直接用作 jupyter 笔记本的一部分,并包含 threejs、pythreejs、PyVista 和 matplotlib 的可视化绑定。 它可以轻松集成到其他大型库(如 Open3D 和 PyVista)的工作流程中。 pyntcloud 的体素化功能非常强大,具有体素表示,已经包含许多预先计算的特征,如体素到点的对应关系、体素网格段信息、每个体素中的点密度和二进制掩码等。 Pyntcloud 在 Linux、Mac 和 Windows 上使用 Python 3。 它需要 NumPy 和 Pandas 作为先决条件。 该库在不断发展,每月更新一次。 它可以使用 pip 或 Anaconda 安装。 我们通常将每个库安装在一个新的 Anaconda 环境中以保持一切整洁,但在这种情况下,我们将与 Open3d 一起安装 pyntcloud 以利用前者的可视化功能。 我们这样做是因为 pyntcloud 中的体素和网格可视化需要 threejs 或 pythreejs,而这又需要 jupyter 笔记本或启动本地服务器。 这些超出了本文的范围,但我仍将举例说明如何直接在 pyntcloud 中可视化体素。 conda create -n pyntcloud_env python=3.8 conda activate pyntcloud_env pip install open3d pip install pyntcloud OR conda install pyntcloud -c conda-forge一旦我们安装了所有东西并且没有出现错误,我们就可以通过首先调用 import open3d as o3d 和 print(o3d.version) 然后调用 from pyntcloud import PyntCloud 和 print(PyntCloud.version) 来测试这两个库。 如果导入了两个库,我们就可以继续学习教程。 pyntcloud 的 I/O 模块无论好坏都非常简化。 它使用 PyntCloud.from_file() 来加载网格和点云。 该函数根据需要加载的文件的扩展名来决定调用哪些内部函数。 有关 pyntcloud 所有支持的文件类型的列表,可以在此处阅读他们的 I/O 页面。 对于包含点云的 ASCII 文件,pyntcloud 直接调用 Pandas 并需要额外的输入参数,如分隔符、列名、是否有标题部分等。在本教程中,我们导入兔子雕像点云,需要明确 指定所有列的名称。 加载点云后,我们需要调用 .add_structure(“voxelgrid”, grid_size_x, grid_size_y, grid_size_z) 在点云之上创建体素网格。 此函数的输出是体素网格 ID,其中点云中的点与网格相交。 然后我们使用这些 id 通过调用 name_of_point_cloud.structures[voxelgrid_ids] 创建点云的占用体素表示。 从这里开始,我们可以使用此对象来提取体素信息并可视化所有内容。 下面给出了导入点云和提取体素的代码。 # Set up the path to the point cloud point_cloud_path = os.path.join('point_cloud','bunnyStatue.txt') # Load the point cloud. As internally from_file is calling Pandas, we set Pandas input parameters like separator, header and column names cloud = PyntCloud.from_file(point_cloud_path, sep=" ", header=0, names=["x","y","z","r","g","b","nx","ny","nz"]) # We use the imported point cloud to create a voxel grid of size 64x64x64. voxelgrid_id = cloud.add_structure("voxelgrid", n_x=64, n_y=64, n_z=64) # We use the calculated occupied voxel grid ids to create the voxel representation of the point cloud voxelgrid = cloud.structures[voxelgrid_id] # We extract the density feature for each occupied voxel that we will use for coloring the voxels density_feature_vector = voxelgrid.get_feature_vector(mode="density") # Calculate the maximum density to normalize the colors max_density = density_feature_vector.max() # We extract the shape of a voxel, as well as the position of each point in X, Y, Z in the voxel grid voxel_size = voxelgrid.shape x_cube_pos = voxelgrid.voxel_x y_cube_pos = voxelgrid.voxel_y z_cube_pos = voxelgrid.voxel_z一旦我们创建了点云的体素表示,我们就可以通过调用 voxelgrid.plot(cmap=“hsv”, backend=“threejs”)使用 pyntcloud 直接将其可视化。 可以在此处调用不同的后端,但对于网格和体素,仅支持 threejs 和 pythreejs。 为了能够在不需要运行服务器的情况下更轻松地可视化所有内容,我们将创建的体素网格传输到 Open3D 并使用 Open3D 部分中显示的技术将其可视化。 通过这种方式,我们还展示了结合这两个库、利用它们的优势是多么容易。 我们首先创建一个空的 Open3D geometry.TriangleMesh(),它将被体素填充。 然后我们遍历 pyntcloud 体素网格上的所有体素。 我们可以从 voxelgrid.voxel_n 数组中获取当前的体素 id,我们可以使用这个 id 通过调用 voxelgrid.voxel_centers[voxel_id] 来获取它的体素中心。 为了获得我们将用作体素颜色的密度值,我们使用我们已经提取的体素网格中体素的 X、Y 和 Z 位置。 从这里开始,一切都与 Open3D 示例中的相同。 我们给框基元上色,缩放它并将它转换到体素中心。 最后,我们初始化 Open3D 可视化器并将创建的体素网格作为几何体添加到其中。 下面给出了完整的 pyntcloud/Open3D 可视化代码。 from pyntcloud import PyntCloud import os import open3d as o3d # Set up the path to the point cloud point_cloud_path = os.path.join('point_cloud','bunnyStatue.txt') # Load the point cloud. As internally from_file is calling Pandas, we set Pandas input parameters like separator, header and column names cloud = PyntCloud.from_file(point_cloud_path, sep=" ", header=0, names=["x","y","z","r","g","b","nx","ny","nz"]) # We use the imported point cloud to create a voxel grid of size 64x64x64. voxelgrid_id = cloud.add_structure("voxelgrid", n_x=64, n_y=64, n_z=64) # We use the calculated occupied voxel grid ids to create the voxel representation of the point cloud voxelgrid = cloud.structures[voxelgrid_id] # We extract the density feature for each occupied voxel that we will use for coloring the voxels density_feature_vector = voxelgrid.get_feature_vector(mode="density") # Calculate the maximum density to normalize the colors max_density = density_feature_vector.max() # We extract the shape of a voxel, as well as the position of each point in X, Y, Z in the voxel grid voxel_size = voxelgrid.shape x_cube_pos = voxelgrid.voxel_x y_cube_pos = voxelgrid.voxel_y z_cube_pos = voxelgrid.voxel_z # Initialize a open3d triangle mesh object vox_mesh = o3d.geometry.TriangleMesh() # go through all voxelgrid voxels for idx in range(0, len(voxelgrid.voxel_n)): # get the id of the current voxel in the voxel grid curr_number = voxelgrid.voxel_n[idx] # get the center of the voxel grid voxel voxel_center = voxelgrid.voxel_centers[curr_number] # get the density value of the current voxel. Because the density matrix is in the shape X,Y,Z, where they are the coordinates in the voxel grid # we use the voxel grid positions we already curr_density = density_feature_vector[x_cube_pos[idx],y_cube_pos[idx],z_cube_pos[idx]] # we normalize the value using the maximum density curr_density_normalized = curr_density / max_density # create a box primitive in open3d primitive=o3d.geometry.TriangleMesh.create_box(width=1, height=1, depth=1) # paint the box uniformly using the normalized density primitive.paint_uniform_color((curr_density_normalized,curr_density_normalized,curr_density_normalized)) # scale the cube using the saved voxel size primitive.scale(voxel_size[0], center=primitive.get_center()) # we translate the box to the center position of the voxel primitive.translate(voxel_center, relative=True) # add to the voxel mesh vox_mesh+=primitive # Initialize a visualizer object vis = o3d.visualization.Visualizer() # Create a window, name it and scale it vis.create_window(window_name='Bunny Visualize', width=800, height=600) # add the voxel mesh to the visualizer vis.add_geometry(vox_mesh) vis.run() # Once the visualizer is closed destroy the window and clean up vis.destroy_window()
为了获得更多乐趣,我们可以在用其他基元创建体素网格时替换框基元。 Open3D 有大量的图元——球体、圆柱体、环面、八面体、圆锥体等。我们创建了一个小的选择函数,它采用图元的名称并返回 3D 对象。 然后我们唯一改变的是 primitive = o3d.geometry.TriangleMesh.createbox() 到新函数调用 primitive = choose_primitive(“cylinder”)。 该函数的代码如下所示。 # Selection function which takes a name of the primitive and returns a mesh object # For the sphere and torus we lower the default resolution values so they can be visualized easier def choose_primitive(name): return { 'box': o3d.geometry.TriangleMesh.create_box(), 'cone': o3d.geometry.TriangleMesh.create_cone(), 'sphere': o3d.geometry.TriangleMesh.create_sphere(resolution=5), 'cylinder': o3d.geometry.TriangleMesh.create_cylinder(), 'icosahedron': o3d.geometry.TriangleMesh.create_icosahedron(), 'octahedron': o3d.geometry.TriangleMesh.create_octahedron(), 'torus': o3d.geometry.TriangleMesh.create_torus( radial_resolution=10, tubular_resolution=5) }[name] 3、使用 Trimesh 进行体素化
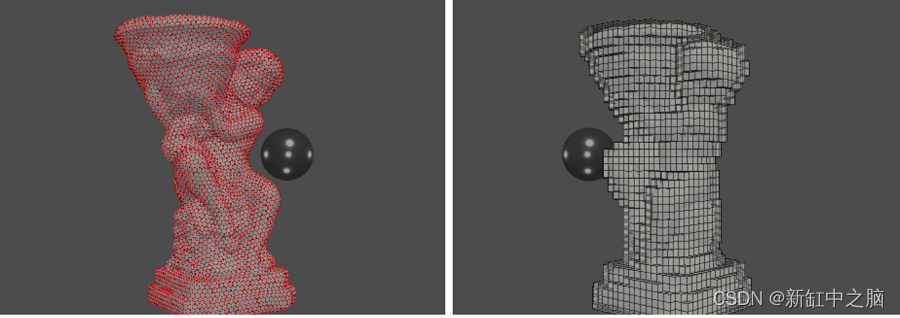
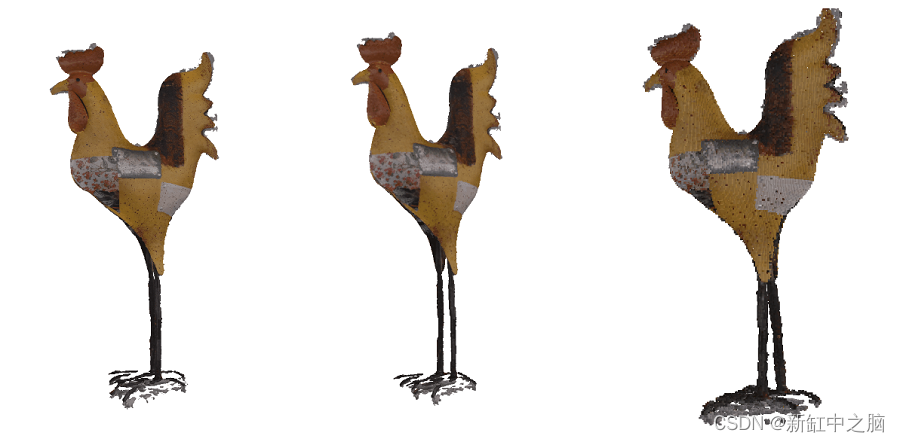
Trimesh 是使用最广泛的用于处理网格的 Python 库之一。 大量其他库和独立项目使用它或直接构建在它之上。 它提供了大量的点云和网格分析和转换工具。 有关 Trimesh 的安装说明和可视化使用示例,你可以查看文章“用于网格、点云和数据可视化的 Python 库(第 1 部分)”,我们在其中展示了如何处理网格和点数据集。 对于体素化,Trimesh 有许多方法来创建体素网格,在内部挖空它们,以及使用闭合和二进制膨胀等形态学操作填充它们。 它还具有通过分别调用 trimesh.voxel.morphology.surface 和 trimesh.voxel.morphology.fill 来提取体素网格的表面或填充的直接方法。 该库还提供了用于快速分析体素化网格的工具,例如提取边界、检查网格中的体素空间是空的还是填充的,以及计算占用体素的比例和体积。 执行行进立方体计算的功能也很容易获得。 Trimesh 的一个非常棘手的功能是提取网格的纹理颜色信息并将其作为颜色提供给体素表示。 为此,我们首先提取纹理信息并将其作为颜色信息映射到网格的每个顶点。 这是通过调用 name_of_the_imported_mesh.visual.to_color().vertex_colors 来完成的。 然后我们可以将其转换为 NumPy 数组并为每个网格顶点自由访问它。 然后我们可以通过直接调用 name_of_the_imported_mesh.voxelized().hollow() 从网格创建体素网格,我们可以在其中指定体素网格的分辨率。 我们还将体素化转换为空心表示,因为我们需要计算网格和体素表示之间的距离。 由于 Trimesh 不包含将网格颜色直接映射到体素表示的体素的功能,我们先要调用 trimesh.proximity.ProximityQuery(name_of_the_mesh).vertex(voxel_grid_name.points) 来计算网格的每个顶点和 已经创建的体素表示点。 然后我们需要遍历每个点,提取最近的网格顶点的颜色,并将其映射到大小为 (X,Y,Z,4)的颜色数组中,其中X,Y,Z是生成的大小 体素网格和 3 是颜色的 R、G、B 和 A 分量。 一旦我们有了映射,我们就可以调用 voxel_grid_name.as_boxes(colors = mapped_color_array),这使得体素网格成为一个 Trimesh 网格对象,体素/框颜色等于初始网格的颜色。 读者在运行代码时会看到的一件事是体素化网格中有孔。 这很可能是因为公鸡雕像网格由于运动过程中的结构不是完全水密的。 下面给出了体素化过程的代码。 import trimesh import numpy as np # Load the rooster mesh. Trimesh directly detects that the mesh is textured and contains a material mesh_path = 'mesh/rooster.obj' mesh = trimesh.load(mesh_path) # Voxelize the loaded mesh with a voxel size of 0.01. We also call hollow() to remove the inside voxels, which will help with color calculation angel_voxel = mesh.voxelized(0.01).hollow() # Transform the texture information to color information, mapping it to each vertex. Transform it to a numpy array only_colors = mesh.visual.to_color().vertex_colors only_colors = np.asarray(only_colors) # If we want to add the color information to the mesh uncomment this part # mesh.visual = mesh.visual.to_color() # Extract the mesh vertices mesh_verts = mesh.vertices # We use the ProximityQuery built-in function to get the closest voxel point centers to each vertex of the mesh _,vert_idx = trimesh.proximity.ProximityQuery(mesh).vertex(angel_voxel.points) # We initialize a array of zeros of size X,Y,Z,4 to contain the colors for each voxel of the voxelized mesh in the grid cube_color=np.zeros([angel_voxel.shape[0],angel_voxel.shape[1],angel_voxel.shape[2],4]) # We loop through all the calculated closest voxel points for idx, vert in enumerate(vert_idx): # Get the voxel grid index of each closets voxel center point vox_verts = angel_voxel.points_to_indices(mesh_verts[vert]) # Get the color vertex color curr_color = only_colors[vert] # Set the alpha channel of the color curr_color[3] = 255 # add the color to the specific voxel grid index cube_color[vox_verts[0],vox_verts[1], vox_verts[2],:] = curr_color # generate a voxelized mesh from the voxel grid representation, using the calculated colors voxelized_mesh = angel_voxel.as_boxes(colors=cube_color) # Initialize a scene s = trimesh.Scene() # Add the voxelized mesh to the scene. If want to also show the intial mesh uncomment the second line and change the alpha channel of in the loop to something |

【本文地址】
今日新闻 |
推荐新闻 |