LDAP 与 HIVE、HUE 集成 |
您所在的位置:网站首页 › phpldapadmin中文版 › LDAP 与 HIVE、HUE 集成 |
LDAP 与 HIVE、HUE 集成
|
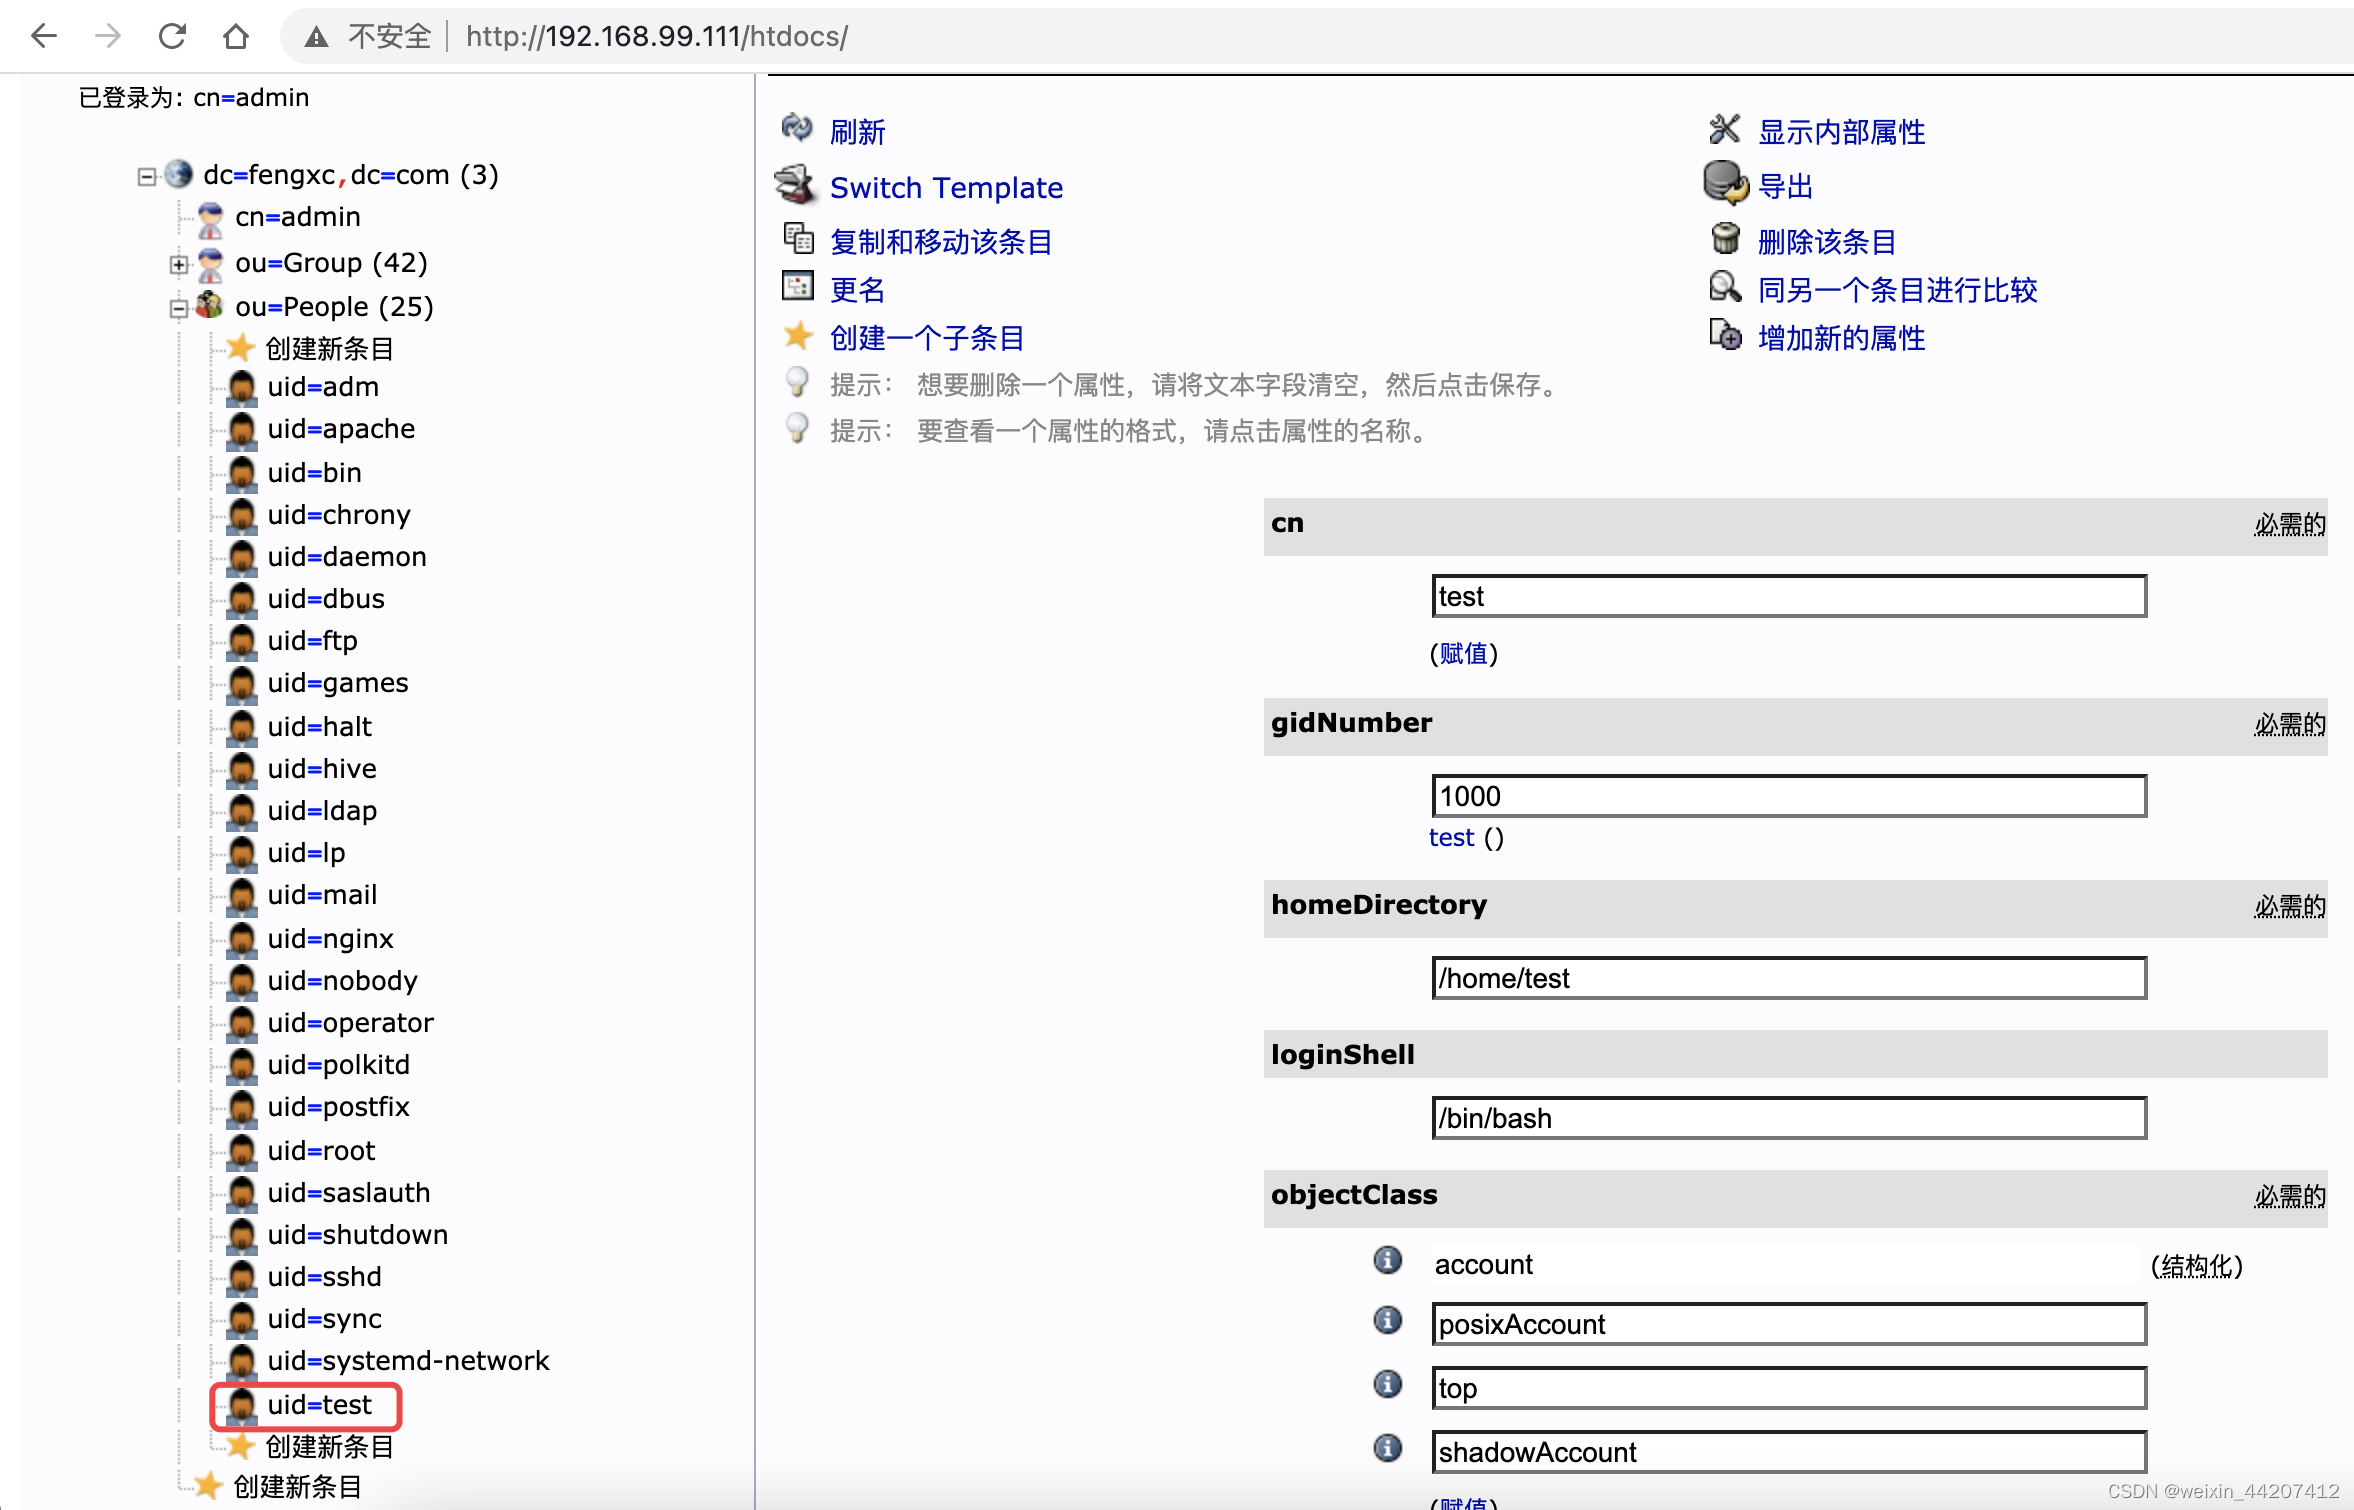
目录 1 关闭防火墙 2 安装 OpenLDAP 组件 3 修改LDAP配置 3.1 生成管理员密码 3.2 复制配置模板 3.3 生成数据库文件 3.4 SElinux配置 3.5 启动 LDAP 进程 slapd 3.6 新增修改密码文件 3.7 LDAP中导入基本的 Schema 3.8 修改域名 3.9 启用memberof功能 3.10 创建组织角色 4 配置日志 5 LDAP 安装 Web 管理服务 启动 http 服务 安装配置phpldapadmin 配置http相关访问权限 重启 httpd 服务 通过页面访问测试 6 使用migrationtools 创建用户 6.1 修改migrate_common.ph文件 6.2 利用pl脚本将/etc/passwd 和/etc/group生成LDAP能读懂的文件格式 6.3 将文件导入LDAP 6.4 设置密码 7 Hive配置LDAP 在 hive-site.xml 中配置添加以下配置 重启 HiveServer2 与 LDAP 使用 beeline 验证 8 HUE 配置 LDAP 修改hue.ini 也可以界面化操作 连接hive/impala 验证 1 关闭防火墙 # 首先使用systemctl status firewalld确认防火墙是否打开,如过打开,则关闭: [[email protected] ~]# systemctl stop firewalld [[email protected] ~]# systemctl disable firewalld 2 安装 OpenLDAP 组件 [[email protected] ~]# yum install -y openldap openldap-servers openldap-clients openldap-devel compat-openldap migrationtools 3 修改LDAP配置这里就是重点中的重点了,从openldap2.4.23版本开始,所有配置都保存在 /etc/openldap/slapd.d 目录下的 cn=config 文件夹内,不再使用 slapd.conf 作为配置文件。配置文件的后缀为 ldif,且每个配置文件都是通过命令自动生成的,任意打开一个配置文件,在开头都会有一行注释,说明此为自动生成的文件,请勿编辑,使用 ldapmodify 命令进行修改 安装openldap后,会有三个命令用于修改配置文件,分别为 ldapadd, ldapmodify, ldapdelete,顾名思义就是添加,修改和删除。而需要修改或增加配置时,则需要先写一个ldif后缀的配置文件,然后通过命令将写的配置更新到slapd.d目录下的配置文件中去。 /etc/openldap/slapd.d 下的文件不能手动添加、修改和删除。 3.1 生成管理员密码 [[email protected] ~]# slappasswd -s 123456 {SSHA}ifcLacR1RubRTM5P7Ox+UlMMV+7GQFAy 3.2 复制配置模板 [[email protected] ~]# cp /usr/share/openldap-servers/DB_CONFIG.example /var/lib/ldap/DB_CONFIG [[email protected] ~]# chown ldap:ldap -R /var/lib/ldap [[email protected] ~]# chmod 700 -R /var/lib/ldap 3.3 生成数据库文件使用如下命令生成数据库文件,不必担心报错信息。 [[email protected] ~]# slaptest 5fcef848 hdb_db_open: database "dc=my-domain,dc=com": db_open(/var/lib/ldap/id2entry.bdb) failed: No such file or directory (2). 5fcef848 backend_startup_one (type=hdb, suffix="dc=my-domain,dc=com"): bi_db_open failed! (2) slap_startup failed (test would succeed using the -u switch) 3.4 SElinux配置 [[email protected] ~]# setsebool -P httpd_can_connect_ldap on [[email protected] ~]# getsebool httpd_can_connect_ldap httpd_can_connect_ldap --> on或者使用命令getenforce查看结果是否为Disabled,若不是,则关闭 Selinux: 临时的生效:执行setenforce 0; 永久生效:修改配置文件/etc/sysconfig/selinux,把SELINUX=disabled,然后重启 。 3.5 启动 LDAP 进程 slapd [[email protected] ~]# systemctl start slapd [[email protected] ~]# systemctl enable slapd 3.6 新增修改密码文件 [[email protected] ~]# mkdir ~/ldap [[email protected] ~]# cd ldap [[email protected] ~]# vim changepwd.ldif dn: olcDatabase={0}config,cn=config changetype: modify add: olcRootPW olcRootPW: {SSHA}ifcLacR1RubRTM5P7Ox+UlMMV+7GQFAy注意:olcRootPW的值来自于章节“4.1 生成管理员密码” 文件内容说明: 第一行执行配置文件,这里就表示指定为 cn=config/olcDatabase={0}config 文件。你到/etc/openldap/slapd.d/目录下就能找到此文件 第二行 changetype 指定类型为修改 第三行 add 表示添加 olcRootPW 配置项 第四行指定 olcRootPW 配置项的值在执行下面的命令前,你可以先查看原本的 /etc/openldap/slapd.d/cn\=config/olcDatabase\=\{0\}config.ldif 文件,里面是没有 olcRootPW这个项的,执行命令后,你再看就会新增了 olcRootPW 项,而且内容是我们文件中指定的值加密后的字符串 [[email protected] ~]# ldapadd -Y EXTERNAL -H ldapi:/// -f ~/ldap/changepwd.ldif查看olcDatabase={0}config内容,新增了一个olcRootPW项。 olcRootPW:: e1NTSEF9VFJ4bTZqYm9VZGVVQlZyajlJVXUzaU03eHI2MURhSlo= 3.7 LDAP中导入基本的 Schema需要向 LDAP 中导入一些基本的 Schema。这些 Schema 文件位于 /etc/openldap/schema/ 目录中,schema控制着条目拥有哪些对象类和属性,可以自行选择需要的进行导入, 依次执行下面的命令,导入基础的一些配置,这里将所有的都导入一下,其中core.ldif是默认已经加载了的,不用导入。 ldapadd -Y EXTERNAL -H ldapi:/// -f /etc/openldap/schema/cosine.ldif ldapadd -Y EXTERNAL -H ldapi:/// -f /etc/openldap/schema/nis.ldif ldapadd -Y EXTERNAL -H ldapi:/// -f /etc/openldap/schema/inetorgperson.ldif ldapadd -Y EXTERNAL -H ldapi:/// -f /etc/openldap/schema/collective.ldif ldapadd -Y EXTERNAL -H ldapi:/// -f /etc/openldap/schema/corba.ldif ldapadd -Y EXTERNAL -H ldapi:/// -f /etc/openldap/schema/duaconf.ldif ldapadd -Y EXTERNAL -H ldapi:/// -f /etc/openldap/schema/dyngroup.ldif ldapadd -Y EXTERNAL -H ldapi:/// -f /etc/openldap/schema/java.ldif ldapadd -Y EXTERNAL -H ldapi:/// -f /etc/openldap/schema/misc.ldif ldapadd -Y EXTERNAL -H ldapi:/// -f /etc/openldap/schema/openldap.ldif ldapadd -Y EXTERNAL -H ldapi:/// -f /etc/openldap/schema/pmi.ldif ldapadd -Y EXTERNAL -H ldapi:/// -f /etc/openldap/schema/ppolicy.ldif 3.8 修改域名新增 changedomain.ldif , 这里我自定义的域名为 juyun.com ,管理员用户账号为 admin。 如果要修改,则修改文件中相应的 dc=juyun,dc=com 为自己的域名 [[email protected] ~]# vim /etc/openldap/changedomain.ldif dn: olcDatabase={1}monitor,cn=config changetype: modify replace: olcAccess olcAccess: {0}to * by dn.base="gidNumber=0+uidNumber=0,cn=peercred,cn=external,cn=auth" read by dn.base="cn=admin,dc=juyun,dc=com" read by * none dn: olcDatabase={2}hdb,cn=config changetype: modify replace: olcSuffix olcSuffix: dc=juyun,dc=com dn: olcDatabase={2}hdb,cn=config changetype: modify replace: olcRootDN olcRootDN: cn=admin,dc=juyun,dc=com dn: olcDatabase={2}hdb,cn=config changetype: modify replace: olcRootPW olcRootPW: {SSHA}fLe3LLnKYQYG+DQzViYr1Hyb04+7Pt6u dn: olcDatabase={2}hdb,cn=config changetype: modify add: olcAccess olcAccess: {0}to attrs=userPassword,shadowLastChange by dn="cn=admin,dc=juyun,dc=com" write by anonymous auth by self write by * none olcAccess: {1}to dn.base="" by * read olcAccess: {2}to * by dn="cn=admin,dc=juyun,dc=com" write by * read执行命令,修改配置 [[email protected] ~]# ldapmodify -Y EXTERNAL -H ldapi:/// -f ~/ldap/changedomain.ldif SASL/EXTERNAL authentication started SASL username: gidNumber=0+uidNumber=0,cn=peercred,cn=external,cn=auth SASL SSF: 0 modifying entry "olcDatabase={1}monitor,cn=config" modifying entry "olcDatabase={2}hdb,cn=config" modifying entry "olcDatabase={2}hdb,cn=config" modifying entry "olcDatabase={2}hdb,cn=config" modifying entry "olcDatabase={2}hdb,cn=config" 3.9 启用memberof功能 [[email protected] ~]# vim ~/ldap/add-memberof.ldif dn: cn=module{0},cn=config cn: modulle{0} objectClass: olcModuleList objectclass: top olcModuleload: memberof.la olcModulePath: /usr/lib64/openldap dn: olcOverlay={0}memberof,olcDatabase={2}hdb,cn=config objectClass: olcConfig objectClass: olcMemberOf objectClass: olcOverlayConfig objectClass: top olcOverlay: memberof olcMemberOfDangling: ignore olcMemberOfRefInt: TRUE olcMemberOfGroupOC: groupOfUniqueNames olcMemberOfMemberAD: uniqueMember olcMemberOfMemberOfAD: memberOf新增refint1.ldif文件 [[email protected] ~]# vim ~/ldap/refint1.ldif dn: cn=module{0},cn=config add: olcmoduleload olcmoduleload: refint新增refint2.ldif文件 [[email protected] ~]# vim ~/ldap/refint2.ldif dn: olcOverlay=refint,olcDatabase={2}hdb,cn=config objectClass: olcConfig objectClass: olcOverlayConfig objectClass: olcRefintConfig objectClass: top olcOverlay: refint olcRefintAttribute: memberof uniqueMember manager owner依次执行下面命令,加载配置,顺序不能错 [[email protected] ~]# ldapadd -Q -Y EXTERNAL -H ldapi:/// -f ~/ldap/add-memberof.ldif [[email protected] ~]# ldapmodify -Q -Y EXTERNAL -H ldapi:/// -f ~/ldap/refint1.ldif [[email protected] ~]# ldapadd -Q -Y EXTERNAL -H ldapi:/// -f ~/ldap/refint2.ldif 3.10 创建组织角色到此,配置修改完了,在上述基础上,创建一个叫做 “juyun company” 的组织,并在其下创建一个 “admin” 的组织角色(该组织角色内的用户具有管理整个 LDAP 的权限)和 “People” 和 “Group” 两个组织单元: [[email protected] ~]# vim ~/ldap/base.ldif dn: dc=juyun,dc=com objectClass: top objectClass: dcObject objectClass: organization o: juyun Company dc: juyun dn: cn=admin,dc=juyun,dc=com objectClass: organizationalRole cn: admin dn: ou=People,dc=juyun,dc=com objectClass: organizationalUnit ou: People dn: ou=Group,dc=juyun,dc=com objectClass: organizationalRole cn: Group执行命令,添加配置, 这里要注意修改域名为自己配置的域名,然后需要输入上面我们生成的密码 [[email protected] ~]# ldapadd -x -D cn=admin,dc=fengxc,dc=com -W -f ~/ldap/base.ldif通过以上的所有步骤,我们就设置好了一个 LDAP 目录树:其中基准 “dc=juyun,dc=com” 是该树的根节点,其下有一个管理域 “cn=admin,dc=juyun,dc=com” 和两个组织单元 “ou=People,dc=juyun,dc=com” 及 “ou=Group,dc=juyun,dc=com”。 4 配置日志 [[email protected] ~]# mkdir -p /var/log/slapd [[email protected] ~]# chown ldap:ldap /var/log/slapd/ [[email protected] ~]# touch /var/log/slapd/slapd.log [[email protected] ~]# chown ldap . /var/log/slapd/slapd.log [[email protected] ~]# echo "local4.* /var/log/slapd/slapd.log" >> /etc/rsyslog.conf [[email protected] ~]# vim /etc/logrotate.d/ldap /var/log/slapd/slapd.log { prerotate /usr/bin/chattr -a /var/log/slapd/slapd.log endscript compress delaycompress notifempty rotate 100 size 10M postrotate /usr/bin/chattr +a /var/log/slapd/slapd.log endscript } 5 LDAP 安装 Web 管理服务 [[email protected] ~]# yum install httpd -y [[email protected] ~]# vim /etc/httpd/conf/httpd.conf AllowOverride all 启动 http 服务 [[email protected] ~]# systemctl start httpd [[email protected] ~]# systemctl enable httpd Created symlink from /etc/systemd/system/multi-user.target.wants/httpd.service to /usr/lib/systemd/system/httpd.service. 安装配置phpldapadmin [[email protected] ~]# yum install phpldapadmin -y [[email protected] ~]# vim /etc/phpldapadmin/config.php #取消下面配置的注释 $servers->setValue('server','host','127.0.0.1'); #298行 $servers->setValue('login','attr','dn'); #397行 #注释下面的配置 //$servers->setValue('login','attr','cn'); #398行 配置http相关访问权限 [[email protected] ~]# vim /etc/httpd/conf.d/phpldapadmin.conf #生产环境请根据自己的需求进行修改 2.4版本配置为 Require all granted 2.2版本配置为 Order allow,deny Allow from all 重启 httpd 服务 [[email protected] ~]# systemctl restart httpd 通过页面访问测试http://IP/phpldapadmin 6 使用migrationtools 创建用户 6.1 修改migrate_common.ph文件 [[email protected] ~]# vim /usr/share/migrationtools/migrate_common.ph # Default DNS domain $DEFAULT_MAIL_DOMAIN = "juyun.com"; # Default base $DEFAULT_BASE = "dc=juyun,dc=com"; 6.2 利用pl脚本将/etc/passwd 和/etc/group生成LDAP能读懂的文件格式 [[email protected] ~]# useradd test [[email protected] ~]# cat /etc/passwd | grep test > ~/ldap/password/passwd [[email protected] ~]# cat /etc/group | grep test > ~/ldap/password/group [[email protected] ~]# /usr/share/migrationtools/migrate_base.pl > ~/ldap/password/base.ldif [[email protected] ~]# /usr/share/migrationtools/migrate_passwd.pl ~/ldap/password/passwd > ~/ldap/password/passwd.ldif [[email protected] ~]# /usr/share/migrationtools/migrate_group.pl ~/ldap/password/group > ~/ldap/password/group.ldif 6.3 将文件导入LDAP [[email protected] ~]# ldapadd -x -D "cn=admin,dc=juyun,dc=com" -W -f ~/ldap/password/base.ldif [[email protected] ~]# ldapadd -x -D "cn=admin,dc=juyun,dc=com" -W -f ~/ldap/password/passwd.ldif [[email protected] ~]# ldapadd -x -D "cn=admin,dc=juyun,dc=com" -W -f ~/ldap/password/group.ldif 6.4 设置密码登录phpLDAPadmin,定位到test账号,如下图中的 uid=test。
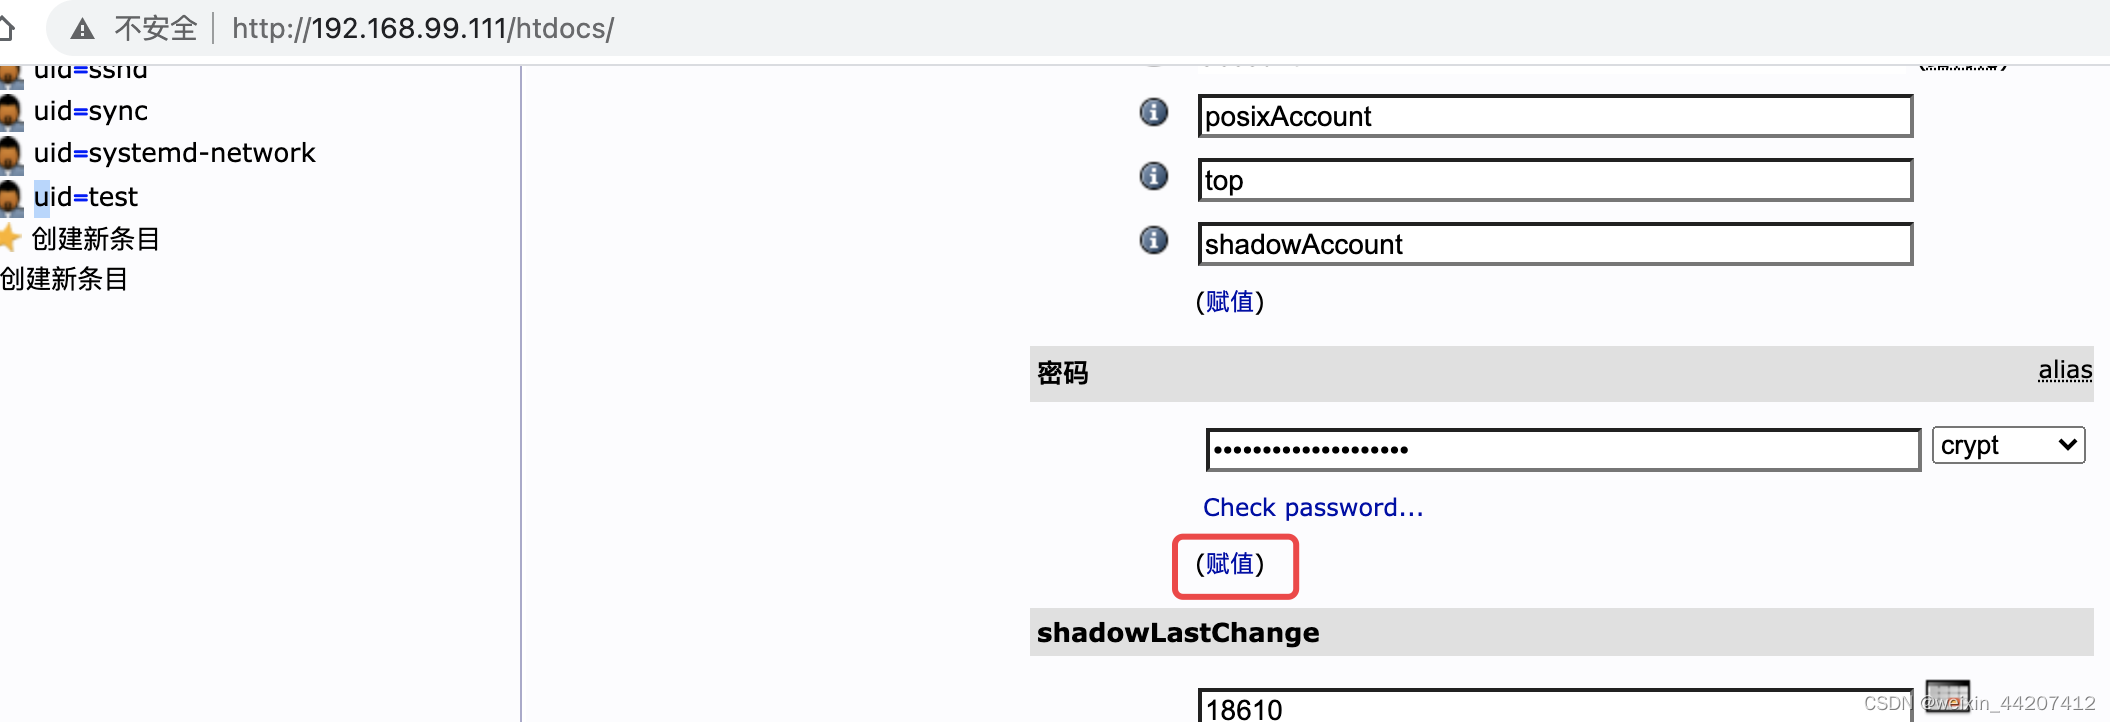
点击“赋值”
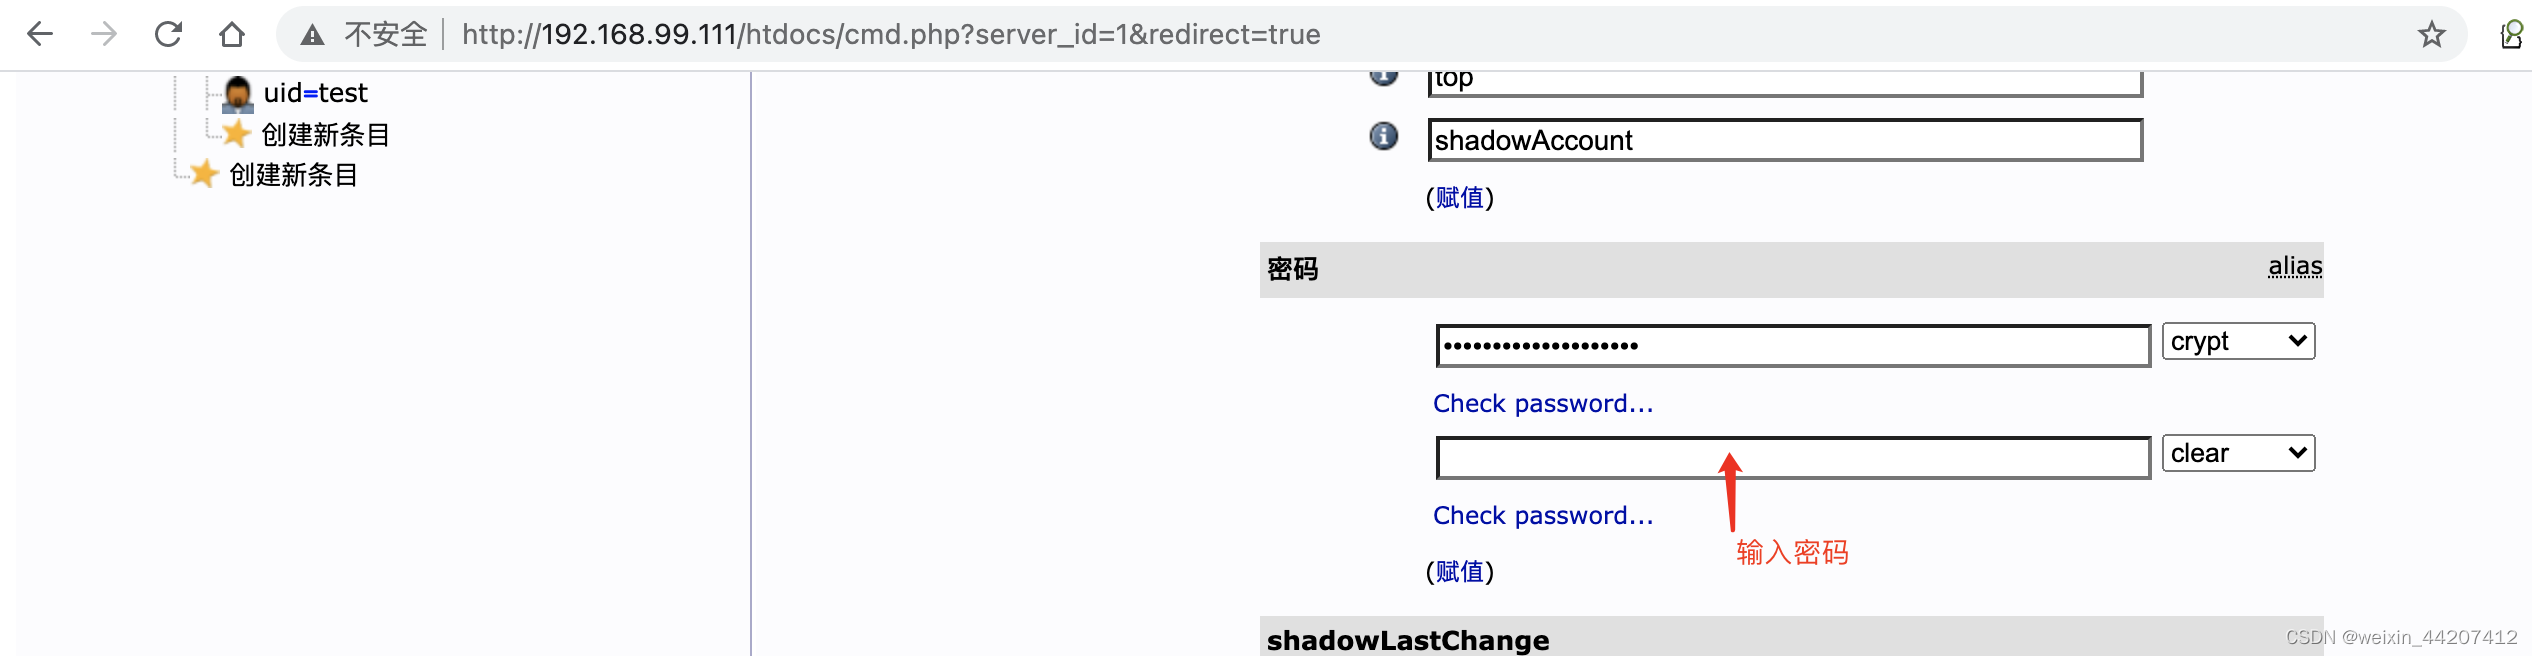
输入密码,点击“Check password”可以验证输入密码。
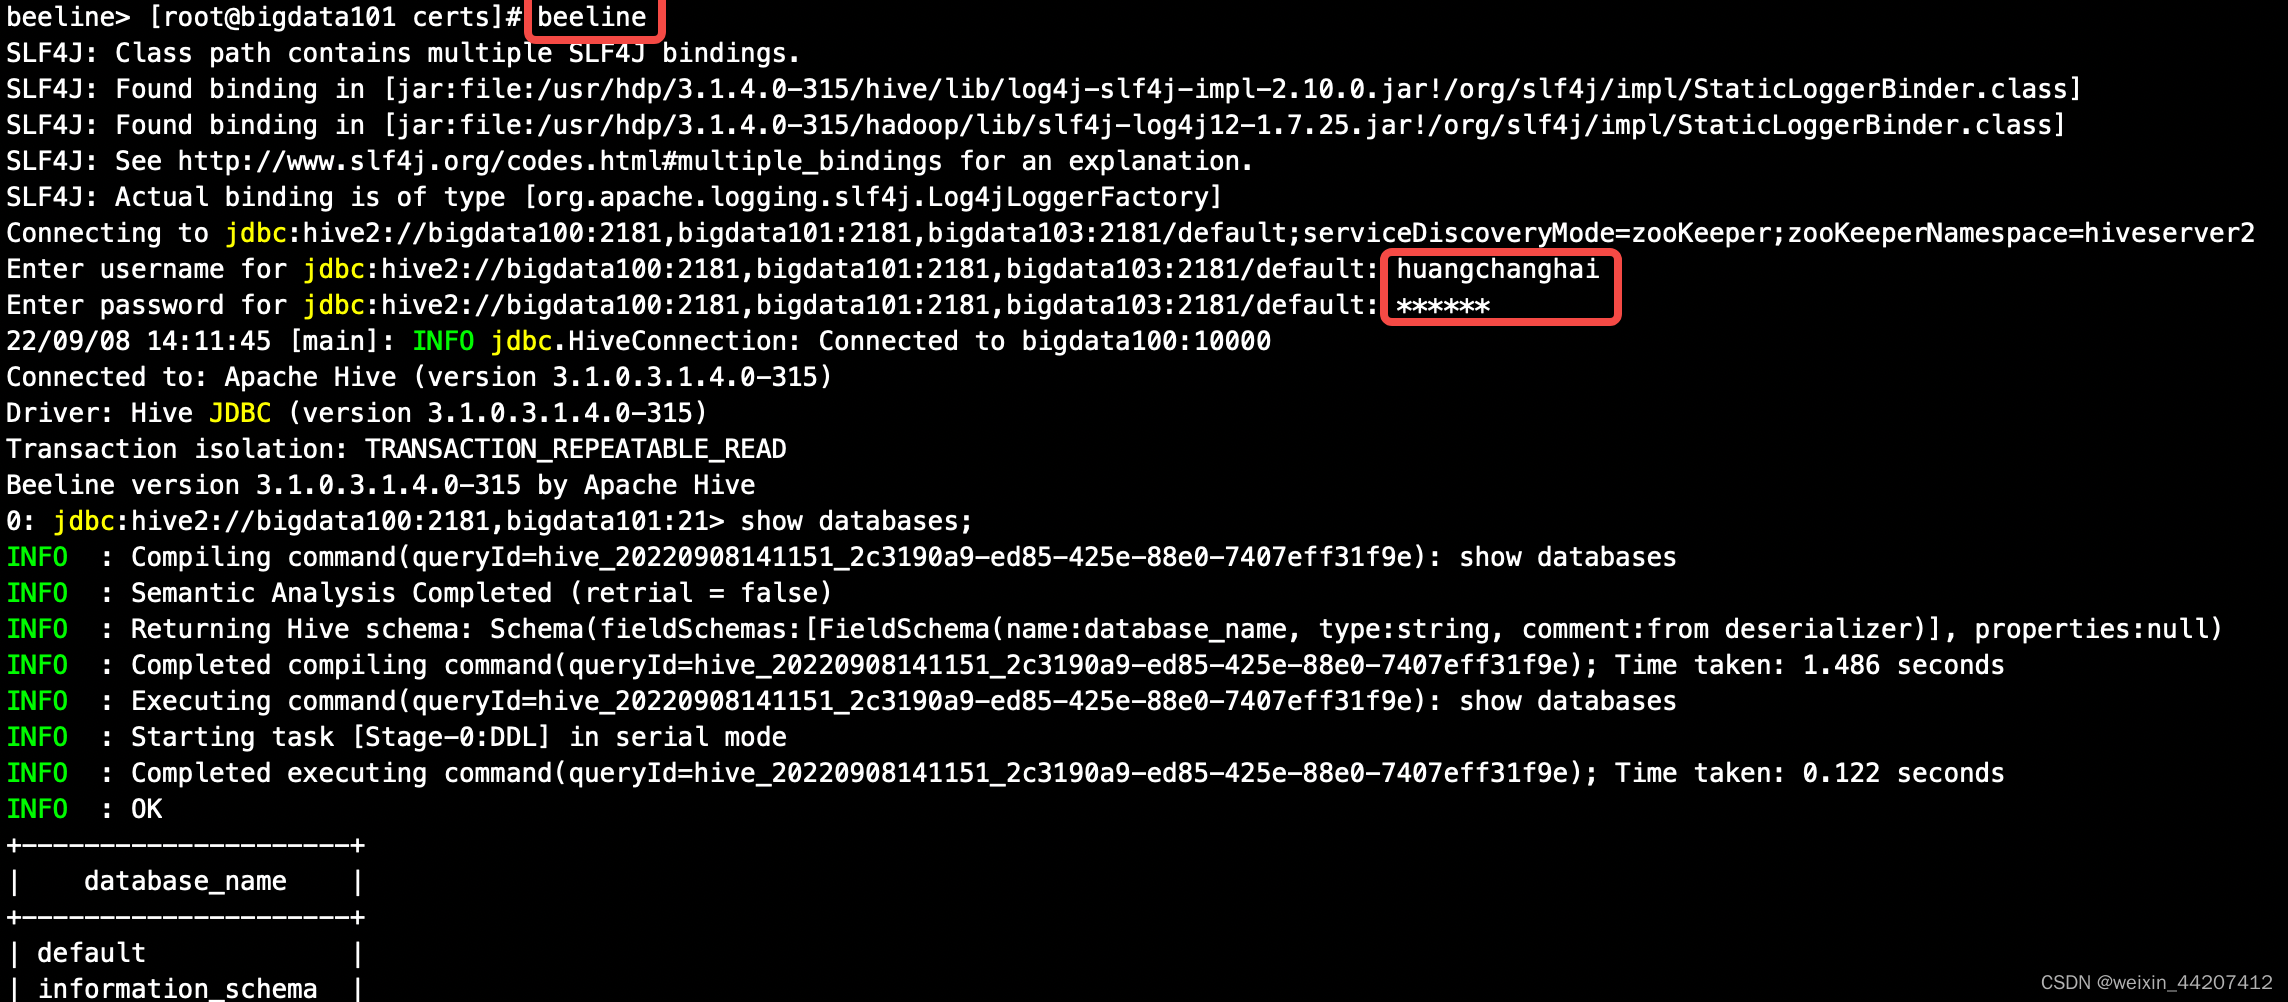
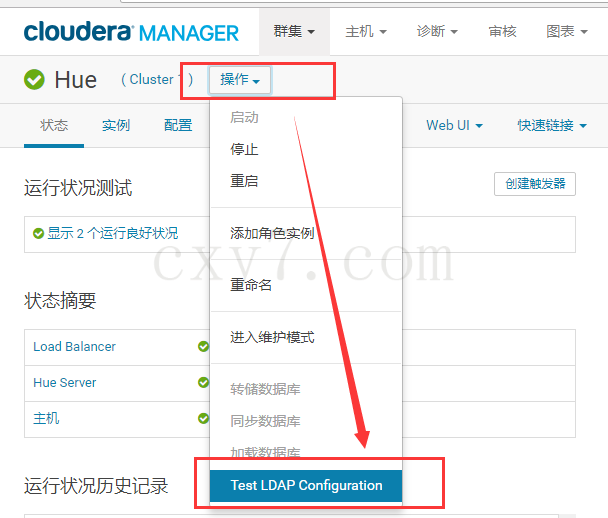
如果是 CDH 或者 Ambari 集成 LDAP ,那么需要在界面重启即可。 [[email protected] ~]# $HIVE_HOME/bin/hiveserver2 [[email protected] ~]# systemctl start slapd 使用 beeline 验证
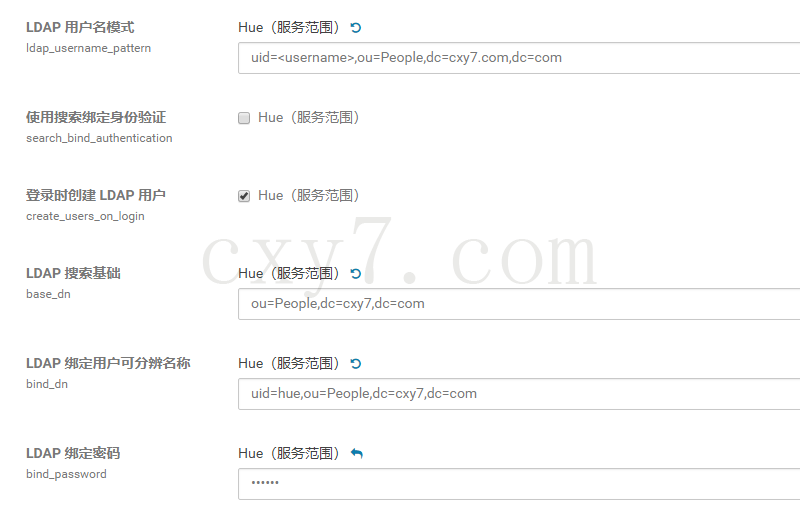
选择身份认证方式 选择desktop.auth.backend.LdapBackend
配置LDAP LDAP 服务器的 URL
Hue在连接其它系统如hive/impala时,需要使用一个预设的用户名和密码,连接成功之后,当真正执行QL的时候,还使用登录时的账号来做鉴权。
|


【本文地址】
今日新闻 |
推荐新闻 |