如何制作CA证书(含二级CA证书),及签发数字证书 |
您所在的位置:网站首页 › p10请求文件 › 如何制作CA证书(含二级CA证书),及签发数字证书 |
如何制作CA证书(含二级CA证书),及签发数字证书
|
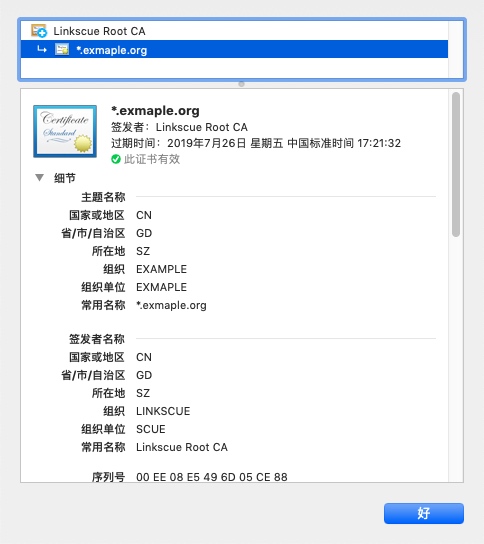
在本文章中,我将尽可能的把CA证书、二级CA证书和证书签名讲述清楚。 前置知识 文件格式约定 为了把文章讲述得更清楚,需要把文件格式约定一下,以避免产生歧义,造成文章理解困难 .key文件:私钥文件,如ca.key .csr文件:证书签名请求(Certificate Signing Request)文件 .crt文件:数字证书(Digital Certificate)文件,如ca.crt .bundle.crt文件:最终在NGINX上配置的数字证书文件,通常包含两部分,如:.crt和ca.crt .chain.crt文件:证书链文件,通常是指cat second.crt ca.crt > second.chain.crt生成的证书链文件 .srl文件:openssl ca签名过程中产生的Serial Number存放的文件 .cnf文件:openssl 配置文件 数字证书(Digital Certificate) 使用CA私钥加密(拥有者信息、公钥信息和拥有者公钥)得到的数据,即是数字证书 客户端收到这个证书之后,使用CA公钥进行解密,拿到拥有者公钥之后,就可以与服务器进行安全通信了 若想快速了解数字证书,推荐阅读 ☞数字签名是什么?——阮一峰 证书签名请求(Certificate Signing Request) 一般是发给CA待签名的文件 包含一些信息,如subject相关信息(包含是什么名字、什么组织、什么单位,…) 它们将会体现在最后的数字证书上(有一些extensions选项可能会被CA签名过程中修改) 非对称加密 仅有一把私钥,但公钥可以是多个 私钥加密的内容,所有公钥都能解开 公钥加密的内容,只有私钥才能解开 若想快速了解,推荐阅读 ☞ RSA 非对称加密原理(小白也能看懂哦~) Public Key Infrastructure(PKI),公钥基础设施 指的是通过证书颂发机构(Certificate Authority (CA))以确定一个公钥的真实身份 Certificate Authority (CA) CA就是这样子的一个中心化的,可信任的证书颁发机构 X.509 是国际电信联盟针对PKI制定的标准 RFCs: Version 1 - RFC1422 Version 2 - RFC2459 Version 3 - RFC5280 一个X.509 v3版本的数字证书(Digital Certificate)包含的结构如下: 证书(Certificate): Version - 必须是v3 Serial Number - 每个证书都有唯一的序列号 Algorithm ID - 算法ID,与底下的证书签名算法必须一致 Issuer - 发行者 Validity - 指明有效期 Subject - 拥有者的相关信息,如 C=CN, ST=GD, L=SZ, O=LINKSCUE, OU=XXX, CN=*.linkscue.com Subject public key info Issuer Unique Identifier (optional) Subject Unique Identifier (optional) Extensions (optional) - 拓展,尤其是Subject Alternative Name的拓展非常关键 Subject Key Identifier:可选 Authority Key Identifier:可选 Subject Alternative Name: 重要 通配证书(Wildcard Certificates)指的是像*.github.com一类的证书 通配证书就要求在这里写入裸域信息,如DNS.1=github.com, DNS.2=*.github.com 写入这个信息之后,才不会报github.com与*.github.com证书名称不匹配的问题 Basic Constraints:可选 … 证书签名算法(Certificate Signature Algorithm) - 举例粒子:SHA-256 证书签名(Certificate Signature) 一、自建CA 1 2 3 4 5 6 # ① 生成CA私钥文件 openssl genrsa -out ca.key 2048 # ② 生成CA证书文件 openssl req -new -x509 -key ca.key -out ca.crt # ③ 查看CA证书信息 openssl x509 -in ca.crt -noout -text没错,只需要这三步,你的CA证书已经生成了,详细输出如下: $ openssl genrsa -out ca.key 2048 Generating RSA private key, 2048 bit long modulus .................................................................+++ .......................................................................................................................................+++ e is 65537 (0x10001) $ openssl req -new -x509 -key ca.key -out ca.crt You are about to be asked to enter information that will be incorporated into your certificate request. What you are about to enter is what is called a Distinguished Name or a DN. There are quite a few fields but you can leave some blank For some fields there will be a default value, If you enter '.', the field will be left blank. ----- Country Name (2 letter code) []:CN State or Province Name (full name) []:GD Locality Name (eg, city) []:SZ Organization Name (eg, company) []:LINKSCUE Organizational Unit Name (eg, section) []:SCUE Common Name (eg, fully qualified host name) []:Root CA Email Address []: $ openssl x509 -in ca.crt -noout -text Certificate: Data: Version: 1 (0x0) Serial Number: 18419436977515027198 (0xff9efc57377a5afe) Signature Algorithm: sha256WithRSAEncryption Issuer: C=CN, ST=GD, L=SZ, O=LINKSCUE, OU=SCUE, CN=Root CA Validity Not Before: Jun 26 07:42:38 2019 GMT Not After : Jul 26 07:42:38 2019 GMT Subject: C=CN, ST=GD, L=SZ, O=LINKSCUE, OU=SCUE, CN=Root CA Subject Public Key Info: Public Key Algorithm: rsaEncryption Public-Key: (2048 bit) ... 二、证书签名请求假定我们现在需要对 example.org 生成证书,那么就需要生成一个证书签名请求(CSR)文件,在此之前,还需要生成一个私钥文件提供给 example.org 建站时使用(后边的NGINX配置有提到)。 1 2 3 4 5 6 # ① 生成私钥 openssl genrsa -out example.org.key 2048 # ② 生成证书签名请求 openssl req -new -key example.org.key -out example.org.csr # ③ 查看证书签名请求文件 openssl req -in example.org.csr -noout -text值得注意的是,Common Name一定要填写*.exmaple.org,以表示这个证书是一个通配证书(Wildcard Certificates),浏览器检查一个证书是否匹配,检查的就是Common Name。 命令详细输出如下: $ openssl genrsa -out example.org.key 2048 Generating RSA private key, 2048 bit long modulus ......................................................+++ ..........+++ e is 65537 (0x10001) $ openssl req -new -key example.org.key -out example.org.csr You are about to be asked to enter information that will be incorporated into your certificate request. What you are about to enter is what is called a Distinguished Name or a DN. There are quite a few fields but you can leave some blank For some fields there will be a default value, If you enter '.', the field will be left blank. ----- Country Name (2 letter code) []:CN State or Province Name (full name) []:GD Locality Name (eg, city) []:SZ Organization Name (eg, company) []:EXAMPLE Organizational Unit Name (eg, section) []:EXMAPLE Common Name (eg, fully qualified host name) []:*.exmaple.org Email Address []: Please enter the following 'extra' attributes to be sent with your certificate request A challenge password []: $ openssl req -in example.org.csr -noout -text Certificate Request: Data: Version: 0 (0x0) Subject: C=CN, ST=GD, L=SZ, O=EXAMPLE, OU=EXMAPLE, CN=*.exmaple.org Subject Public Key Info: Public Key Algorithm: rsaEncryption Public-Key: (2048 bit) ... 三、签名过程 方式1:直接通过命令行签名 1 2 3 4 5 6 # ① 签名 openssl x509 -req -in example.org.csr -CA ca.crt -CAkey ca.key -CAcreateserial -out example.org.x1.crt # ② 验证 openssl verify -CAfile ca.crt example.org.x1.crt # ③ 查看 openssl x509 -in example.org.x1.crt -noout -text没错,通过上方的命令行就可以签名成功了,但此时,如果你搭建好了网站、并使用了这个数字证书,会发现Google Chrome提示NET::ERR_CERT_COMMON_NAME_INVALID,说明证书的COMMON_NAME设定不正确,为什么呢? 其实是由于我们没有写设定Subject Alternative Name导致的,接下来我们应当设定一下这个extension,先写一个配置文件如下: 名字:example.extensions.cnf 内容: basicConstraints=CA:FALSE subjectAltName=@my_subject_alt_names subjectKeyIdentifier = hash [ my_subject_alt_names ] DNS.1 = *.example.org DNS.2 = example.org再次签名: 1 2 3 4 5 6 # ④ 添加 extenstion openssl x509 -req -in example.org.csr -CA ca.crt -CAkey ca.key -CAcreateserial -out example.org.x2.crt -extfile example.extensions.cnf # ⑤ 验证 openssl verify -CAfile ca.crt example.org.x2.crt # ⑥ 更新站点的SSL配置 cat example.org.x2.crt ca.crt > /path/to/ssl/example.org.bundle.crt再次验证,你会发现Google Chrome这一次不报NET::ERR_CERT_COMMON_NAME_INVALID了,而是NET::ERR_CERT_WEAK_SIGNATURE_ALGORITHM,提示使用弱的签名算法,这是为什么呢? 因为默认的签名算法是sha1WithRSAEncryption,而Google已声称SHA1不够安全了。 第三次签名: 1 2 3 4 # ⑦ 使用安全的SHA256签名证书 openssl x509 -req -in example.org.csr -CA ca.crt -CAkey ca.key -CAcreateserial -out example.org.x3.crt -extfile example.extensions.cnf -sha256 # ⑧ 再次更新站点的SSL配置 cat example.org.x2.crt ca.crt > /path/to/ssl/example.org.bundle.crt最后,发现Google Chrome不再提示证书错误的问题了。 PS: 以上,需要用户手动安装ca.crt证书,命令行如下: sudo security add-trusted-cert -d -r trustRoot -k /Library/Keychains/System.keychain ca.crt 小结: 正确的签名过程如下: 1 2 3 4 5 6 # ① 签名(带extenstion、使用安全签名算法sha256) openssl x509 -req -in example.org.csr -CA ca.crt -CAkey ca.key -CAcreateserial -out example.org.x4.crt -extfile example.extensions.cnf -sha256 # ② 验证证书 openssl verify -CAfile ca.crt example.org.x4.crt # ③ 查看证书信息 openssl x509 -in example.org.x4.crt -noout -text 方式2:通过配置文件签名命令行纵然有千万般好,但还是觉得调用的命令参数太多了,能不能简化一些? 答案是可以的,建立一个ca.cnf文件,内容如下: [ ca ] default_ca = my_ca [ my_ca ] # a text file containing the next serial number to use in hex. Mandatory. # This file must be present and contain a valid serial number. serial = ./ca.srl # the text database file to use. Mandatory. This file must be present though # initially it will be empty. database = ./index.txt unique_subject = no # specifies the directory where new certificates will be placed. Mandatory. new_certs_dir = ./newcerts # the file containing the CA certificate. Mandatory certificate = ./ca.crt # the file contaning the CA private key. Mandatory private_key = ./ca.key # the message digest algorithm. Remember to not use MD5 default_md = sha256 # for how many days will the signed certificate be valid default_days = 365 # a section with a set of variables corresponding to DN fields policy = my_policy [ my_policy ] # if the value is "match" then the field value must match the same field in the # CA certificate. If the value is "supplied" then it must be present. # Optional means it may be present. Any fields not mentioned are silently # deleted. countryName = supplied stateOrProvinceName = supplied organizationName = supplied commonName = supplied organizationalUnitName = optional commonName = supplied配置文件指明了使用哪个CA证书文件、CA私钥文件、序列号文件存放位置,以及新证书目录等,同时指明了签名的策略(policy),不符合这个策略的会直接报出错误,以辅助我们生成正确的、可用的证书。 1 2 3 4 5 6 # ① 初始化 touch index.txt mkdir newcerts echo '01' > ./ca.srl # ② 签名命令 openssl ca -config ca.cnf -out example.org.x4.crt -in example.org.csr -extfile example.extensions.cnf -batch这不,签名的命令简化了不少。 四、建站和证书的使用example.org站点文件: example.org ├── ssl/ │ ├── example.org.bundle.crt │ └── example.org.key ├── wwwroot/ │ └── index.html ├── README.md └── example.org.conf它们是这样子生成的: 1 2 3 4 5 6 mkdir ../exmaple.org # ① 数字证书和私钥文件 cat example.org.x4.crt ca.crt > ../example.org/ssl/example.org.bundle.crt cp example.org.key ../example.org/ssl/example.org.key # ② index.html文件 echo 'Welcome example.org!' > ../example.org/wwwroot/index.html其中的example.org.conf为NGINX的配置文件: server { listen 80; server_name example.org; return 301 https://$host$request_uri; } server { listen 443 ssl; server_name example.org; root /etc/nginx/wwwroot/; charset utf-8; ssl_certificate /etc/nginx/ssl/example.org.bundle.crt; ssl_certificate_key /etc/nginx/ssl/example.org.key; ssl_session_cache shared:SSL:1m; ssl_session_timeout 10m; ssl_ciphers ALL:!kEDH!ADH:RC4+RSA:+HIGH:+EXP; ssl_prefer_server_ciphers on; }接下来,我们使用docker来跑起一个nginx服务器: 1 2 3 4 5 6 7 # ③ 启动nginx服务器 cd ../example.org/ docker run --rm -it -p 443:443 \ -v $PWD/ssl:/etc/nginx/ssl \ -v $PWD/wwwroot:/etc/nginx/wwwroot \ -v $PWD/example.org.conf:/etc/nginx/conf.d/example.org.conf \ nginx:alpine再接下来,我们应该让系统信任一下我们自己的CA证书 1 2 # ④ 信任CA sudo security add-trusted-cert -d -r trustRoot -k /Library/Keychains/System.keychain ca.crt接下来,我们应该在/etc/hosts上写入127.0.0.1 example.org,然后打开浏览器,输入https://example.org/
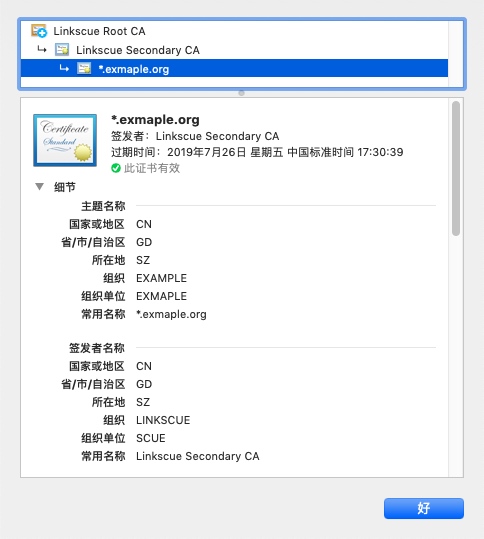
然后,我们的证书就被显示是安全的证书了~ 五、如何生成二级CA证书?很多时候,我们的购买的数字证书,往往是二级CA签发的,那怎么制作自己的二级CA证书呢? 1 2 3 4 5 6 7 8 9 10 11 12 13 14 15 16 17 18 19 # ① 生成私钥 openssl genrsa -out second.key 2048 # ② 生成证书签名请求(CSR) # Subject: C=CN, ST=GD, L=SZ, O=LINKSCUE, OU=SCUE, CN=Linkscue Secondary CA # !!!务必确保Organization Name与根证书相同!!! openssl req -new -key second.key -out second.csr # ③ 生成二级CA证书 openssl x509 -req -CA ca.crt -CAkey ca.key -CAcreateserial -in second.csr -out second.crt -sha256 # ④ 验证二级CA证书是否有效 openssl verify -CAfile ca.crt second.crt # ⑤ 生成证书链文件 cat second.crt ca.crt > second.chain.crt # ⑥ 使用二级CA证书签名 openssl x509 -req -in example.org.csr -CA second.crt -CAkey second.key -CAcreateserial -out example.org.x5.crt -extfile example.extensions.cnf -sha256 # ⑦ 验证签名的证书(需指定second.chain.crt证书链文件) openssl verify -CAfile second.chain.crt example.org.x5.crt # ⑧ bundle.crt文件(注意需使用的是second.crt,而不是ca.crt) cat example.org.x5.crt second.crt > ../example.org/ssl/example.org.bundle.crt cp example.org.key ../example.org/ssl/example.org.key最后,重启docker的nginx,证书信息如下:
这样,建造二级CA证书,并使用二级CA证书颁发数字证书就完成了。 参考文章 How to setup your own CA with OpenSSL 利用CA私钥和证书创建中间CA 那些证书相关的玩意儿(SSL,X.509,PEM,DER,CRT,CER,KEY,CSR,P12等) |
【本文地址】
今日新闻 |
推荐新闻 |