Coffee Lake i5 NUC Review (NUC8i5BEK / NUC8i5BEH) |
您所在的位置:网站首页 › nuc8i5beh硬改 › Coffee Lake i5 NUC Review (NUC8i5BEK / NUC8i5BEH) |
Coffee Lake i5 NUC Review (NUC8i5BEK / NUC8i5BEH)
|
Ok, last week I was looking at the i3 Bean Canyon NUC and now it’s time to do the same for the i5 model. The model I have under review here is the NUC8i5BEK that’s powered by a Coffee Lake CPU, which is the last 14 nm CPU Intel is producing before moving onwards to 10 nm manufacturing process. The model I have here is the compact version without a slot for a 2.5″ drive. I won’t write a separate NUC8i5BEH review as the only difference to this model is the larger case that has a bit more space for the 2.5″ drive. The same mainboard and CPU is used for both models.
Full technical product specifications are available as PDF. Unboxing
The Coffee Lake NUC is delivered as a barebones unit. This means there’s no operating system, memory or an SSD drive installed. You’ll need to buy them separately and install yourself or buy from a vendor that does it for you. It’s not that difficult to install the components yourself though. You will need to bring a DDR4 SODIMM memory module or actually ideally two of them for dual-channel operation. Furthermore you’ll need some form of storage. The NUC8i5BEH model has a slot for a 2.5″ SATA drive, whereas the more compact NUC8i5BEK model does not. Both models have an M.2 slot that can be used with NVMe or SATA SSD drives. On NUC8i5BEH you can even install both an M.2 and a SATA drive simultaneously. Since the mainboard is the same on the NUC, the NUC8i5BEK also has the connectors for the SATA drive, but there’s absolutely no space in the case for one.
Disclaimer: the picture above is actually taken from my i3 NUC review, but the box contents are identical for i5. You’ll find a 90-watt power brick, power cable, a VESA mounting plate to mount the NUC behind your TV or monitor, some screws and instruction brochures and advertisement material.
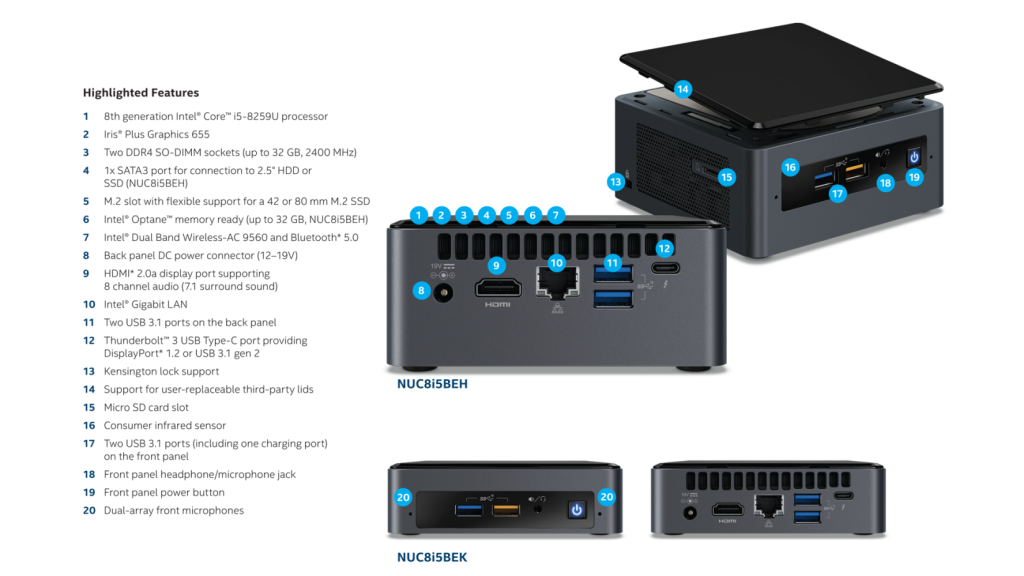
I really like how compact the K model is. In the above model you can see the difference between the H and the K models. There’s not much in the front panel: HDD LED, two USB ports (the yellow one is charging capable), headphone/headset jack and the power button. The two small holes are for the dual microphone array. You don’t see it, but there’s also an infrared receiver in the front panel in case you want to control your NUC with a traditional infrared remote control. That’s handy for a HTPC.
On the left side of the NUC there’s a micro SD card reader and a hole for a Kensington lock if you want to keep someone from slipping the NUC to their pocket while no-one’s watching. The right side is more plain with only a plain air intake grille there.
Despite being smaller than the NUC8i5BEH model, the NUC8i5BEK has exactly the same connectors in the back panel. There’s a DC power jack, a HDMI 2.0a connector, Gigabit Ethernet port, two USB 3.1 type A ports and a single type C port that can be used for Thunderbolt 3, DisplayPort and USB 3.1 connectivity. Building ItThe installation of RAM and the SSD drive into the NUC is simple.  Unfasten the 4 screws.
 Take off the bottom cover.
 Add your RAM and M.2 SSD.
You’ll need to unscrew the 4 screws on the bottom plate and pull it out. You’ll immediately see the mainboard in front of you. Click the memory modules in place first. Unscrew the small screw from the M.2 slot and insert the SSD drive into the M.2 slot before replacing the M.2 slot screw again (the screw is the one on the upper left side of the picture here – little bit left of the “970”). Nothing more to do here, so you can close the bottom cover and fasten the screws. There’s a thermal pad on the bottom cover to distribute the heat that the SSD drive generates and if you have an SSD drive that has a larger heat sink one of the screws will be a more difficult to fasten. Maybe it’s even a good idea to not fasten the screw fully in order to avoid excessive force being exerted on the SSD. If you use an SSD such as the Samsung 970 EVO seen here and what our NUC Guru – Build a NUC tool recommends, there’s not going to be any trouble. Mainboard and coolingDisclaimer: The following chapter and the pictures are from my i3 review. The i5 looks exactly the same so I was feeling a bit lazy and did not photograph it again.
Normally you don’t need to detach the mainboard from the case but I wanted to do so, as I wanted to see the updated cooling solution on the other side of the mainboard.
As you can see, on the other side there’s a much larger diameter fan (80 mm in this NUC) than previously was used on the Core NUCs. This is good news because large fans can move more air without spinning so fast. This in turn means less noise and noise is what some might remember the previous generation Kaby Lake NUCs from.
I detached the fan to find the copper heat pipe under the fan.
And finally you’ll find the CPU under the heat pipe. There’s quite a generous amount of cooling paste applied between the CPU and the heat pipe. A bit too much for my liking even, but seems to work ok though.
Finally, if you look close enough you can see the MegaChips MCDP2800 LSPCon chip that converts the internal DisplayPort 1.2 signal into HDMI 2.0a signal. I know this will be a disappointment for some as Intel had some problems with the LSPCon chips a couple of years ago and they did get some bad rep out there. The LSPCon and the GPU in NUC8i5BEH/NUC8i5BEK support HDR. The firmware version of the LSPCon was 1.73. BIOS


The BIOS in the Coffee Lake NUCs is the Visual BIOS that hasn’t changed much over the years when it comes to the user interface. You can use your mouse and keyboard to move around. All your basic options are present, but don’t expect a host of overclocking possibilities being offered here. BIOS version 0048 was used for this review. It’s worth pointing out that the consumer infrared receiver is disabled in the BIOS by default. The driver installation in Windows will fail unless you enable it. Contents |


【本文地址】