|
大致思路如下
对图片做降噪滤波处理寻找硬币的边缘使用硬币边缘打造蒙版,并切割出图像
对应的方法如下
对图片进行二值化COLOR_BGR2GRAY处理,高斯滤波GaussianBlur处理。使用canny算子进行边缘查找,并使用findContours方法提取边缘坐标点。使用boundingRect方法找出硬币所在的矩形进行裁切,使用minEnclosingCircle找出包络圆作为蒙版,并使用bitwise_and隐藏背景。
首先导入必要的库,测试一下是否加载成功,注意cv2.waitKey(0)一定不要忘记!
import cv2
import numpy as np
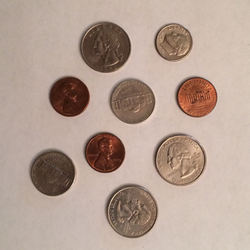
image = cv2.imread("coins.png")
cv2.imshow("if imread successfully",image)
cv2.waitKey(0)
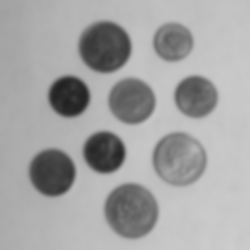
 接着进行灰度处理和模糊处理,在这之前需要关掉第一张图像 接着进行灰度处理和模糊处理,在这之前需要关掉第一张图像
gray = cv2.cvtColor(image,cv2.COLOR_BGR2GRAY)
blurred = cv2.GaussianBlur(gray,(11,11),0)
cv2.imshow("blurred",blurred)
cv2.waitKey(0)
 进行边缘提取 进行边缘提取
edged = cv2.Canny(blurred, 30, 150)
cv2.imshow("edged",edged)
cv2.waitKey(0)
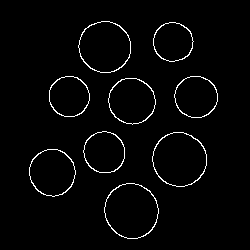 在原图中进行边缘提取 在原图中进行边缘提取
# 注意这里只能返回2个变量
(cnts,_) = cv2.findContours(edged.copy(),cv2.RETR_EXTERNAL,cv2.CHAIN_APPROX_SIMPLE)
print(" {} coins in the image".format(len(cnts)))
显示:9 coins in the image
然后画在原图中
coins = image.copy()
cv2.drawContours(coins, cnts, -1, (0,255,0), 2)
cv2.imshow("coins",coins)
cv2.waitKey(0)
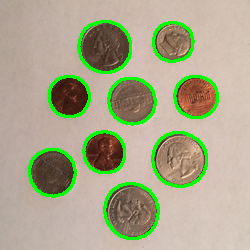 最后对图片进行裁切 最后对图片进行裁切
coins = image.copy()
cv2.drawContours(coins, cnts, -1, (0,255,0), 2)
cv2.imshow("coins",coins)
cv2.waitKey(0)
for (i,circle) in enumerate(cnts):
# circle是每个提取出来的圆
(x,y,w,h) = cv2.boundingRect(circle)
print("coin #{}".format(i+1))
coin_canvas = image[y:y+h, x:x+w]
cv2.imshow("coin",coin_canvas)
cv2.waitKey(0)
mask = np.zeros(image.shape[:2], dtype = 'uint8')
((centerX,centerY),radius) = cv2.minEnclosingCircle(circle)
# 在蒙版上画圆,这里是灰度图,所以255表示白色
cv2.circle(mask,(int(centerX),int(centerY)), int(radius), 255, -1)
mask = mask[y:y+h, x:x+w]
# 自身和自身进行与运算即可
cv2.imshow("masked coin",cv2.bitwise_and(coin_canvas, coin_canvas, mask = mask))
cv2.waitKey(0)
裁切出来的图片  加上蒙版的图片 加上蒙版的图片  以上代码均在notebook中运行通过。 以上代码均在notebook中运行通过。
|