VScode 完整安装、配置及完全卸载 |
您所在的位置:网站首页 › mo怎么彻底删除 › VScode 完整安装、配置及完全卸载 |
VScode 完整安装、配置及完全卸载
|
文章目录
1、VScode 完整安装1.1、安装VScode1.2、安装MinGW1.3、安装python1.4、安装VScode扩展
2、VScode C的环境配置2.1、建立 launch.json 文件2.2、建立 settings.json 文件2.3、建立 tasks.json 文件
3、VScode C++ 的环境配置3.1、建立 launch.json 文件3.2、建立 tasks.json 文件3.3、建立 settings.json 文件3.4、建立 c_cpp_properties.json文件
4、VScode python 的环境配置5、VScode 完全卸载
1、VScode 完整安装
1.1、安装VScode
安装版本:VSCodeUserSetup-x64-1.36.1 下载链接:https://code.visualstudio.com/Download# 1.2、安装MinGW使用MinGW-W64 GCC-8.1.0编译器默认安装目录的配置文件 MinGW-W64 GCC下载地址:https://sourceforge.net/projects/mingw-w64/files/Toolchains%20targetting%20Win32/Personal%20Builds/mingw-builds/installer/mingw-w64-install.exe/download 离线下载地址:https://sourceforge.net/projects/mingw-w64/files/mingw-w64/mingw-w64-release/ 安装结束后记得添加环境变量: 如果要使用vscode在本地调试python,需要在先在电脑上安装python.我安装的python版本是:python-3.6.4rc1-amd64。 1.4、安装VScode扩展安装vscode时选择默认路径,安装完成后打开,安装扩展: 1、 C/C++(就是有些教程里的cpptools) 2、 C/C++ Clang Command Adapter:提供静态检测(Lint),很重要 3、 Code Runner:右键即可编译运行单文件,很方便 4、 Bracket Pair Colorizer:彩虹花括号 5、 Include Autocomplete:提供头文件名字的补全 6、 C/C++ Snippets:Snippets 即重用代码块, 7、 One Dark Pro:大概是VS Code安装量最高的主题 8、 python 9、Clang-Format 10、Chinese (Simplified)Language Pack for Visual Studio Code:汉化包 扩展的安装根据自己的需求,我只是安装了一些自己觉得可以用的扩展。 2、VScode C的环境配置 2.1、建立 launch.json 文件 { "version": "0.2.0", "configurations": [ { "name": "(gdb) Launch", // 配置名称,将会在启动配置的下拉菜单中显示 "type": "cppdbg", // 配置类型,这里只能为cppdbg "request": "launch", // 请求配置类型,可以为launch(启动)或attach(附加) "program": "${workspaceRoot}/${fileBasenameNoExtension}.exe", // 将要进行调试的程序的路径 "args": [], // 程序调试时传递给程序的命令行参数,一般设为空即可 "stopAtEntry": false, // 设为true时程序将暂停在程序入口处,一般设置为false "cwd": "${workspaceRoot}", // 调试程序时的工作目录,一般为${workspaceRoot}即代码所在目录 "environment": [], "externalConsole": true, // 调试时是否显示控制台窗口,一般设置为true显示控制台 "MIMode": "gdb", "miDebuggerPath": "C:/Program Files (x86)/mingw-w64/i686-8.1.0-posix-dwarf-rt_v6-rev0/mingw32/bin/gdb.exe", // miDebugger的路径,注意这里要与MinGw的路径对应 "preLaunchTask": "gcc", // 调试会话开始前执行的任务,一般为编译程序,c++为g++, c为gcc "setupCommands": [ { "description": "Enable pretty-printing for gdb", "text": "-enable-pretty-printing", "ignoreFailures": true } ] } ] } 2.2、建立 settings.json 文件 { "C_Cpp.errorSquiggles": "Enabled", "editor.fontSize": 16, "editor.detectIndentation": false, "files.autoSave": "onFocusChange" } 2.3、建立 tasks.json 文件 { "version": "2.0.0", "command": "gcc", "args": ["-g","${file}","-o","${fileBasenameNoExtension}.exe"] } 3、VScode C++ 的环境配置 3.1、建立 launch.json 文件 { "version": "0.2.0", "configurations": [ { "name": "(gdb) Launch", // 配置名称,将会在启动配置的下拉菜单中显示 "type": "cppdbg", // 配置类型,这里只能为cppdbg "request": "launch", // 请求配置类型,可以为launch(启动)或attach(附加) "program": "${workspaceRoot}/${fileBasenameNoExtension}.exe", // 将要进行调试的程序的路径 "args": [], // 程序调试时传递给程序的命令行参数,一般设为空即可 "stopAtEntry": false, // 设为true时程序将暂停在程序入口处,一般设置为false "cwd": "${workspaceRoot}", // 调试程序时的工作目录,一般为${workspaceRoot}即代码所在目录 "environment": [], "externalConsole": true, // 调试时是否显示控制台窗口,一般设置为true显示控制台 "MIMode": "gdb", "miDebuggerPath": "C:/Program Files (x86)/mingw-w64/i686-8.1.0-posix-dwarf-rt_v6-rev0/mingw32/bin/gdb.exe", // miDebugger的路径,注意这里要与MinGw的路径对应 "preLaunchTask": "g++", // 调试会话开始前执行的任务,一般为编译程序,c++为g++, c为gcc "setupCommands": [ { "description": "Enable pretty-printing for gdb", "text": "-enable-pretty-printing", "ignoreFailures": false } ] } ] } 3.2、建立 tasks.json 文件 { "version": "2.0.0", "command": "g++", "args": [ "-g", "${file}", "-o", "${fileBasenameNoExtension}.exe" ], // 编译命令参数 "problemMatcher": { "owner": "cpp", "fileLocation": [ "relative", "${workspaceRoot}" ], "pattern": { "regexp": "^(.*):(\\d+):(\\d+):\\s+(warning|error):\\s+(.*)$", "file": 1, "line": 2, "column": 3, "severity": 4, "message": 5 } } } 3.3、建立 settings.json 文件 { "workbench.colorTheme": "One Dark Pro Vivid", "atomKeymap.promptV3Features": true, "editor.multiCursorModifier": "ctrlCmd", "editor.fontSize": 18, // "[cpp]": { // "editor.quickSuggestions": true // }, // "[c]": { // "editor.quickSuggestions": true // }, "files.associations": { "*.json": "jsonc", "*.cfg": "ini", "*.fsh": "glsl", "stack": "cpp", "iostream": "cpp", "ostream": "cpp", "*.tcc": "cpp", "cctype": "cpp", "clocale": "cpp", "cmath": "cpp", "cstdint": "cpp", "cstdio": "cpp", "cstdlib": "cpp", "cwchar": "cpp", "cwctype": "cpp", "exception": "cpp", "initializer_list": "cpp", "iosfwd": "cpp", "istream": "cpp", "limits": "cpp", "new": "cpp", "stdexcept": "cpp", "streambuf": "cpp", "system_error": "cpp", "type_traits": "cpp", "typeinfo": "cpp", "utility": "cpp" }, "editor.snippetSuggestions": "top", "C_Cpp.clang_format_sortIncludes": true, "editor.wordWrap": "on", "editor.formatOnPaste": true, "editor.formatOnType": true, "editor.codeActionsOnSaveTimeout": 500, "files.autoSave": "onFocusChange", "files.autoSaveDelay": 50, "editor.hover.delay": 0, "files.autoGuessEncoding": true, "editor.detectIndentation": false, } 3.4、建立 c_cpp_properties.json文件 { "configurations": [ { "name": "Win32", "includePath": [ "${workspaceRoot}", "C:/Program Files (x86)/mingw-w64/i686-8.1.0-posix-dwarf-rt_v6-rev0/mingw32/lib/gcc/i686-w64-mingw32/8.1.0/include/c++", "C:/Program Files (x86)/mingw-w64/i686-8.1.0-posix-dwarf-rt_v6-rev0/mingw32/lib/gcc/i686-w64-mingw32/8.1.0/include/c++/i686-w64-mingw32", "C:/Program Files (x86)/mingw-w64/i686-8.1.0-posix-dwarf-rt_v6-rev0/mingw32/lib/gcc/i686-w64-mingw32/8.1.0/include/c++/backward", "C:/Program Files (x86)/mingw-w64/i686-8.1.0-posix-dwarf-rt_v6-rev0/mingw32/lib/gcc/i686-w64-mingw32/8.1.0/include", "C:/Program Files (x86)/mingw-w64/i686-8.1.0-posix-dwarf-rt_v6-rev0/mingw32/lib/gcc/i686-w64-mingw32/8.1.0/include/c++/tr1", "C:/Program Files (x86)/mingw-w64/i686-8.1.0-posix-dwarf-rt_v6-rev0/mingw32/include", "C:/Program Files (x86)/mingw-w64/i686-8.1.0-posix-dwarf-rt_v6-rev0/mingw32/lib/gcc/i686-w64-mingw32/8.1.0/include-fixed" ], "defines": [ "_DEBUG", "UNICODE", "__GNUC__=6", "__cdecl=__attribute__((__cdecl__))" ], "intelliSenseMode": "msvc-x64", "browse": { "path": [ "${workspaceRoot}", "C:/Program Files (x86)/mingw-w64/i686-8.1.0-posix-dwarf-rt_v6-rev0/mingw32/lib/gcc/i686-w64-mingw32/8.1.0/include/c++", "C:/Program Files (x86)/mingw-w64/i686-8.1.0-posix-dwarf-rt_v6-rev0/mingw32/lib/gcc/i686-w64-mingw32/8.1.0/include/c++/i686-w64-mingw32", "C:/Program Files (x86)/mingw-w64/i686-8.1.0-posix-dwarf-rt_v6-rev0/mingw32/lib/gcc/i686-w64-mingw32/8.1.0/include/c++/backward", "C:/Program Files (x86)/mingw-w64/i686-8.1.0-posix-dwarf-rt_v6-rev0/mingw32/lib/gcc/i686-w64-mingw32/8.1.0/include", "C:/Program Files (x86)/mingw-w64/i686-8.1.0-posix-dwarf-rt_v6-rev0/mingw32/lib/gcc/i686-w64-mingw32/8.1.0/include/c++/tr1", "C:/Program Files (x86)/mingw-w64/i686-8.1.0-posix-dwarf-rt_v6-rev0/mingw32/include", "C:/Program Files (x86)/mingw-w64/i686-8.1.0-posix-dwarf-rt_v6-rev0/mingw32/lib/gcc/i686-w64-mingw32/8.1.0/include-fixed" ] }, "limitSymbolsToIncludedHeaders": true, "databaseFilename": "", "compilerPath": "C:/Program Files (x86)/mingw-w64/i686-8.1.0-posix-dwarf-rt_v6-rev0/mingw32/bin/g++.exe", "cStandard": "c11", "cppStandard": "c++17" } ], "version": 4 } 4、VScode python 的环境配置python 不需要额外配置其他的,只要在电脑和vscode扩展里安装好python,python即可使用。 5、VScode 完全卸载1、打开控制面板的程序,卸载安装的vscode
|

 2、找到安装目录下:H:\Users\zhangjunhao\AppData\Roaming(我的H盘为系统盘),删除文件夹 Code 和 Visual Studio Code
 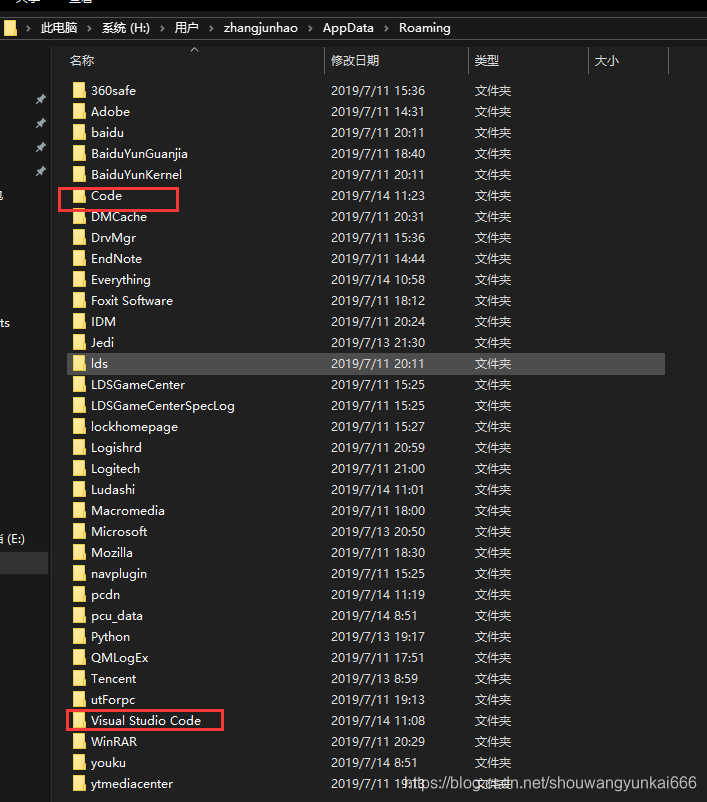 3、找到目录:H:\Users\zhangjunhao 删除文件夹 .vscode ,该文件夹下是vscode中安装的扩展。
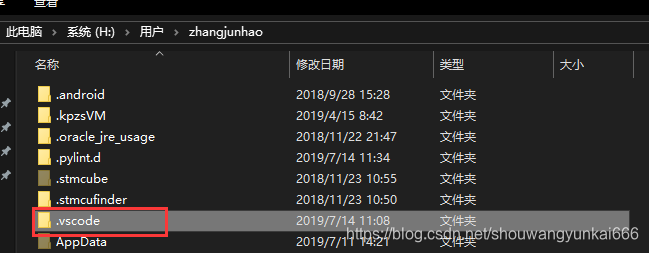 至此,vscode就算完全卸载,如果需要重装,就不会出现前面安装过的扩展和配置。
【本文地址】
今日新闻 |
推荐新闻 |