用户交互界面 |
您所在的位置:网站首页 › meter图片 › 用户交互界面 |
用户交互界面
|
用户交互界面---python-PySimpleGUI库
前言PySimpleGUI库PySimpleGUI库介绍PySimpleGUI库安装PySimpleGUI库常用函数基本弹窗函数popuppopup函数以及其变体popup函数应用示例
文字弹窗函数popup_scrolled用户输入的弹窗popup_get_textpopup_get_text显示输入内容popup_get_text不显示输入内容
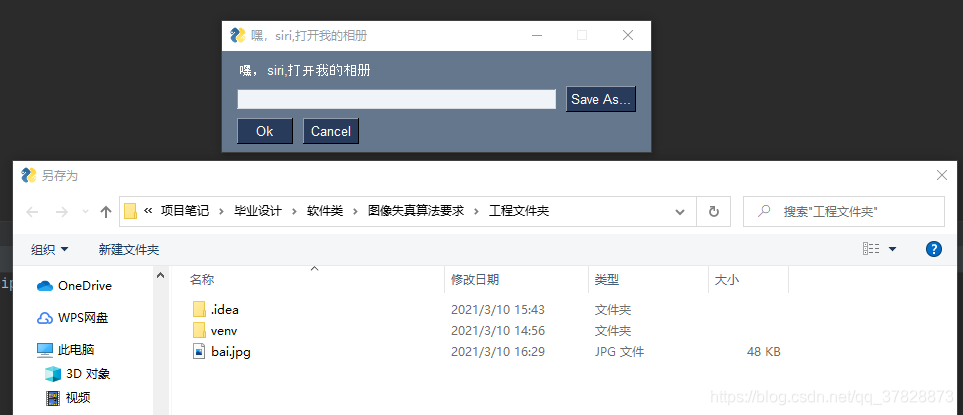
文件选择弹出窗口函数sg.popup_get_file进度条弹窗函数one_line_progress_meter主菜单的制作基本窗口函数window
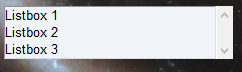
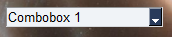
PySimpleGUI库常用控件例程代码Frame控件Text控件:文本Image控件:图片Button控件:按键Radio控件:单项选择Slider控件:滑块调节Listbox控件:列表框Cbox控件:复选框Combo控件:下拉选框FileBrowse控件:选取文件FolderBrowse控件:选取文件夹Table:列表
用户交互界面设计注意事项关于用户界面的美化
前言
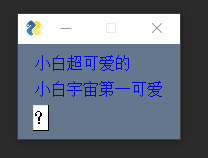
PySimpleGUI库的功能非常之多,而且拥有200多个开发示例,很多时候只需要对这些示例稍作修改就可以拿来用了,本文主要介绍了一写PySimpleGUI库中一些宠用的函数,再不借助类似qt这类可视化界面设计的情况下如何快速的做出自己想要的界面,因为篇幅较长,因此大家可以根据目录进行跳转到自己需要的部分。 PySimpleGUI库 PySimpleGUI库介绍PySimpleGUI是python用于制作用户交互界面的库,使用起来非常方便,官方的默认缩写为sg,因此使用时建议采用import PySimpleGUI as sg语句 PySimpleGUI库安装如果是在命令行终端输入 pip install pysimplegui即可 如果是在pycharm中,那么可以在file–setting–python interpreter–±-输入PySimpleGUI–install,等待安装完成后即可 PySimpleGUI库常用函数 基本弹窗函数popup popup函数以及其变体 sg.popup(‘基本函数’) sg.popup_ok('带ok键的弹窗') sg.popup_yes_no('带Yes和No按钮的弹窗') sg.popup_cancel('带cancel按钮的弹窗') sg.popup_ok_cancel('带OK和cancel按钮的弹窗') sg.popup_error('带红色error按钮的弹窗') sg.popup_auto_close('几秒后自动关闭的弹窗') popup函数应用示例 import PySimpleGUI as sg sg.popup( '小白超可爱的',#显示的内容 '小白宇宙第一可爱',#显示的内容 title='嗷呜',#窗口名 button_color=('#000000','#FFFFFF'),#按钮颜色(前景色和背景色) line_width=10,#每一行的字数 custom_text='?',#按键显示内容 location=(857,857),#屏幕显示的位置 auto_close=True,#会自动关闭 auto_close_duration=5,#自动关闭的时间,单位秒 text_color='blue',#文字颜色 grab_anywhere=True,#窗口是否可以移动 font='23',#字体大小 )
window函数可以创建一个窗口,在该窗口上可以放置各种各样的控件供我们使用。 top_window = sg.Window('Everything bagel', #展示窗口 layout, #窗口控件布局 finalize=True, #貌似是必要参数 keep_on_top=True, #控件保持在屏幕上方 grab_anywhere=True,#可以拖动窗口 transparent_color=sg.theme_background_color(), #背景主题 no_titlebar=True)#去掉标题栏 PySimpleGUI库常用控件 例程代码想要掌握window,那么关键在于如何创建和使用控件,以及如何进行函数回调 先来看一下比较便于掌握控件的例程 import PySimpleGUI as sg """ Highly experimental demo of how the illusion of a window with a background image is possible with PySimpleGUI. Requires the latest PySimpleGUI from GitHub. Your copy of PySimpleGUI should be local to your application so that the global variable _move_all_windows can be changed. Copyright 2020 PySimpleGUI.org """ sg.Window._move_all_windows = True def title_bar(title, text_color, background_color): """ Creates a "row" that can be added to a layout. This row looks like a titlebar :param title: The "title" to show in the titlebar :type title: str :param text_color: Text color for titlebar :type text_color: str :param background_color: Background color for titlebar :type background_color: str :return: A list of elements (i.e. a "row" for a layout) :rtype: List[sg.Element] """ bc = background_color tc = text_color font = 'Helvetica 12' return [sg.Col([[sg.T(title, text_color=tc, background_color=bc, font=font, grab=True)]], pad=(0, 0), background_color=bc), sg.Col([[sg.T('_', text_color=tc, background_color=bc, enable_events=True, font=font, key='-MINIMIZE-'), sg.Text('❎', text_color=tc, background_color=bc, font=font, enable_events=True, key='Exit')]], element_justification='r', key='-C-', grab=True, pad=(0, 0), background_color=bc)] def main(): background_layout = [ title_bar('This is the titlebar', sg.theme_text_color(), sg.theme_background_color()), [sg.Image(data=background_image)]] window_background = sg.Window('Background', background_layout, no_titlebar=True, finalize=True, margins=(0, 0), element_padding=(0,0), right_click_menu=[[''], ['Exit',]]) window_background['-C-'].expand(True, False, False) # expand the titlebar's rightmost column so that it resizes correctly # ------ Column Definition ------ # column1 = [[sg.Text('Column 1', justification='center', size=(10, 1))], [sg.Spin(values=('Spin Box 1', 'Spin Box 2', 'Spin Box 3'), initial_value='Spin Box 1')], [sg.Spin(values=['Spin Box 1', '2', '3'], initial_value='Spin Box 2')], [sg.Spin(values=('Spin Box 1', '2', '3'), initial_value='Spin Box 3')]] layout = [#控件的设置在这里 [sg.Text('Window + Background Image\nWith tkinter', size=(30, 2), justification='center', font=("Helvetica", 25), relief=sg.RELIEF_RIDGE)], [sg.Text('Here is some text.... and a place to enter text')], [sg.InputText('This is my text')], [sg.Frame(layout=[ [sg.CBox('Checkbox', size=(10, 1)), sg.CBox('My second checkbox!', default=True)], [sg.Radio('My first Radio! ', "RADIO1", default=True, size=(10, 1)), sg.Radio('My second Radio!', "RADIO1")]], title='Options', relief=sg.RELIEF_SUNKEN, tooltip='Use these to set flags')], [sg.MLine(default_text='This is the default Text should you decide not to type anything', size=(35, 3)), sg.MLine(default_text='A second multi-line', size=(35, 3))], [sg.Combo(('Combobox 1', 'Combobox 2'),default_value='Combobox 1', size=(20, 1)), sg.Slider(range=(1, 100), orientation='h', size=(34, 20), default_value=85)], [sg.OptionMenu(('Menu Option 1', 'Menu Option 2', 'Menu Option 3'))], [sg.Listbox(values=('Listbox 1', 'Listbox 2', 'Listbox 3'), size=(30, 3)), sg.Frame('Labelled Group', [[ sg.Slider(range=(1, 100), orientation='v', size=(5, 20), default_value=25, tick_interval=25), sg.Slider(range=(1, 100), orientation='v', size=(5, 20), default_value=75), sg.Slider(range=(1, 100), orientation='v', size=(5, 20), default_value=10), sg.Col(column1)]]) ], [sg.Text('_' * 80)], [sg.Text('Choose A Folder', size=(35, 1))], [sg.Text('Your Folder', size=(15, 1), justification='right'), sg.InputText('Default Folder'), sg.FolderBrowse()], [sg.Submit(tooltip='Click to submit this form'), sg.Cancel()], [sg.Text('Right Click To Exit', size=(30, 1), justification='center', font=("Helvetica", 25), relief=sg.RELIEF_SUNKEN)], ] #只要把layout传递给window函数就可以让窗口搭载设定好的控件了 top_window = sg.Window('Everything bagel', layout, finalize=True, keep_on_top=True, grab_anywhere=False, transparent_color=sg.theme_background_color(), no_titlebar=True) # window_background.send_to_back() # top_window.bring_to_front() while True: window, event, values = sg.read_all_windows() print(event, values) if event is None or event == 'Cancel' or event == 'Exit': print(f'closing window = {window.Title}') break top_window.close() window_background.close() if __name__ == '__main__': background_image = 图片的URL #链接太长了就不贴了,需要的话自己去找一下图片,也可以用本地图片但是只支持gif格式的图片 main()
sg.Frame()里面可以穿插其他控件,在同一个sg.Frame控件里的控件会被框起来代表是一组,比较常用语里面插入选择性的控件,主要参数有 tooltip:提示信息,鼠标放置在控件上会出现提示title:标题 [sg.Frame(layout=[ [sg.CBox('Checkbox', size=(10, 1)), sg.CBox('My second checkbox!', default=True)], [sg.Radio('My first Radio! ', "RADIO1", default=True, size=(10, 1)), sg.Radio('My second Radio!', "RADIO1")]], title='Options', relief=sg.RELIEF_SUNKEN, tooltip='Use these to set flags')] Text控件:文本sg.Text()里面可以插入文本内容,并显示在窗口上,是很常用的控件类型,主要参数有 size:文本框大小justification:文字位置font:字体型号以及字体大小 sg.Text('Your Folder', size=(15, 1), justification='right')
sg.Image控件可以用来植入图片或者动态图,但是只支持gif格式和png格式,其他格式的图片需要转化成这俩种格式,不过我测试只有gif可用,常用的参数有 size:图片大小,比图片大的话不会被放大填充,但是比图片小的话图片会被缩放 附上其他类型图片转化为gif图片的源码:
picref = Image.open(picref_path)
picrefNew.append(picref)
picrefNew[0].save("./picref.gif", 'gif', save_all=True, append_images=picrefNew[1:])
Button控件:按键 附上其他类型图片转化为gif图片的源码:
picref = Image.open(picref_path)
picrefNew.append(picref)
picrefNew[0].save("./picref.gif", 'gif', save_all=True, append_images=picrefNew[1:])
Button控件:按键
sg.Button控件可以创造一个按键,用户每当按下按键,则会返回所有当前所有选择框的状态,从而便于让开发者去调用对应的响应函数,在PySimpleGUI库中,有很多奇奇怪怪的按键函数,但实际上只是换了名字而已,与sg.Button并没有什么额外的内容。 OKOkSubmitCancelYesNoExitQuitHelpSaveSaveAsOpen sg.OK()就相当于sg.Button(‘OK’),Button的主要参数有size:按键大小key:传入一个字符串,代表键值 sg.Button('评估',size=(30,1),key='assess')
一组sg.Radio同时只有一个控件可以被选择,可以用作单项选择或者确定是否,主要参数有 default:初始是否被选中size:尺寸大小 sg.Radio('My first Radio! ', "RADIO1", default=True, size=(10, 1))
sg.Slider()可以产生一个可滑动调节的按钮,主要的参数有 range:可滑动范围,例如(1,100)size:尺寸大小default_value:默认滑块所在的位置 sg.Slider(range=(1, 100), orientation='h', size=(34, 20), default_value=85)
listbox可以创建一个列表框供人选择,在触发回调事件时,列表框被选中的情况会被返回 sg.Listbox(values=('Listbox 1', 'Listbox 2', 'Listbox 3'), size=(30, 3))
Cbox函数可以用来创建复选框,复选框可以有多个控件被同时选择,主要参数: default:默认值为False,决定初始化后是否被选择size:控件大小 [sg.CBox('Checkbox', size=(10, 1)), sg.CBox('My second checkbox!', default=True)]
Combo用于生成下拉选框,当有回调事件触发时会返回选框内的值,主要参数: size:控件大小 default:默认选择哪个值 sg.Combo(('Combobox 1', 'Combobox 2'), default_value='Combobox 1', size=(20, 1))
FileBrowse常用于打开一个文件,但是该函数不会触发按键效果,所以就会出现用该函数打开了一个文件后却不可以即使更新到界面上,也无法触发其他回调函数,但是可以通过以下语句更新到文本框中 layout=[sg.Text('源图像', size=(8, 1)),sg.Input(),sg.FileBrowse('选择源图像', size=(30, 1))]
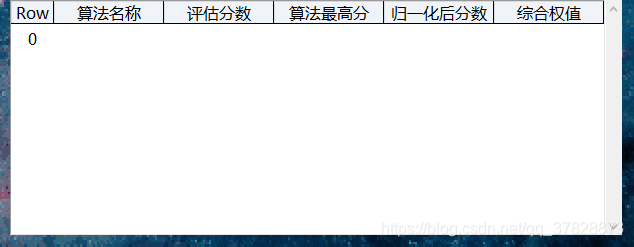
和FileBrowse没有什么区别,不过对象从文件变成了文件夹,也一样不会触发回调,但是可以更新到文本框当中 layout=[sg.Text('源图像', size=(8, 1)),sg.Input(),sg.FolderBrowse('选择源图像', size=(30, 1))] Table:列表Table函数可以生成一个列表将需要展示的数据展示出来是很好用的函数 [sg.Table(values=[[" ", " ", " ", " "," "]],#列的初始宽度 headings=['算法名称', '评估分数', '算法最高分', '归一化后分数','综合权值'],#列头的初始值 max_col_width=500,#行宽 auto_size_columns=True, # 自动调整列宽(根据上面第一次的values默认值为准,update时不会调整) display_row_numbers=True, # 序号 justification='center', # 字符排列 left right center num_rows=7, # 行数 row_height=30, # 行高 key='_table_',#键值 font=('微软雅黑', 12),#字体大小和字体类型 text_color='black',#文本颜色 background_color='white',#背景颜色 enable_events=True, bind_return_key=True, tooltip='仿真评估表')],]#文本提示
对于一名非颜值主义者,五官跟着三观走的人来说没有什么很好的美术设计功底与概念 简单来说:我不会作美化 |
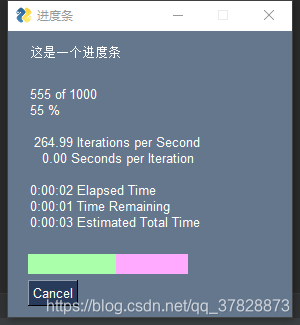 进度条上的英文是自动产生的,我目前没有找到消除或者修改内容的方法。


【本文地址】