MAC与PHY调试遇到的那些坑 · JasonWang's Blog |
您所在的位置:网站首页 › mdc怎么读 › MAC与PHY调试遇到的那些坑 · JasonWang's Blog |
MAC与PHY调试遇到的那些坑 · JasonWang's Blog
|
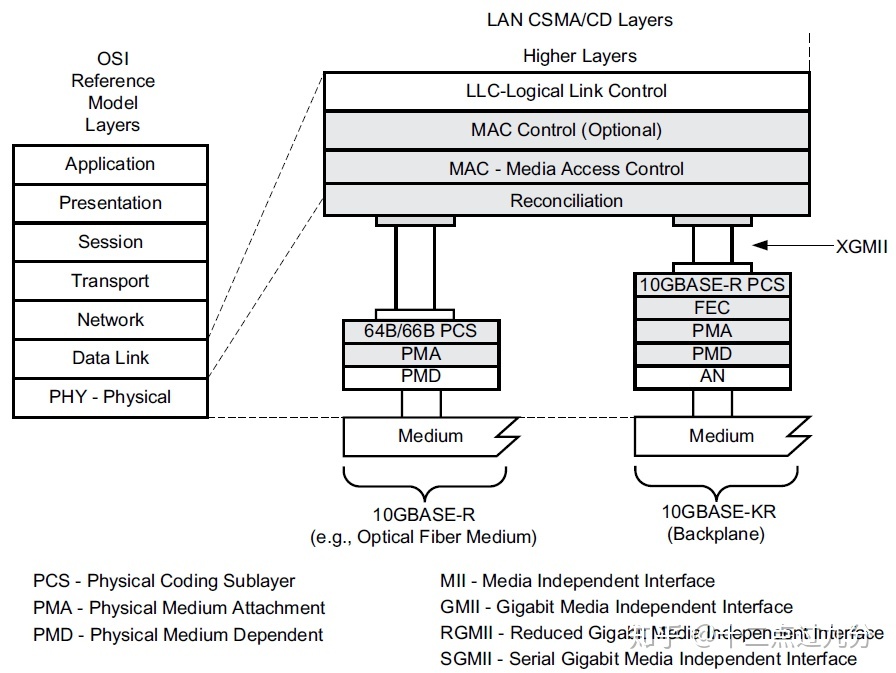
这次新平台采用了与之前不同的以太网方案, MAC是内置在SoC(System On Chip)上,而PHY采用了Marvell的一款100Mps的车规级的芯片,MAC/PHY的驱动都要重新开发适配,工作难度比之前预想的要大了很多,完成时间比预想的慢了近一个星期。不过,往后看,这种直接与硬件打交道的经验很能锻炼人,在一定程度改善了我对系统的认知与理解。这篇文章重点在梳理总结下车在以太网MAC/PHY遇到的一些问题,以及Linux下MAC/PHY驱动的一些基本流程。 大致分为如下几个部分: MAC/PHY的基础知识 Linux下MAC/PHY驱动的加载流程 PHY驱动的开发与适配 车载以太网MAC/PHY调试的一些经验总结 MAC/PHY的基本概念MAC即媒介访问控制层(Media Access Control, 位于TCP/IP协议栈的第二层-数据链路层,用于数据传输过程的数据流控制,其将上层IP数据包分割成适合于物理层传输的数据帧,并负责数据传输的冲突管理。按照 IEEE Std 802-2001 上的定义,MAC主要做如下几个事情: 数据帧的封装与识别 根据MAC地址来与目标主机进行通讯 检测数据传输错误(MAC帧中有一个FCS, Frame Checksum Sequence) 物理媒介的访问控制,半双工情况下需要进行传输冲突控制,如CSMA/CD而PHY(Physical layer)即物理层, 其主要负责物理信号的传输, 其通过线束(如光纤/铜线)与其他设备进行连接。一个PHY芯片主要包含了两个部分: PCS(Physical Coding Sublayer), PMD(Physical Medium Dependent), 对车载PHY芯片来说,通常还包含了一个PMA(Physical Media Attachment)子层, 位于PCS与PMD之间; 下图是一个以太网的大致结构图:
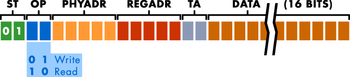
那么,MAC与PHY是具体如何通讯的? 其通讯接口实际分控制接口与数据接口。控制接口是用于访问控制PHY的寄存器的MDIO(Management Data Input/Output)/MDC(Management Data Clock), 其中MDIO是数据传输用,而MDC是为MDIO的访问提供时序。MDIO最初是在IEEE RFC802.3中定义,只有Clause22一种标准,允许MAC访问32个PHY的寄存器;后来,为了适应千兆以太网PHY,提供了clause45协议,最多支持65,536个寄存器的访问,同时兼容clause22的方式来访问clause45的寄存器。下图是Clause22协议访问PHY寄存器的帧结构:
其中: ST(2bits): SOF(start of frame), 对Clause22来说是01 OP(2bits): 操作码, 读或写(01-write/10-read) PHYADDR(5bits): PHY的物理地址,这个与硬件配置有关 REGADDR(5bits): 32位寄存器地址 TA(2bits): 从STA(MAC)到MMD(PHY)总线使用权切换所需要的翻转时间(turnaround time) DATA(16bits): 数据,写寄存器是MAC将数据放到该位置; 读寄存器时PHY将结果放入该位置更多关于MDIO的两种协议Clause22/Cluase45的信息可以参考:MDIO background 除了控制接口,MAC/PHY之间还有数据传输的接口MII(Media Independent Interface), 针对不同的应用场景,目前已有RMII(Reduced MII), GMII(Gigabit MII), RGMII(Reduced Gigabit MII), SGMII(Serial Gigabit MII), XGMII(10-gigabit MII)等多种接口。 Linux中MAC/PHY驱动的启动流程这里讲MAC/PHY驱动,不会涉及具体的芯片,只分析MAC/PHY启动的关键流程。总的来说, MAC/PHY启动大致有几个步骤: 内核加载MAC驱动 MAC驱动对MAC/PHY芯片上电,并读取PHY的状态寄存器确认PHY正常上电 MAC注册一个MDIO总线对象,提供PHY寄存器操作的接口 MAC获取到MDIO总线上的PHY设备,并将其与MAC对应的网络设备进行连接 用户进程进行了interface up的操作并配置IP,MAC与PHY可以准备接发数据这里只讲述下与硬件平台无关的核心部分流程(中间三个部分): MDIO总线访问接口注册在MAC/PHY都正常上电后, MAC驱动需要注册一个MDIO的总线接口供后续PHY驱动读写寄存器使用,接口位于include/linux/phy.h: 123456static inline struct mii_bus *mdiobus_alloc(void){ return mdiobus_alloc_size(0);}mdiobus_alloc_size(0)为mii_bus对象分配内存空间: 123456789101112131415161718192021222324252627282930struct mii_bus *mdiobus_alloc_size(size_t size){ struct mii_bus *bus; size_t aligned_size = ALIGN(sizeof(*bus), NETDEV_ALIGN); size_t alloc_size; int i; /* If we alloc extra space, it should be aligned */ if (size) alloc_size = aligned_size + size; else alloc_size = sizeof(*bus); bus = kzalloc(alloc_size, GFP_KERNEL); if (!bus) return NULL; bus->state = MDIOBUS_ALLOCATED; if (size) bus->priv = (void *)bus + aligned_size; /* Initialise the interrupts to polling */ for (i = 0; i < PHY_MAX_ADDR; i++) bus->irq[i] = PHY_POLL; return bus;}EXPORT_SYMBOL(mdiobus_alloc_size);这个结构mii_bus对象即是MAC与PHY之间控制访问的接口,主要包括了用于访问PHY寄存器的函数read/write以及用于PHY芯片软复位的reset函数,这三个函数通常需要在MAC驱动根据实际的PHY寄存器访问协议来实现;另外还包括了mdio总线所包含的所有PHY设备mdio_map(最多支持32个PHY)。 123456789101112131415161718192021222324252627282930313233343536373839404142434445464748495051/* * The Bus class for PHYs. Devices which provide access to * PHYs should register using this structure */struct mii_bus { struct module *owner; const char *name; char id[MII_BUS_ID_SIZE]; void *priv; int (*read)(struct mii_bus *bus, int addr, int regnum); int (*write)(struct mii_bus *bus, int addr, int regnum, u16 val); int (*reset)(struct mii_bus *bus); /* * A lock to ensure that only one thing can read/write * the MDIO bus at a time */ struct mutex mdio_lock; struct device *parent; enum { MDIOBUS_ALLOCATED = 1, MDIOBUS_REGISTERED, MDIOBUS_UNREGISTERED, MDIOBUS_RELEASED, } state; struct device dev; /* list of all PHYs on bus */ struct mdio_device *mdio_map[PHY_MAX_ADDR]; /* PHY addresses to be ignored when probing */ u32 phy_mask; /* PHY addresses to ignore the TA/read failure */ u32 phy_ignore_ta_mask; /* * An array of interrupts, each PHY's interrupt at the index * matching its address */ int irq[PHY_MAX_ADDR]; /* GPIO reset pulse width in microseconds */ int reset_delay_us; /* RESET GPIO descriptor pointer */ struct gpio_desc *reset_gpiod;};初始化完mii_bus后, MAC驱动会通过mdiobus_register注册该对象; 在这里,做的最重要的一个事情就是扫描所有MDIO下面的PHY设备,并将其保存到mdio_map中: 123456789101112131415161718192021222324252627282930313233343536373839404142434445464748495051525354555657585960616263646566676869707172737475767778798081828384int __mdiobus_register(struct mii_bus *bus, struct module *owner){ struct mdio_device *mdiodev; int i, err; struct gpio_desc *gpiod; if (NULL == bus || NULL == bus->name || NULL == bus->read || NULL == bus->write) return -EINVAL; BUG_ON(bus->state != MDIOBUS_ALLOCATED && bus->state != MDIOBUS_UNREGISTERED); bus->owner = owner; bus->dev.parent = bus->parent; bus->dev.class = &mdio_bus_class; bus->dev.groups = NULL; dev_set_name(&bus->dev, "%s", bus->id); err = device_register(&bus->dev); if (err) { pr_err("mii_bus %s failed to register\n", bus->id); return -EINVAL; } mutex_init(&bus->mdio_lock); /* de-assert bus level PHY GPIO reset */ gpiod = devm_gpiod_get_optional(&bus->dev, "reset", GPIOD_OUT_LOW); if (IS_ERR(gpiod)) { dev_err(&bus->dev, "mii_bus %s couldn't get reset GPIO\n", bus->id); device_del(&bus->dev); return PTR_ERR(gpiod); } else if (gpiod) { bus->reset_gpiod = gpiod; gpiod_set_value_cansleep(gpiod, 1); udelay(bus->reset_delay_us); gpiod_set_value_cansleep(gpiod, 0); } if (bus->reset) bus->reset(bus); // 扫描所有PHY设备 for (i = 0; i < PHY_MAX_ADDR; i++) { if ((bus->phy_mask & (1 state = MDIOBUS_REGISTERED; pr_info("%s: probed\n", bus->name); return 0;error: while (--i >= 0) { mdiodev = bus->mdio_map[i]; if (!mdiodev) continue; mdiodev->device_remove(mdiodev); mdiodev->device_free(mdiodev); } /* Put PHYs in RESET to save power */ if (bus->reset_gpiod) gpiod_set_value_cansleep(bus->reset_gpiod, 1); device_del(&bus->dev); return err;} 扫描MIDO总线的PHY设备函数mdiobus_scan首先调用get_phy_device获取指定地址上的PHY设备ID,并创建一个 phy_device对象,然后通过phy_device_register初始化创建的phy_device对象: 12345678910111213141516171819202122232425struct phy_device *mdiobus_scan(struct mii_bus *bus, int addr){ struct phy_device *phydev; int err; phydev = get_phy_device(bus, addr, false); if (IS_ERR(phydev)) return phydev; /* * For DT, see if the auto-probed phy has a correspoding child * in the bus node, and set the of_node pointer in this case. */ of_mdiobus_link_mdiodev(bus, &phydev->mdio); err = phy_device_register(phydev); if (err) { phy_device_free(phydev); return ERR_PTR(-ENODEV); } return phydev;}函数get_phy_id通过读取MII_PHYSID1/MII_PHYSID2两个PHY的ID寄存器获取PHY的ID,这里mdiobus_read正是之前MAC实现的mii_bus的中的read接口,如果该接口实现有问题,MAC就无法正常与PHY进行通讯。另外需要注意的是,默认情况下,Linux都是基于MDIO的Clause22协议来访问PHY的寄存器的(调试PHY驱动的时候需要留意)。 123456789101112131415161718192021222324252627static int get_phy_id(struct mii_bus *bus, int addr, u32 *phy_id, bool is_c45, struct phy_c45_device_ids *c45_ids){ int phy_reg; if (is_c45) return get_phy_c45_ids(bus, addr, phy_id, c45_ids); /* Grab the bits from PHYIR1, and put them in the upper half */ phy_reg = mdiobus_read(bus, addr, MII_PHYSID1); if (phy_reg < 0) return -EIO; *phy_id = (phy_reg & 0xffff) mdio); if (err) return err; /* Run all of the fixups for this PHY */ err = phy_scan_fixups(phydev); if (err) { pr_err("PHY %d failed to initialize\n", phydev->mdio.addr); goto out; } phydev->mdio.dev.groups = phy_dev_groups; err = device_add(&phydev->mdio.dev); if (err) { pr_err("PHY %d failed to add\n", phydev->mdio.addr); goto out; } return 0; out: mdiobus_unregister_device(&phydev->mdio); return err;} MAC与PHY进行匹配连接通过mdiobus_get_phy这个接口,MAC获取到当前MDIO总线上对应物理地址的PHY设备,然后通过phy_connect_direct将MAC对应的网络设备与PHY设备进行连接绑定: 123456789101112131415161718192021222324252627282930/** * phy_connect_direct - connect an ethernet device to a specific phy_device * @dev: the network device to connect * @phydev: the pointer to the phy device * @handler: callback function for state change notifications * @interface: PHY device's interface */int phy_connect_direct(struct net_device *dev, struct phy_device *phydev, void (*handler)(struct net_device *), phy_interface_t interface){ int rc; if (!dev) return -EINVAL; rc = phy_attach_direct(dev, phydev, phydev->dev_flags, interface); if (rc) return rc; phy_prepare_link(phydev, handler); phy_start_machine(phydev); if (phydev->irq > 0) phy_start_interrupts(phydev); return 0;}将MAC网络设备与PHY进行绑定,并进行初始化,如进行PHY的软复位; 这里要注意的时,PHY的驱动要根据PHYID提前做好适配,不然这里的d->driver值未空,就无法正常进行phy的初始化了,网络自然无法正常工作。 123456789101112131415161718192021222324252627282930313233343536373839404142434445464748495051525354555657585960616263646566676869707172737475767778798081828384858687888990919293949596979899100101int phy_attach_direct(struct net_device *dev, struct phy_device *phydev, u32 flags, phy_interface_t interface){ struct module *ndev_owner = dev->dev.parent->driver->owner; struct mii_bus *bus = phydev->mdio.bus; struct device *d = &phydev->mdio.dev; bool using_genphy = false; int err; ... get_device(d); /* Assume that if there is no driver, that it doesn't * exist, and we should use the genphy driver. */ if (!d->driver) { if (phydev->is_c45) d->driver = &genphy_10g_driver.mdiodrv.driver; else d->driver = &genphy_driver.mdiodrv.driver; using_genphy = true; } if (!try_module_get(d->driver->owner)) { dev_err(&dev->dev, "failed to get the device driver module\n"); err = -EIO; goto error_put_device; } if (using_genphy) { err = d->driver->probe(d); if (err >= 0) err = device_bind_driver(d); if (err) goto error_module_put; } ... phydev->phy_link_change = phy_link_change; phydev->attached_dev = dev; dev->phydev = phydev; /* Some Ethernet drivers try to connect to a PHY device before * calling register_netdevice() -> netdev_register_kobject() and * does the dev->dev.kobj initialization. Here we only check for * success which indicates that the network device kobject is * ready. Once we do that we still need to keep track of whether * links were successfully set up or not for phy_detach() to * remove them accordingly. */ phydev->sysfs_links = false; err = sysfs_create_link(&phydev->mdio.dev.kobj, &dev->dev.kobj, "attached_dev"); if (!err) { err = sysfs_create_link_nowarn(&dev->dev.kobj, &phydev->mdio.dev.kobj, "phydev"); if (err) { dev_err(&dev->dev, "could not add device link to %s err %d\n", kobject_name(&phydev->mdio.dev.kobj), err); /* non-fatal - some net drivers can use one netdevice * with more then one phy */ } phydev->sysfs_links = true; } phydev->dev_flags = flags; phydev->interface = interface; phydev->state = PHY_READY; /* Initial carrier state is off as the phy is about to be * (re)initialized. */ netif_carrier_off(phydev->attached_dev); /* Do initial configuration here, now that * we have certain key parameters * (dev_flags and interface) */ err = phy_init_hw(phydev); if (err) goto error; phy_resume(phydev); phy_led_triggers_register(phydev); return err; ...}有关PHY驱动与PHY设备如何进行匹配的实现细节,可以参考Linux内核的文档: /kernel/msm-4.14/Documentation/driver-model/*.txt 下面一部分我们就简单看下如何开发一个PHY驱动. PHY驱动开发Linux中PHY的驱动已经有了很完整的框架, 对于开发者来说, 只需要实现对应框架struct phy_driver的几个关键接口就可以了. 一般来说, 需要指定或者实现: phy_id: PHY对应的ID, 这个可以找供应商要或者在MAC驱动里读取打印出来 phy_id_mask: 决定如何比较PHY ID name: PHY的名字 features: PHY的配置特性, 包括速率/单双工配置 config_init: PHY初始化配置, 配置关键寄存器如Master/Slave probe: 驱动初始化函数, 分配内存以及添加文件节点等 read_status: 读取Link状态寄存器 ack_interrupt: 清除PHY中断寄存器 config_intr: 配置PHY中断寄存器 did_interrupt: 确认PHY是否产生中断 suspend/resume: 休眠唤醒的回调接口 12345678910111213141516171819202122232425262728293031323334353637383940414243444546struct phy_driver { struct mdio_driver_common mdiodrv; u32 phy_id; char *name; unsigned int phy_id_mask; u32 features; u32 flags; const void *driver_data; ... /* * Called to initialize the PHY, * including after a reset */ int (*config_init)(struct phy_device *phydev); /* * Called during discovery. Used to set * up device-specific structures, if any */ int (*probe)(struct phy_device *phydev); /* PHY Power Management */ int (*suspend)(struct phy_device *phydev); int (*resume)(struct phy_device *phydev); ... /* Determines the negotiated speed and duplex */ int (*read_status)(struct phy_device *phydev); /* Clears any pending interrupts */ int (*ack_interrupt)(struct phy_device *phydev); /* Enables or disables interrupts */ int (*config_intr)(struct phy_device *phydev); /* * Checks if the PHY generated an interrupt. * For multi-PHY devices with shared PHY interrupt pin */ int (*did_interrupt)(struct phy_device *phydev); ...};实现驱动后, 只需要通过module_phy_driver(marvell_drivers)将驱动注册到系统, 然后内核在初始化时会根据PHY ID去匹配对应的驱动实现. 具体如何实现这些接口, 可以参考Linux中已有的实现marvell.c/micrel.c, 当然更重要的是参考供应商提供的PHY芯片手册, 确保寄存器状态配置正常. MAC/PHY调试容易踩到的坑一般来说,MAC跟PHY的连接有这么几种形式: MAC/PHY都采用独立的芯片,MAC通过PCI总线接入到系统 MAC集成到SoC上,PHY采用外接芯片的形式 MAC/PHY集成在一个芯片上,然后通过PCI总线接入到系统现在也开始采用另外一种连接方式: MAC集成到SoC上, 与一个Switch的MAC端口通过如RGMII接口直连(不再有PHY设备了), 即MAC直连, 这种只需要在MAC驱动添加一个虚拟的FIXED PHY, EMAC就可以正常工作, 可以参考FIXED PHY driver;或者Linux源代码 对现如今集成度越来越高的系统来说,很多SoC都会采用将MAC集成到系统,采用EMAC(Embedded MAC)的形式,这样简化了硬件与软件的设计,对于开发人员来说最主要的工作就是PHY驱动以及相关协议的适配了。由于之前对MAC/PHY驱动的工作接触不多,这次是第一次完全从零开发以太网驱动,遇到了不少坑,总结下主要有如下几点: MAC/PHY之间的通讯实际上都是标准的MDIO/MII接口,相对而言都比较成熟了,驱动适配首先还是要确保使用的接口,比如是RGMII还是GMII,两者要一致; 另外速率要保持一致,比如MAC配置成100Mbps,同样PHY要对应是100Mbps,否则以太网可能没法工作 如今的PHY都支持千兆网速了,所以很多PHY都开始支持clause45的协议寄存器的访问,有些PHY是clause22/clause45都支持,有些PHY则只支持clause45,这个是比较容易出问题的地方。使用正确的MDIO协议访问寄存器才能正常读到PHY芯片的状态 最后也是很重要的一点,认真读下厂商提供的PHY芯片手册,以及硬件设计的要点,避免踩到不必要的坑总的说来,梳理好MAC/PHY的流程,再进行驱动开发就会顺手不少。 原文作者:Jason Wang 更新日期:2022-05-05, 18:36:22 版权声明:本文采用知识共享署名-非商业性使用 4.0 国际许可协议进行许可 Next Post 不得不说的2020 Previous Post 汽车网络演化-从CAN到以太网 |
【本文地址】