PointNetGPD使用手册 |
您所在的位置:网站首页 › mc指令下载安装 › PointNetGPD使用手册 |
PointNetGPD使用手册
|
1.创建环境+配置环境变量
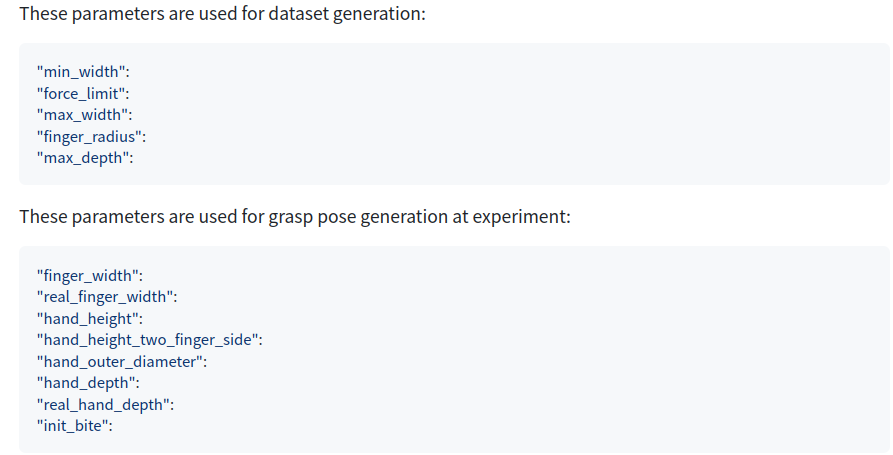
mkdir -p $HOME/code/ cd $HOME/code/ - Set environment variable `PointNetGPD_FOLDER` in your `$HOME/.bashrc` file. export PointNetGPD_FOLDER=$HOME/code/PointNetGPD 2.安装1. Install `pcl-tools` via `sudo apt install pcl-tools`. 2. An example for create a virtual environment: `conda create -n pointnetgpd python=3.10 numpy ipython matplotlib opencv mayavi -c conda-forge` 3. Make sure in your Python environment do not have same package named ```meshpy``` or ```dexnet```. 4. Install PyTorch: https://pytorch.org/get-started/locally/ 3.项目1. Clone this repository: cd $HOME/codegit clone https://github.com/lianghongzhuo/PointNetGPD.git 2. Install our requirements in `requirements.txt` cd $PointNetGPD_FOLDER pip install -r requirements.txt 3. Install our modified meshpy (Modify from [Berkeley Automation Lab: meshpy](https://github.com/BerkeleyAutomation/meshpy)) cd $PointNetGPD_FOLDER/meshpy python setup.py develop 4. Install our modified dex-net (Modify from [Berkeley Automation Lab: dex-net](https://github.com/BerkeleyAutomation/dex-net)) cd $PointNetGPD_FOLDER/dex-net python setup.py develop 5. Modify the gripper configurations to your own gripper vim $PointNetGPD_FOLDER/dex-net/data/grippers/robotiq_85/params.json 1.下载作者生成好的数据集: https://tams.informatik.uni-hamburg.de/research/datasets/PointNetGPD_grasps_dataset.zip 2.修改文件夹名字为`ycb_grasp`并移动到`$PointNetGPD_FOLDER/PointNetGPD/data/` 4.1 自己生成数据集1. 下载YCB数据集:(http://ycb-benchmarks.s3-website-us-east-1.amazonaws.com/). 1.1 用命令下载数据集(https://github.com/lianghongzhuo/ycb-tools). cd $PointNetGPD_FOLDER/data git clone https://github.com/lianghongzhuo/ycb-tools cd ycb-tools python download_ycb_dataset.py rgbd_512 2. 数据集里内容格式:Manage your dataset at: `$PointNetGPD_FOLDER/PointNetGPD/data` Every object should have a folder, structure like this: ``` ├002_master_chef_can |└── google_512k | ├── nontextured.obj (generated by pcl-tools) | ├── nontextured.ply | ├── nontextured.sdf (generated by SDFGen) |└── rgbd | ├── *.jpg | ├── *.h5 | ├── ... ├003_cracker_box └004_sugar_box ... ``` 3. Install SDFGen from [GitHub](https://github.com/jeffmahler/SDFGen.git): cd $PointNetGPD_FOLDER git clone https://github.com/jeffmahler/SDFGen.git cd SDFGen && mkdir build && cd build && cmake .. && make 4. Install [Open3D](http://www.open3d.org/docs/latest/getting_started.html) pip install open3d 5. Generate `nontextured.sdf` file and `nontextured.obj` file using `pcl-tools` and `SDFGen` by running: cd $PointNetGPD_FOLDER/dex-net/apps python read_file_sdf.py 6. Generate dataset by running the code: cd $PointNetGPD_FOLDER/dex-net/apps python generate-dataset-canny.py [prefix] where `[prefix]` is optional, it will add a prefix on the generated files. 5. 可视化结果- Visualization grasps可视化抓取 cd $PointNetGPD_FOLDER/dex-net/apps python read_grasps_from_file.py Note: - This file will visualize the grasps in `$PointNetGPD_FOLDER/PointNetGPD/data/ycb_grasp/` folder - Visualization object normal可视化法线 cd $PointNetGPD_FOLDER/dex-net/apps python Cal_norm.py This code will check the norm calculated by `meshpy` and `pcl` library. 6.训练网络Training the network1. YCB数据准备: cd $PointNetGPD_FOLDER/PointNetGPD/data Make sure you have the following files, The links to the dataset directory should add by yourself: ``` ├── google2cloud.csv (Transform from google_ycb model to ycb_rgbd model) ├── google2cloud.pkl (Transform from google_ycb model to ycb_rgbd model) └── ycb_grasp (generated grasps) ``` 2.从RGBD图像中生成点云 you may change the number of process running in parallel if you use a shared host with others cd $PointNetGPD_FOLDER/PointNetGPD python ycb_cloud_generate.py Note: Estimated running time at our `Intel(R) Xeon(R) CPU E5-2690 v4 @ 2.60GHz` dual CPU with 56 Threads is 36 hours. Please also remove objects beyond the capacity of the gripper. 7. Run the experiments:cd $PointNetGPD_FOLDER/PointNetGPD Launch a tensorboard for monitoring tensorboard --log-dir ./assets/log --port 8080 and run an experiment for 200 epoch python main_1v.py --epoch 200 --mode train --batch-size x (x>1) File name and corresponding experiment: ``` main_1v.py --- 1-viewed point cloud, 2 class——单视角点云+2类 main_1v_mc.py --- 1-viewed point cloud, 3 class——单视角点云+3类 main_1v_gpd.py --- 1-viewed point cloud, GPD——单视角点云+GPD main_fullv.py --- Full point cloud, 2 class——整个点云+2类 main_fullv_mc.py --- Full point cloud, 3 class——整个点云+3类 main_fullv_gpd.py --- Full point cloud, GPD——整个点云+GPD ``` For GPD experiments, you may change the input channel number by modifying `input_chann` in the experiment scripts(only 3 and 12 channels are available) 8. 使用训练的网络Using the trained network1. Get UR5 robot state: Goal of this step is to publish a ROS parameter tell the environment whether the UR5 robot is at home position or not. cd $PointNetGPD_FOLDER/dex-net/apps python get_ur5_robot_state.py 2. Run perception code: This code will take depth camera ROS info as input, and gives a set of good grasp candidates as output. All the input, output messages are using ROS messages. cd $PointNetGPD_FOLDER/dex-net/apps python kinect2grasp.py arguments: -h, --help show this help message and exit --cuda using cuda for get the network result --gpu GPU set GPU number --load-model LOAD_MODEL set witch model you want to use (rewrite by model_type, do not use this arg) --show_final_grasp show final grasp using mayavi, only for debug, not working on multi processing --tray_grasp not finished grasp type --using_mp using multi processing to sample grasps --model_type MODEL_TYPE selet a model type from 3 existing models ``` |
【本文地址】
今日新闻 |
推荐新闻 |