【Maya绑定】三点式IK骨架的比例拉伸 |
您所在的位置:网站首页 › mayaik控制器怎么绑定 › 【Maya绑定】三点式IK骨架的比例拉伸 |
【Maya绑定】三点式IK骨架的比例拉伸
|
前言
原理之前在这篇文档讲过,纯属于自嗨产物,大概只有自己能看得懂写了啥。然后根据这个思路实现。这篇主要目的就是复习下节点编辑器。maya节点编辑器的手感真的稀烂。 这个系列都是挖的国外的某个教程,不太适合我这种彩笔,操作真的飞快。 代码实现我还是觉得代码最清晰,先放代码 def add_ik_stretch(side, part, ik_chain, base_ctrl, local_ctrl, world_ctrl,primary_axis): base_name = side +'_' + part # start to end distance limb_dist = cmds.createNode('distanceBetween', name=base_name+'_DIST') # cinditon node limb_cnd = cmds.createNode('condition', name=base_name+'CND') # allocate locater, get transform node start_LOC = cmds.spaceLocator(name=base_name+'_start_LOC')[0] end_LOC = cmds.spaceLocator(name=base_name+'_end_LOC')[0] stretch_mdn = cmds.createNode('multiplyDivide', name=base_name+'_stretch_MDN') # calculate section length length_a = distance_between(ik_chain[0],ik_chain[1]) length_b = distance_between(ik_chain[1], ik_chain[2]) total_length = length_b + length_a # measure start-end desired direct distance # move the loc first cmds.pointConstraint(base_ctrl, start_LOC, maintainOffset=False) cmds.pointConstraint(local_ctrl, end_LOC, maintainOffset=False) connectAttr(start_LOC, 'worldMatrix[0]', limb_dist, 'inMatrix1') connectAttr(end_LOC, 'worldMatrix[0]', limb_dist, 'inMatrix2') # length ratio connectAttr(limb_dist, 'distance', stretch_mdn,'input1X') cmds.setAttr(stretch_mdn+'.input2X', total_length)#set devision cmds.setAttr(stretch_mdn+'.operation', 2) connectAttr(limb_dist,'distance',limb_cnd,'firstTerm') connectAttr(stretch_mdn,'outputX', limb_cnd,'colorIfTrueR') cmds.setAttr(limb_cnd+'.secondTerm', total_length) cmds.setAttr(limb_cnd+'.operation',3) # switch stretch cmds.addAtter(world_ctrl, attributeType='double', min=0, max=1, defaultValue=1, keyable=True, longName='stretch') up_name = 'up' + part.title() lo_name = 'lo' + part.title() cmds.addAtter(world_ctrl, attributeType='double', defaultValue=1, keyable=True, longName='up_name') cmds.addAtter(world_ctrl, attributeType='double', defaultValue=1, keyable=True, longName='lo_name') stretch_bta = cmds.createNode('blendTwoAttr', name = base_name+'_BTA') cmds.setAttr(stretch_bta+'.input[0]', 1) connectAttr(limb_cnd,'outColorR',stretch_bta,'input[1]') connectAttr(world_ctrl,'stretch',stretch_bta,'attributesBlender') up_pma = cmds.createNode('plusMinusAverage', name=up_name+'_PMA') lo_pma = cmds.createNode('plusMinusAverage', name=lo_name + '_PMA') connectAttr(world_ctrl, up_name, up_pma, 'input1D[0]') connectAttr(world_ctrl, lo_name, lo_pma, 'input1D[0]') connectAttr(stretch_bta, 'output', up_pma, 'input1D[1]') connectAttr(stretch_bta, 'output', lo_pma, 'input1D[1]') cmds.setAttr(up_pma+'.input1D[2]', -1) cmds.setAttr(lo_pma + '.input1D[2]', -1) connectAttr(up_pma,'output1D', ik_chain[0],'scale'+primary_axis[-1]) connectAttr(lo_pma,'output1D', ik_chain[1],'scale'+primary_axis[-1]) return_dict = {'measure_locs': [start_LOC, end_LOC], 'total_length': total_length, 'mdn': stretch_mdn, 'cnd': limb_cnd} return return_dict 过程解释 获取effectors变换信息我们首先创建两个个定位器,将定位器移动到start以及end effector的位置。 start_effector位置事先被base_ctrl(start_effector)记录了 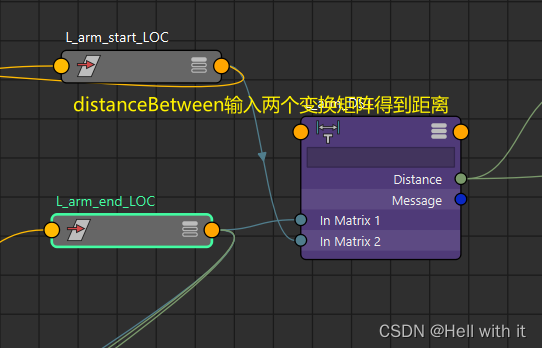 # start to end distance
limb_dist = cmds.createNode('distanceBetween', name=base_name+'_DIST')
···
connectAttr(start_LOC, 'worldMatrix[0]', limb_dist, 'inMatrix1')
connectAttr(end_LOC, 'worldMatrix[0]', limb_dist, 'inMatrix2')
# start to end distance
limb_dist = cmds.createNode('distanceBetween', name=base_name+'_DIST')
···
connectAttr(start_LOC, 'worldMatrix[0]', limb_dist, 'inMatrix1')
connectAttr(end_LOC, 'worldMatrix[0]', limb_dist, 'inMatrix2')
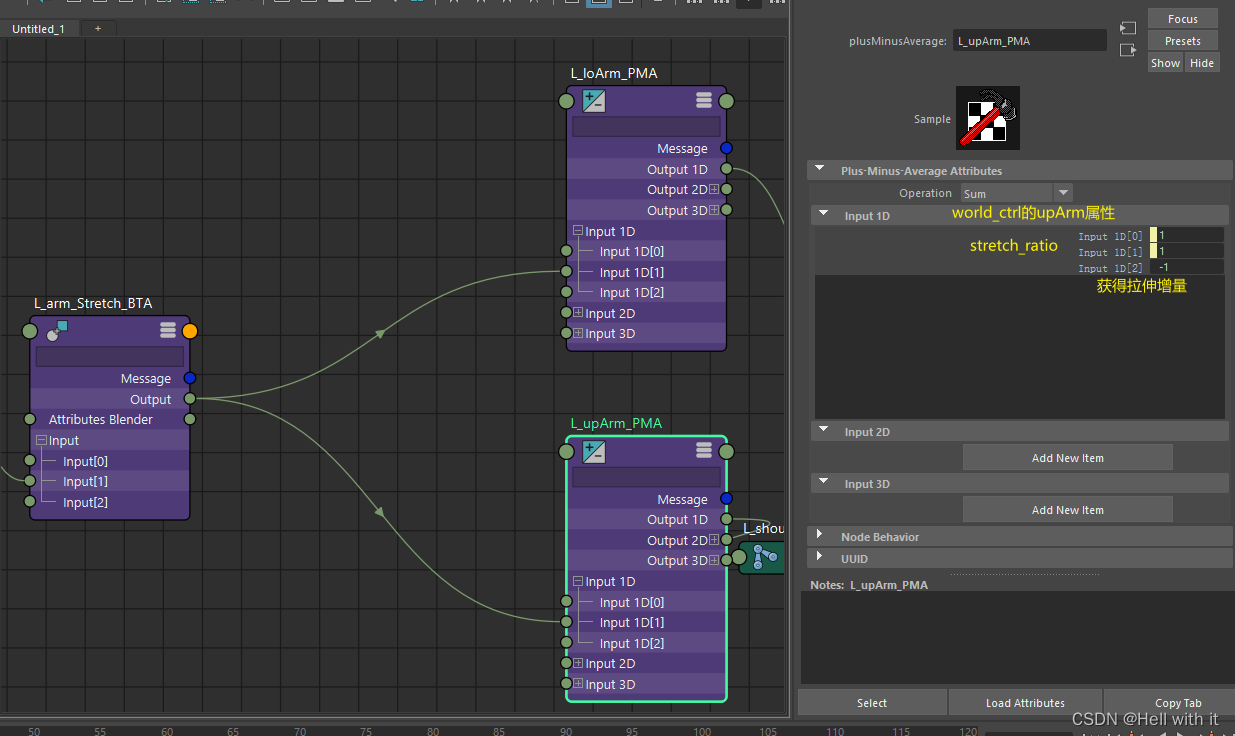
模型上臂和下臂的距离和他们的总和total_length length_a = distance_between(ik_chain[0],ik_chain[1]) length_b = distance_between(ik_chain[1], ik_chain[2]) total_length = length_b + length_a 获得拉伸stretch比例tips:下面的函数connectAttr()是我自己重写的cmds的方法,作用都是一样的 stretch_mdn = cmds.createNode('multiplyDivide', name=base_name+'_stretch_MDN') ··· # length ratio connectAttr(limb_dist, 'distance', stretch_mdn,'input1X') cmds.setAttr(stretch_mdn+'.input2X', total_length)#set devision cmds.setAttr(stretch_mdn+'.operation', 2)
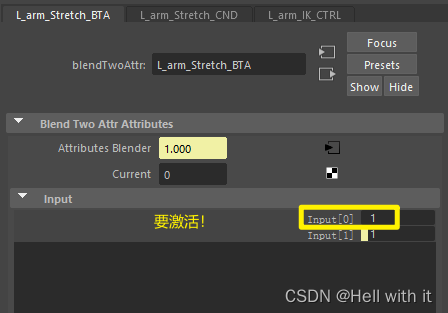
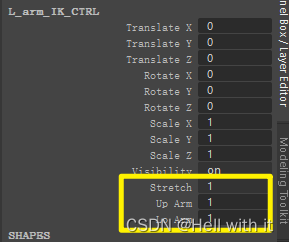
这个道理是: effectors距离>=模型手臂总长时,启用之前计算的strech ratio,否则就是1 我们这里添加新属性是在local_ctrl的父控制器world_ctrl上,这俩玩意的pivot世界位置是一样的 # switch stretch cmds.addAtter(world_ctrl, attributeType='double', min=0, max=1, defaultValue=1, keyable=True, longName='stretch') up_name = 'up' + part.title() lo_name = 'lo' + part.title() cmds.addAtter(world_ctrl, attributeType='double', defaultValue=1, keyable=True, longName='up_name') cmds.addAtter(world_ctrl, attributeType='double', defaultValue=1, keyable=True, longName='lo_name')
 获得部件的拉伸以及实现上下骨架缩放
up_pma = cmds.createNode('plusMinusAverage', name=up_name+'_PMA')
lo_pma = cmds.createNode('plusMinusAverage', name=lo_name + '_PMA')
connectAttr(world_ctrl, up_name, up_pma, 'input1D[0]')
connectAttr(world_ctrl, lo_name, lo_pma, 'input1D[0]')
connectAttr(stretch_bta, 'output', up_pma, 'input1D[1]')
connectAttr(stretch_bta, 'output', lo_pma, 'input1D[1]')
cmds.setAttr(up_pma+'.input1D[2]', -1)
cmds.setAttr(lo_pma + '.input1D[2]', -1)
获得部件的拉伸以及实现上下骨架缩放
up_pma = cmds.createNode('plusMinusAverage', name=up_name+'_PMA')
lo_pma = cmds.createNode('plusMinusAverage', name=lo_name + '_PMA')
connectAttr(world_ctrl, up_name, up_pma, 'input1D[0]')
connectAttr(world_ctrl, lo_name, lo_pma, 'input1D[0]')
connectAttr(stretch_bta, 'output', up_pma, 'input1D[1]')
connectAttr(stretch_bta, 'output', lo_pma, 'input1D[1]')
cmds.setAttr(up_pma+'.input1D[2]', -1)
cmds.setAttr(lo_pma + '.input1D[2]', -1)
以上就是大致的梳理过程还有很多细节没说,怕自己搞忘了,我也放上了节点编辑器版本的同功能mb文件,2020以上才能打开。 |
 同理end_effector被local_ctrl记录了,这个local_ctrl的作用是控制手,不过这里没有增加手的关节。
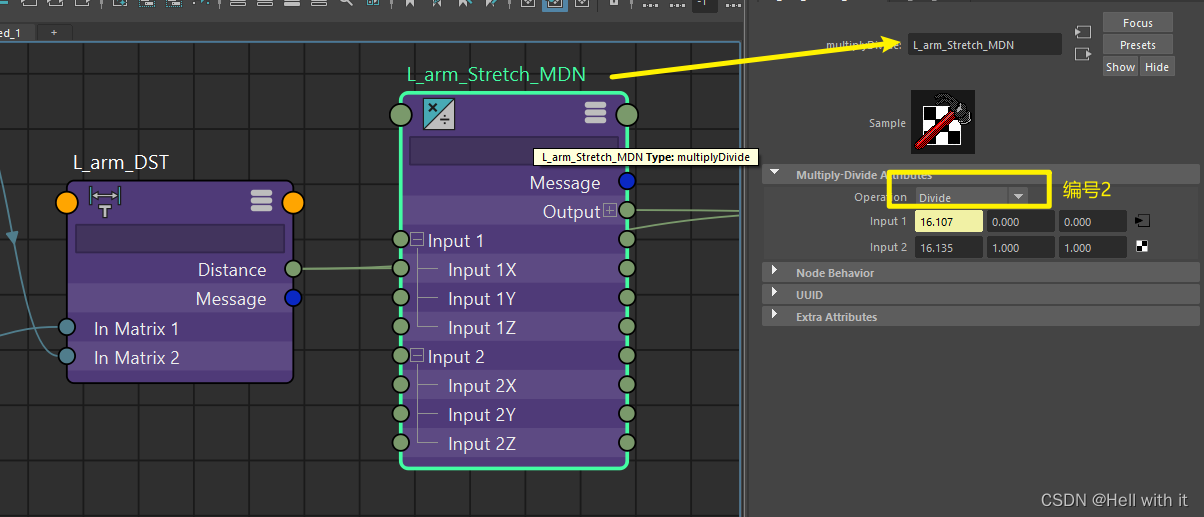 是加上就是stretch ratio = effectors的距离/模型手臂长,这个部分用了’multiplyDivide’这个节点完成。就很麻烦,要是要实现实时计算就必须用节点,除非是一直固定不变的值,比如模型手臂长这种constant我们可以离线计算
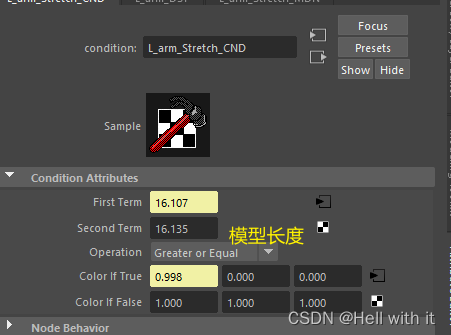
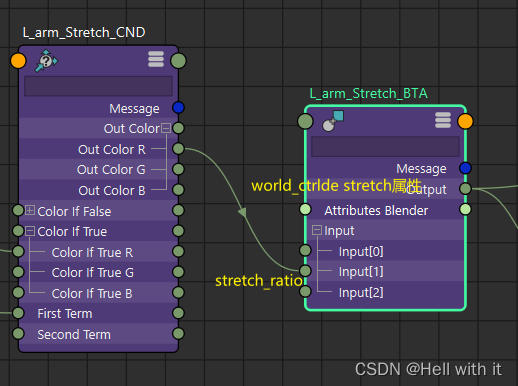
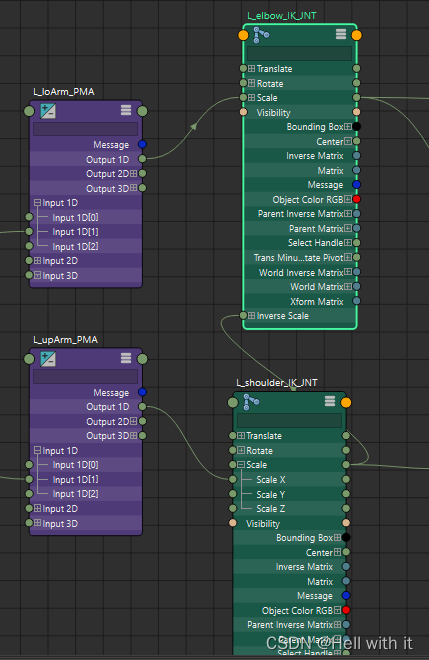 我们将已经按上图得到经过上下手臂的缩放因子衰减的stretch ratio用于IK关节的scale实现拉伸
【本文地址】
今日新闻 |
推荐新闻 |