谈谈Linux内核镜像 |
您所在的位置:网站首页 › linux镜像文件是什么 › 谈谈Linux内核镜像 |
谈谈Linux内核镜像
|
树莓派官方提供的Raspberry Pi OS固件中,boot分区内核的镜像文件命名为kernel7.img,而ubuntu官方提供的固件中,boot分区内核的镜像文件则为vmlinuz,这两者有什么区别?如何生成对应的镜像文件? 这里,我们有必要了解,常见的嵌入式系统中,内核镜像的格式有哪些,如何生成和使用。
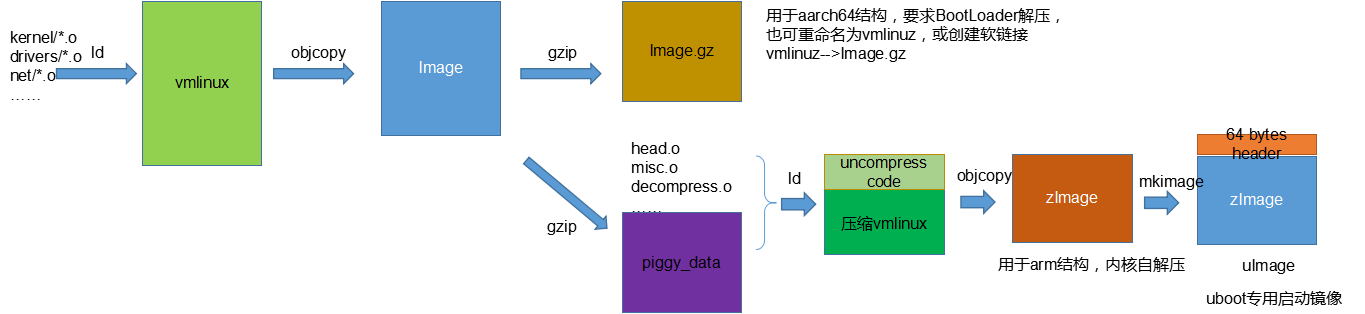
1、内核镜像格式 1.1 vmlinux vmlinux是整个内核编译的直接产物。这里提及的是“编译”。显然,内核主要是C语言实现,编译器对内核编译,同样是一般的编译过程:预处理、编译、汇编和链接。从文件的角度,它是ELF格式文件。比如我们通过gcc对*.c进行编译得到的可执行文件,就是属于ELF格式文件。这里vm代表Virtual Memory,Linux支持虚拟内存,因此得名vm。该文件一般在生成在内核源码根目录下。 通过readelf工具查看vmlinux的文件头信息: readelf -h vmlinux: ELF Header: Magic: 7f 45 4c 46 02 01 01 00 00 00 00 00 00 00 00 00 Class: ELF64 Data: 2's complement, little endian Version: 1 (current) OS/ABI: UNIX - System V ABI Version: 0 Type: DYN (Shared object file) Machine: AArch64 Version: 0x1 Entry point address: 0xffffffc010080000 Start of program headers: 64 (bytes into file) Start of section headers: 15358864 (bytes into file) Flags: 0x0 Size of this header: 64 (bytes) Size of program headers: 56 (bytes) Number of program headers: 5 Size of section headers: 64 (bytes) Number of section headers: 32 Section header string table index: 29以上可以看到,该内核镜像文件是在aarch64上运行的。
1.2 Image 在编译完内核时候,有如下打印信息: OBJCOPY arch/arm64/boot/Image的确,Image就在上面的目录下。那么OBJCOPY是什么操作?我们来看看实际执行的命令: ./arch/arm64/boot/.Image.cmd:1:cmd_arch/arm64/boot/Image := aarch64-linux-gnu-objcopy -O binary -R .note -R .note.gnu.build-id -R .comment -S vmlinux arch/arm64/boot/Image该命令的解析可以参照如下: objcopy -O binary -R .note -R .comment -S *.elf *.bin #使用 -O binary (或--out-target=binary) 输出为原始的二进制文件 #使用 -R .note (或--remove-section) 输出文件中不要.note这个section,缩小了文件尺寸 #使用 -R .comment(或--remove-section) 输出文件中不要.comment这个section,缩小了文件尺寸 #使用 -S (或 --strip-all)输出文件中不要重定位信息和符号信息,缩小了文件尺寸也即:Image是在vmlinux基础上,去掉不必要信息的二进制码(binary)
1.3 Image.gz 在编译树莓派64内核时,在boot目录下,也会发现该镜像文件。在编译过程,有: GZIP arch/arm64/boot/Image.gz实际上,Image.gz就是通过GZIP压缩工具对上述的Image进行压缩的产物。在编译时,也可以指定make image.gz。注意到,树莓派的Ubuntu提供的固件,其boot区存放的是vmlinuz,其实就是该压缩的Image,只不过是重命名为vmlinuz罢了。因此,也可以手动来生产树莓派ubuntu-arm64对应的内核镜像: gzip Image #执行后,Image将会变成Image.gz cp Image.gz vmlinuzarm64是在linux 3.7版本及之后方导入的arch,也是至此之后,内核生成aarch64的内核镜像都是通过gzip直接对Image压缩的,这和arm(32)的内核镜像不一样(详见后述)。如下是官方的说明: The AArch64 kernel does not currently provide a decompressor and therefore requires decompression (gzip etc.) to be performed by the boot loader if a compressed Image target (e.g. Image.gz) is used. For bootloaders that do not implement this requirement, the uncompressed Image target is available instead.也即:内核镜像vmlinuz/Image.gz,不再(像zImage)那样带有自解压代码,而是需要BootLoader去完成该部分工作,否则,就只能直接使用非解压的Image镜像。
1.4 zImage 我们在编译树莓派32位内核时,会有如下打印信息,基本可以宏观上看到整个生成过程。 LD vmlinux.o MODPOST vmlinux.o KSYM .tmp_kallsyms1.o KSYM .tmp_kallsyms2.o LD vmlinux SORTEX vmlinux SYSMAP System.map OBJCOPY arch/arm/boot/Image Kernel: arch/arm/boot/Image is ready LDS arch/arm/boot/compressed/vmlinux.lds AS arch/arm/boot/compressed/head.o GZIP arch/arm/boot/compressed/piggy_data CC arch/arm/boot/compressed/misc.o CC arch/arm/boot/compressed/decompress.o CC arch/arm/boot/compressed/string.o AS arch/arm/boot/compressed/hyp-stub.o AS arch/arm/boot/compressed/lib1funcs.o AS arch/arm/boot/compressed/ashldi3.o AS arch/arm/boot/compressed/bswapsdi2.o AS arch/arm/boot/compressed/piggy.o LD arch/arm/boot/compressed/vmlinux OBJCOPY arch/arm/boot/zImage Kernel: arch/arm/boot/zImage is ready 首先,zImage是基于Image生成的,和Image.gz不一样的地方是,zImage包含了自解压部分代码,并且不是直接压缩的产物。上面log也看到,piggy_data是在Image基础上压缩的,类似于Image.gz,同时与head.o/misc.o等,链接成vmlinux(显然该compress目录下的vmlinux不同于boot目录下的vmlinux)。最后,通过OBJCOPY,同样去掉一些不必要信息(符号、注释、调试信息等),得到最终的zImage。该镜像可以通过make zImage来生成。 因此,zImage是带有自解压代码的内核镜像文件。
1.5 bzImage bzImage是通过make bzImage命令来生成,其生成过程与zImage一样。如果内核比较小,那么可以采用zImage或bzImage之一,两种方式引导的系统运行 时是相同的。大的内核采用bzImage,不能采用zImage。
1.6 uImage uImage,从名字看,可以简单理解为,给uboot使用的内核镜像。具体地,它是使用uboot工具mkimage对普通的压缩内核映像文件(zImage)加工而得。具体怎样加工?很简单,就是在zImage之前添加64个字节的头,说明这个内核的版本、加载位置、生成时间、大小等信息,这些信息供uboot加载内核的时候使用。
2、总结 内核编译,首先得到的是vmlinux的ELF文件,可以通过OBJCOPY命令来去掉不必要的信息(符号、注释、调试等),得到Image。在64位内核中,通过GZIP对Image直接压缩,得到Image.gz,在一些系统中,还重命名为vmlinuz。由于不带解压程序,因此内核的加载之前,还需要BootLoader去做解压。对32位内核,通常使用带自解压程序的zImage,该镜像是Image基础上进行压缩,然后与head.o/misc.o链接,再经过OBJCOPY的获取到的镜像,因此不是简单的GZIP压缩(也不能通过GZIP来解压使用)。 根据前面的分析,我们将各类镜像的生成过程通过如下图直观表示出来:
回到本文开始提到的问题,您是否得到答案了呢?
本文来自博客园,作者:无剑问天,转载请注明原文链接:https://www.cnblogs.com/cxj2011/p/13430960.html |
【本文地址】
今日新闻 |
推荐新闻 |