Tiny Core Linux 的安装和使用 |
您所在的位置:网站首页 › linux安装lspci命令 › Tiny Core Linux 的安装和使用 |
Tiny Core Linux 的安装和使用
|
文章目录
背景安装流程1. 创建一个虚拟机2. 安装 Tiny Core Linux 到硬盘
3. 基本配置4. 安装一些常用的软件包
背景
Tiny Core Linux 是一个非常小的 Linux 发行版,最小的镜像大小只有十几兆。官网如下: 它的这些特点,使得我经常在测试中用它来作简单的客户端和服务器。本文来讲讲如何在 VMware 中安装它。 安装流程 1. 创建一个虚拟机先到官网下载最小的镜像。我下载的是 9.0版本,Core-9.0.iso,大小为12.6MB。 新创建一个虚拟机,分配内存128MB,一个网卡使用NAT方式上网,光驱选择下载的镜像,硬盘看情况分配就可以。注意硬盘类型选择IDE,否则启动后识别不到。 启动虚拟机。 2. 安装 Tiny Core Linux 到硬盘默认系统的用户是 tc。 先安装 tc-install 程序并执行它: tce-load -wi tc-install sudo tc-install.sh按如下所示操作: 1 Core Installation. Install from [R]unning OS, from booted [C]drom, from [I]so file, or from [N]et. (r/c/i/n): c2 Select install type for /mnt/sr0/boot/core.gz Frugal * Use for frugal hard drive installations. Note: You will be prompted for disk/partion and formatting options. HDD * Use for pendrives. Your BIOS must support USB-HDD booting. * A single FAT partition will be made. Note: Requires dosfstools extension. Warning: This is a whole drive installation! Zip * Use for pendrives. Drive will be formatted into two FAT partitions. * One small one for USB_ZIP boot compatibility, and used to hold Tiny Core. * The remaining partition will be used for backup & extensions. Note: Requires dosfstools and perl extensions. Warning: This is a whole drive installation! Select Install type [F]rugal, [H]DD, [Z]ip. (f/h/z): f3 Select Target for Installation of core 1. Whole Disk 2. Partition Enter selection ( 1 - 2 ) or (q)uit: 14 Would you like to install a bootloader? Most people should answer yes unless they are trying to embed Core into a different Linux distribution with an existing bootloader. Enter selection ( y, n ) or (q)uit: y5 Select Formatting Option for sda 1. ext2 2. ext3 3. ext4 4. vfat Enter selection ( 1 - 4 ) or (q)uit: 3 Enter space separated boot options: Example: vga=normal syslog showapps waitusb=5 vga=788 tce=hda1 Last chance to exit before destroying all data on sda Continue (y/..)? y最后一步安装的输出如下: Writing zero's to beginning of /dev/sda Partitioning /dev/sda Formatting /dev/sda1 mke2fs 1.43.7 (16-Oct-2017) 1+0 records in 1+0 records out 440 bytes (440B) copied, 0.002386 seconds, 180.1KB/s UUID="bce34b1e-341b-4fd0-a3d2-1548fa2030e4" Applying extlinux. /mnt/drive/tce/boot/extlinux is device /dev/sda1 Setting up core image on /mnt/sda1 Installation has completed Press Enter key to continue.安装完后重启。 3. 基本配置安装完成后需要做一些基本的配置,首先就是要安装 ssh 服务: 按如下步骤操作: 设置 root 用户和 tc 用户密码: sudo passwd sudo passwd tc安装 openssh: tce-load -wi openssh系统启动时自动开启 ssh 服务: echo '/usr/local/etc/init.d/openssh start &' >> /opt/bootlocal.sh将上述操作修改的文件保存到硬盘。!!! echo etc >> /opt/.filetool.st echo /usr/local/etc >> /opt/.filetool.st filetool.sh -b重启系统。 4. 安装一些常用的软件包这个系统自带的命令很少,可以手动安装 ip 、tcpdump 等一些常用的命令: tce-load -wi iproute2 tce-load -wi tcpdump接下来就可以使用这些命令做一些简单的网络功能测试了。 注:里面的 nc 命令功能不太好用。比如启动一个持久性的 TCP 服务器的命令: nc 127.0.0.1 -p 2222 -lk在一个客户端连接后就自动关闭了。 |
 这个系统有几个特点:
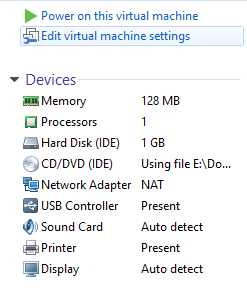
【本文地址】
今日新闻 |
推荐新闻 |