|
XShell支持使用VB,JS,Python脚本去启动自动化任务。这里介绍如何写Xshell的Python脚本。
首先要在脚本中定义一个Main()函数,Xshell会调用这个函数,也就是程序的入口。
然后,通过官方提供的API去完成脚本的书写。
xshell官网API原文:https://netsarang.atlassian.net/wiki/spaces/ENSUP/pages/419957269/Script+API
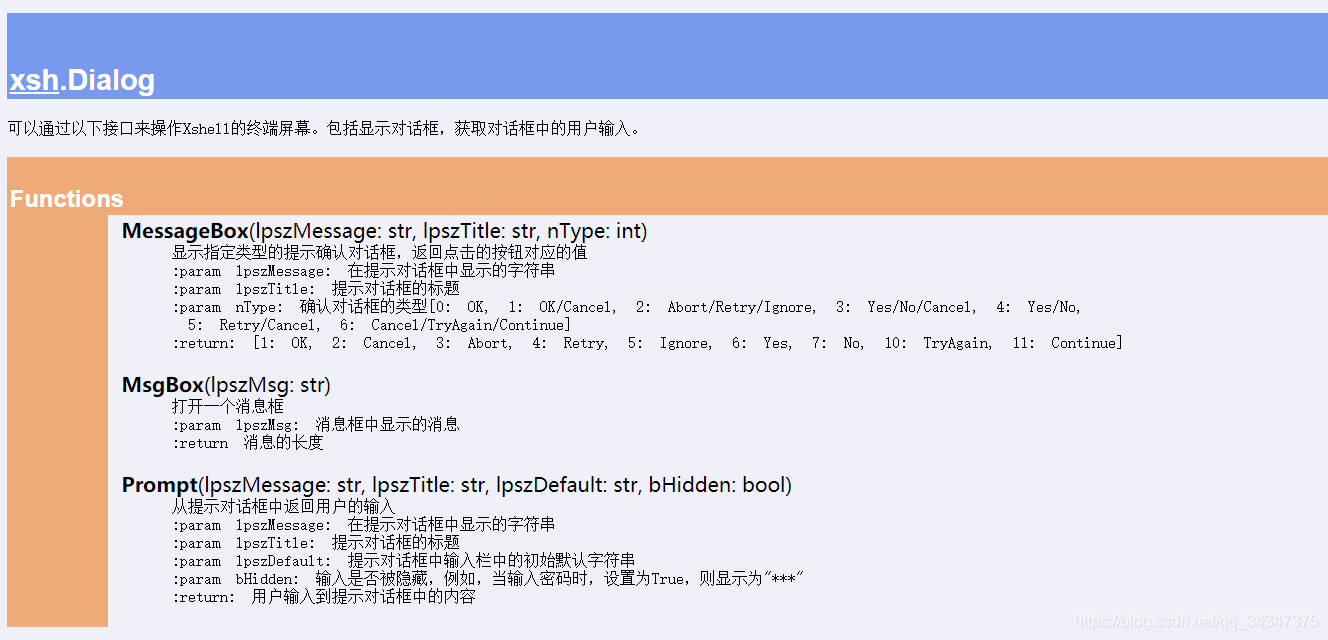
具体的API我已经同名实现并打包,并且提供详细的中文注释,可以100%当作官方API去调用,在实际执行时,需要注释掉导入包的语句,就像下面的示例一样。
获取途径:https://github.com/AZMDDY/xshapi
在项目中,我封装了一些实际工作中会用到的接口(https://github.com/AZMDDY/xshapi/blob/main/util.py),可以直接使用。

example-1: 自动切换到root用户
# import xsh.Session
# import xsh.Screen
# import xsh.Dialog
def get_current_row_info(num: int):
"""
获取终端当前行num个字符
"""
screenRow = xsh.Screen.CurrentRow
line = xsh.Screen.Get(screenRow, 1, screenRow, num)
return line
def Main():
# 打开一个已经存在的会话
# xsh.Session.Open("ssh://user:[email protected]:22")
xsh.Session.Open("G:\\user\\Documents\\NetSarang Computer\\7\\Xshell\\Sessions\\192.168.31.52.xsh")
xsh.Screen.Synchronous = True
xsh.Session.Sleep(1000)
# 切换到root用户
xsh.Screen.Send("su root\r")
xsh.Session.Sleep(100)
line = get_current_row_info(30)
if "Password" in line:
xsh.Screen.Send("paas_word\n")
example-2: 登录另一台设备
# import xsh.Session
# import xsh.Screen
# import xsh.Dialog
import re
def get_current_row_info(num: int):
"""
获取终端当前行num个字符
"""
screenRow = xsh.Screen.CurrentRow
line = xsh.Screen.Get(screenRow, 1, screenRow, num)
return line
def Main():
# 在一个存在的会话中执行
xsh.Screen.Synchronous = True
xsh.Session.Sleep(1000)
xsh.Screen.Send("ssh [email protected]\r")
xsh.Session.Sleep(100)
# 当第一次登录时,会验证初始ssh连接
line = get_current_row_info(100)
if re.search("yes/no", line):
xsh.Screen.Send("yes\r")
xsh.Session.Sleep(100)
# 终端出现提示输入密码时,输入密码
line = get_current_row_info(100)
if re.search("password", line, flags=re.I):
xsh.Screen.Send("pass_word\r")
|