采用layui框架实现表格的简单制作 |
您所在的位置:网站首页 › layui表格美化 › 采用layui框架实现表格的简单制作 |
采用layui框架实现表格的简单制作
|
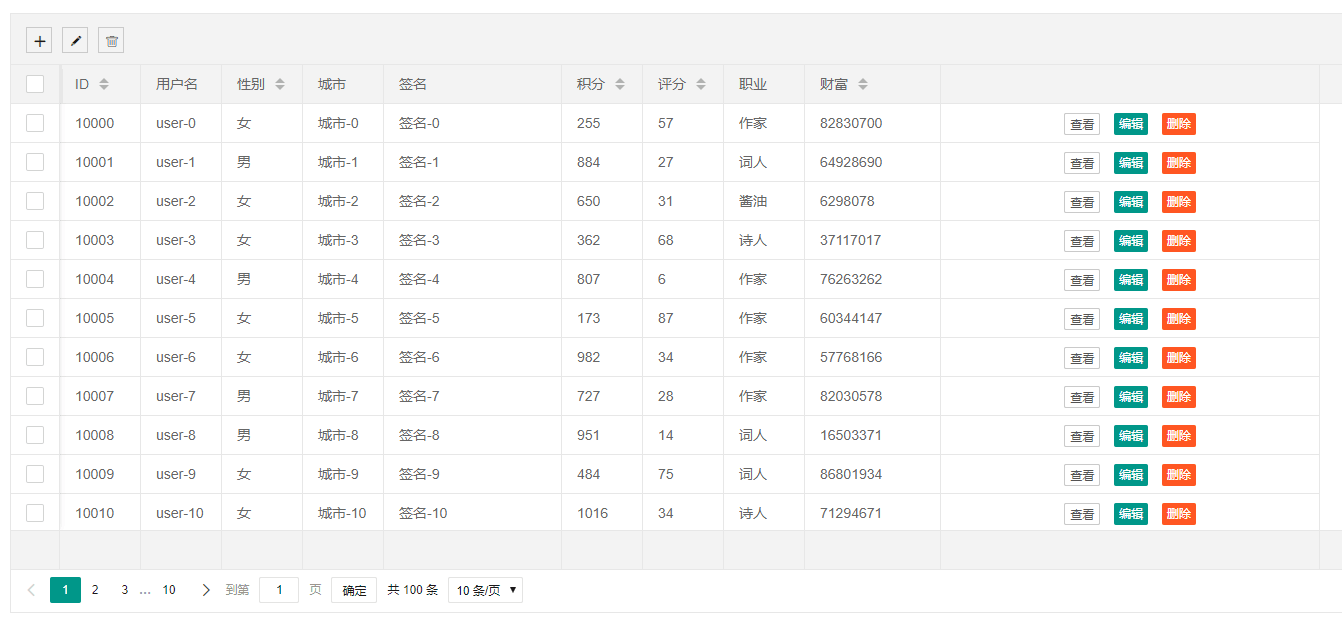
最近想把项目用layui来做,研究了下并记录下来,数据源这个案例放到了new1.json文件中,使用layui框架返回的数据必须按照他们的格式,否则会报请求数据错误。 先上一张展示图:
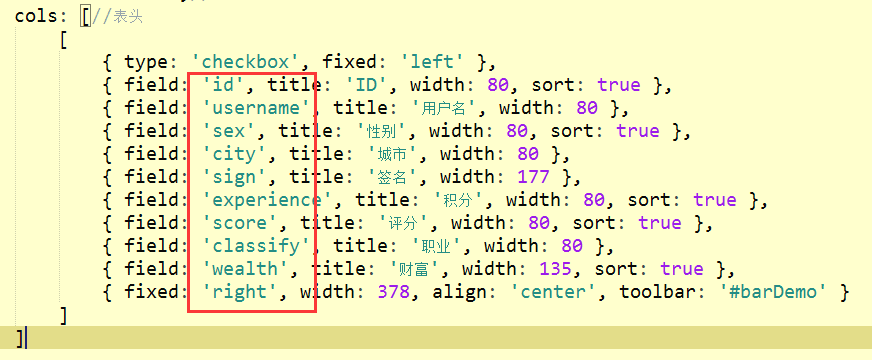
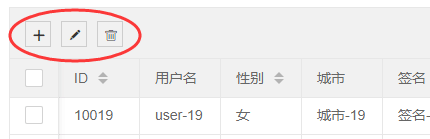
效果还是很好看的,看下如何实现的吧 1、首先做个准备资源 这里主要下载layui文件,因为需要用到其中的layui.css与layui.js这两个文件。 2、body部分只需要加入标签,若想在行的尾部加上编辑|修改其他操作,这里还需要添加组件(也是没看懂,照着做吧),如 查看 编辑 删除3、下面就是js部分(重点) 3-1、预先加载 layui.use('table', function() { var table = layui.table; //表格 }这里采用layui.use(mods,callback)方法来实现预先加载,本次案例只使用表格,如还有其他的,如:日期、轮播、上传等多个模块,就要使用数组,代码是这样的 layui.use(['laydate', 'laypage', 'table', 'carousel', 'upload', 'element'], function() { var laydate = layui.laydate, //日期 laypage = layui.laypage, //分页 table = layui.table, //表格 carousel = layui.carousel, //轮播 upload = layui.upload, //上传 element = layui.element //元素操作 }接下来在对每个模块执行如监听事件: //监听 头 工具栏事件 table.on('toolbar(test)', function(obj) { var checkStatus = table.checkStatus(obj.config.id), data = checkStatus.data; //获取选中的数据 switch(obj.event) { case 'add': layer.msg('添加'); break; case 'update': if(data.length === 0) { layer.msg('请选择一行'); } else if(data.length > 1) { layer.msg('只能同时编辑一个'); } else { layer.alert('编辑 [id]:' + checkStatus.data[0].id); } break; case 'delete': if(data.length === 0) { layer.msg('请选择一行'); } else { layer.msg('删除'); } break; }; });3-2、对表格进行渲染 table.render()方法 //执行一个 table 实例 table.render({ elem: '#demo', height: 600, url: 'new.json',//数据接口 title: '用户表', page: true, //开启分页 toolbar: 'default' ,//开启工具栏,此处显示默认图标,可以自定义模板,详见文档, totalRow: true ,//开启合计行 cols: [//表头 [ { type: 'checkbox', fixed: 'left' }, { field: 'id', title: 'ID', width: 80, sort: true }, { field: 'username', title: '用户名', width: 80 }, { field: 'sex', title: '性别', width: 80, sort: true }, { field: 'city', title: '城市', width: 80 }, { field: 'sign', title: '签名', width: 177 }, { field: 'experience', title: '积分', width: 80, sort: true }, { field: 'score', title: '评分', width: 80, sort: true }, { field: 'classify', title: '职业', width: 80 }, { field: 'wealth', title: '财富', width: 135, sort: true }, { fixed: 'right', width: 378, align: 'center', toolbar: '#barDemo' } ] ] });这里含有许多参数,详解请看layui官方文档,这里就不做详细介绍了,提醒的是,
设置表头时,field:'属性名',若是后台要与类的属性名一一对应。 3-3、这里的url请求的数据接口,没有从后台获取,这里给的json格式的文件 new1.json   {
"code": 0,
"msg": "",
"count": 100,
"data": [
{
"id": 10000,
"username": "user-0",
"sex": "女",
"city": "城市-0",
"sign": "签名-0",
"experience": 255,
"logins": 24,
"wealth": 82830700,
"classify": "作家",
"score": 57
}, {
"id": 10001,
"username": "user-1",
"sex": "男",
"city": "城市-1",
"sign": "签名-1",
"experience": 884,
"logins": 58,
"wealth": 64928690,
"classify": "词人",
"score": 27
}, {
"id": 10002,
"username": "user-2",
"sex": "女",
"city": "城市-2",
"sign": "签名-2",
"experience": 650,
"logins": 77,
"wealth": 6298078,
"classify": "酱油",
"score": 31
}, {
"id": 10003,
"username": "user-3",
"sex": "女",
"city": "城市-3",
"sign": "签名-3",
"experience": 362,
"logins": 157,
"wealth": 37117017,
"classify": "诗人",
"score": 68
}, {
"id": 10004,
"username": "user-4",
"sex": "男",
"city": "城市-4",
"sign": "签名-4",
"experience": 807,
"logins": 51,
"wealth": 76263262,
"classify": "作家",
"score": 6
}, {
"id": 10005,
"username": "user-5",
"sex": "女",
"city": "城市-5",
"sign": "签名-5",
"experience": 173,
"logins": 68,
"wealth": 60344147,
"classify": "作家",
"score": 87
}, {
"id": 10006,
"username": "user-6",
"sex": "女",
"city": "城市-6",
"sign": "签名-6",
"experience": 982,
"logins": 37,
"wealth": 57768166,
"classify": "作家",
"score": 34
}, {
"id": 10007,
"username": "user-7",
"sex": "男",
"city": "城市-7",
"sign": "签名-7",
"experience": 727,
"logins": 150,
"wealth": 82030578,
"classify": "作家",
"score": 28
}, {
"id": 10008,
"username": "user-8",
"sex": "男",
"city": "城市-8",
"sign": "签名-8",
"experience": 951,
"logins": 133,
"wealth": 16503371,
"classify": "词人",
"score": 14
}, {
"id": 10009,
"username": "user-9",
"sex": "女",
"city": "城市-9",
"sign": "签名-9",
"experience": 484,
"logins": 25,
"wealth": 86801934,
"classify": "词人",
"score": 75
}, {
"id": 10010,
"username": "user-10",
"sex": "女",
"city": "城市-10",
"sign": "签名-10",
"experience": 1016,
"logins": 182,
"wealth": 71294671,
"classify": "诗人",
"score": 34
}
]
}
View Code
{
"code": 0,
"msg": "",
"count": 100,
"data": [
{
"id": 10000,
"username": "user-0",
"sex": "女",
"city": "城市-0",
"sign": "签名-0",
"experience": 255,
"logins": 24,
"wealth": 82830700,
"classify": "作家",
"score": 57
}, {
"id": 10001,
"username": "user-1",
"sex": "男",
"city": "城市-1",
"sign": "签名-1",
"experience": 884,
"logins": 58,
"wealth": 64928690,
"classify": "词人",
"score": 27
}, {
"id": 10002,
"username": "user-2",
"sex": "女",
"city": "城市-2",
"sign": "签名-2",
"experience": 650,
"logins": 77,
"wealth": 6298078,
"classify": "酱油",
"score": 31
}, {
"id": 10003,
"username": "user-3",
"sex": "女",
"city": "城市-3",
"sign": "签名-3",
"experience": 362,
"logins": 157,
"wealth": 37117017,
"classify": "诗人",
"score": 68
}, {
"id": 10004,
"username": "user-4",
"sex": "男",
"city": "城市-4",
"sign": "签名-4",
"experience": 807,
"logins": 51,
"wealth": 76263262,
"classify": "作家",
"score": 6
}, {
"id": 10005,
"username": "user-5",
"sex": "女",
"city": "城市-5",
"sign": "签名-5",
"experience": 173,
"logins": 68,
"wealth": 60344147,
"classify": "作家",
"score": 87
}, {
"id": 10006,
"username": "user-6",
"sex": "女",
"city": "城市-6",
"sign": "签名-6",
"experience": 982,
"logins": 37,
"wealth": 57768166,
"classify": "作家",
"score": 34
}, {
"id": 10007,
"username": "user-7",
"sex": "男",
"city": "城市-7",
"sign": "签名-7",
"experience": 727,
"logins": 150,
"wealth": 82030578,
"classify": "作家",
"score": 28
}, {
"id": 10008,
"username": "user-8",
"sex": "男",
"city": "城市-8",
"sign": "签名-8",
"experience": 951,
"logins": 133,
"wealth": 16503371,
"classify": "词人",
"score": 14
}, {
"id": 10009,
"username": "user-9",
"sex": "女",
"city": "城市-9",
"sign": "签名-9",
"experience": 484,
"logins": 25,
"wealth": 86801934,
"classify": "词人",
"score": 75
}, {
"id": 10010,
"username": "user-10",
"sex": "女",
"city": "城市-10",
"sign": "签名-10",
"experience": 1016,
"logins": 182,
"wealth": 71294671,
"classify": "诗人",
"score": 34
}
]
}
View Code
这里只给出10条数据,格式要严格按照这个来,后台返回的数据也要为这种格式的,无论是用何种框架,采用何种方法读取数据库内容,只要提取出来的数据正确,都可以运用layui 对其中代码解释下: "code":0 -数据状态的字段名称(默认),这里必须是0,0代表成功,其他数值均代表错误 "msg":"" -状态信息(默认值) "count":100 -数据总数,根据情况自行而定 "data":[{},{}] -数据列表的字段名称(默认为data) 3-4、设置表头的监听事件
3-5、对行的操作设置监听事件
到这里解析结束,杂乱啊,还是思路没理清,还要研究好久啊 4、附上完整的代码吧
DOCTYPE html>
layui在线调试
body {
margin: 20px;
}
查看
编辑
删除
layui.use('table', function() {
var table = layui.table; //表格
//向世界问个好
layer.msg('Hello World');
//执行一个 table 实例
table.render({
elem: '#demo',
height: 600,
url: 'new1.json',//数据接口
title: '用户表',
page: true, //开启分页
toolbar: 'default' ,//开启工具栏,此处显示默认图标,可以自定义模板,详见文档,
totalRow: true ,//开启合计行
cols: [//表头
[
{ type: 'checkbox', fixed: 'left' },
{ field: 'id', title: 'ID', width: 80, sort: true },
{ field: 'username', title: '用户名', width: 80 },
{ field: 'sex', title: '性别', width: 80, sort: true },
{ field: 'city', title: '城市', width: 80 },
{ field: 'sign', title: '签名', width: 177 },
{ field: 'experience', title: '积分', width: 80, sort: true },
{ field: 'score', title: '评分', width: 80, sort: true },
{ field: 'classify', title: '职业', width: 80 },
{ field: 'wealth', title: '财富', width: 135, sort: true },
{ fixed: 'right', width: 378, align: 'center', toolbar: '#barDemo' }
]
]
});
//监听 头 工具栏事件
table.on('toolbar(test)', function(obj) {
var checkStatus = table.checkStatus(obj.config.id),
data = checkStatus.data; //获取选中的数据
switch(obj.event) {
case 'add':
layer.msg('添加');
break;
case 'update':
if(data.length === 0) {
layer.msg('请选择一行');
} else if(data.length > 1) {
layer.msg('只能同时编辑一个');
} else {
layer.alert('编辑 [id]:' + checkStatus.data[0].id);
}
break;
case 'delete':
if(data.length === 0) {
layer.msg('请选择一行');
} else {
layer.msg('删除');
}
break;
};
});
//监听 行 工具事件
table.on('tool(test)', function(obj) { //注:tool 是工具条事件名,test 是 table 原始容器的属性 lay-filter="对应的值"
var data = obj.data ,//获得当前行数据
layEvent = obj.event; //获得 lay-event 对应的值
if(layEvent === 'detail') {
layer.msg('查看操作');
} else if(layEvent === 'del') {
layer.confirm('真的删除行么', function(index) {
obj.del(); //删除对应行(tr)的DOM结构
layer.close(index);
//向服务端发送删除指令
});
} else if(layEvent === 'edit') {
layer.msg('编辑操作:' + JSON.stringify(data));
}
});
});
View Code
写的很不好,还要再努力学习中,具体说明请看layui的官方文档:https://www.layui.com/doc/modules/util.html layui文件下载:https://www.layui.com/
|

【本文地址】
今日新闻 |
推荐新闻 |