JAVA代码实现登录界面滑块图片验证 |
您所在的位置:网站首页 › js滑块验证码代码怎么写的 › JAVA代码实现登录界面滑块图片验证 |
JAVA代码实现登录界面滑块图片验证
|
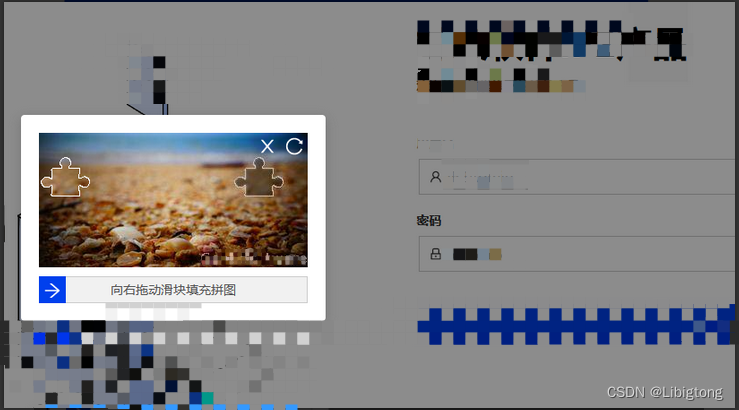
在做登录功能的时候,有一个需求,就是做一下登录验证,并且这些登录验证在系统中都是可以做可视化配置,什么意思呢,就是比如你在系统中做了一个双因子认证功能,又做了一个图片验证码验证功能,还有一个滑块图片验证。这几个功能在你的系统同时存在,在你的系统中要配置一个超级管理员界面来控制此系统当前的登录验证方式。 这是一个比较复杂的配置,在系统不停机的情况下,更改系统的登录方式,那就是意味着要把系统验证方式的参数读取方式从配置文件里面解放出来,存入到数据库中,然后来读取数据库的数据进行改变。 这个是后话了,现在先跟大家讲一下,滑块验证登录功能怎么做。 首先看一下实现之后的效果:
在系统登录页面,点击登录按钮,页面弹出这个弹窗,需要用户拖动滑块进行验证。为了防止机器攻击登录接口,也有一定的安全性考虑 看到这个图片,你能想到接下来的步骤吗? 前端组件咱们就不说了,现在我们后端要实现的是什么呢? 下面的介绍比较详细,大家可以记住这个步骤,然后往下看就好理解了 1.将图片存入到静态资源文件或者自己APP的文件存储系统中; 2.随机从中获取一张原图,这个原图的分辨率最好固定,我这里是300*150; 3.随机获取一张剪切图,就是上图中的那个不规则小方块; 3.对图片进行随机坐标的剪切,并附上水印(工具类在下面); 4.随机剪切的坐标,x坐标存入后端的缓存中,y坐标传给前端做显示; 5.前端传递用户拖动的x坐标与缓存中坐标进行对比。 1. 获取两张图片传给前端做显示我是把图片存入在resources静态资源文件夹下面在,如果你的项目有文件存储系统,你也可以把图片放到文件系统中。
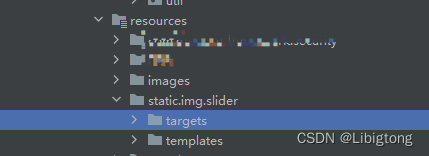
我这里做了一个判断,如果用户需要自己上传验证图片,就可以使用文件系统上传,然后从系统中拿到图片。我这里上传到文件系统的图片在数据库中是有记录的,所有先读取数据库,看是否存在用户上传的图片 List accountUserDataDtos = fwAccountUserDataService.doFindByUserAndType(SliderVerificationConstant.SLIDER_IMAGES_USERID_KEY, SliderVerificationConstant.SLIDER_IMAGES_DATATYPE_KEY,SliderVerificationConstant.SLIDER_IMAGES_DATAID_KEY); InputStream targetFile = null; if (accountUserDataDtos.size() > 0) { //如果存在用户的图片,就读取文件系统,随机获取一张图片 }else{ //如果没有,就使用静态资源文件夹中的图片 }然后选择一个剪切的模板图片,就是抠出来的那一小块图片,这个可以直接存在静态资源文件中 // 随机选择剪切模版 InputStream tempImgFile = getResourceAsStream(SliderVerificationConstant.CUT_TEMPLATE_PATH_KEY + (new Random().nextInt(6) + 1) + SliderVerificationConstant.CUT_TEMPLATE_SUFFIX_KEY);这里获取静态资源文件的图片可能会出现问题,因为在idea运行和部署到服务器上面,获取静态资源的路径会出现变化,解决方案在下面。 2. 对图片进行剪切/抠图处理图片有了,接下来就是对图片进行剪切,然后将横移的坐标去掉,只留下y坐标让前端做显示,这里直接给大家贴上工具类的代码 public class VerifyImageUtils { private static int BOLD = 5; private static final String IMG_FILE_TYPE = "jpg"; private static final String TEMP_IMG_FILE_TYPE = "png"; /** * 根据模板切图 * * @param templateFile 模板文件 * @param targetFile 目标文件 * @return 切图结果信息 * @throws Exception */ public static VerificationDto pictureTemplatesCut(InputStream templateFile, InputStream targetFile) throws Exception { // 模板图 BufferedImage imageTemplate = ImageIO.read(templateFile); int templateWidth = imageTemplate.getWidth(); int templateHeight = imageTemplate.getHeight(); // 原图 BufferedImage oriOldImage = ImageIO.read(targetFile); //创建新的BufferedImage对象,并设置宽高 BufferedImage oriImage = new BufferedImage(300, 150, BufferedImage.TYPE_INT_RGB); //获取新BufferedImage对象的Graphics2D对象 Graphics2D g2d = oriImage.createGraphics(); //调用Graphics2D的drawImage方法,将原始图像绘制到新的BufferedImage对象中 g2d.drawImage(oriOldImage, 0, 0, 300, 150, null); //释放Graphics2D对象 g2d.dispose(); int oriImageWidth = oriImage.getWidth(); int oriImageHeight = oriImage.getHeight(); //添加水印 BufferedImage oriImageNew = addWatermark(oriImage); // 随机生成抠图坐标X,Y // X轴距离右端targetWidth Y轴距离底部targetHeight以上 Random random = new Random(); int widthRandom = random.nextInt(oriImageWidth - 2 * templateWidth) + templateWidth; // int heightRandom = 1; int heightRandom = random.nextInt(oriImageHeight - templateHeight); log.info("原图大小{} x {},随机生成的坐标 X,Y 为({},{})", oriImageWidth, oriImageHeight, widthRandom, heightRandom); // 新建一个和模板一样大小的图像,TYPE_4BYTE_ABGR表示具有8位RGBA颜色分量的图像,正常取imageTemplate.getType() BufferedImage newImage = new BufferedImage(templateWidth, templateHeight, imageTemplate.getType()); // 得到画笔对象 Graphics2D graphics = newImage.createGraphics(); // 如果需要生成RGB格式,需要做如下配置,Transparency 设置透明 newImage = graphics.getDeviceConfiguration().createCompatibleImage(templateWidth, templateHeight, Transparency.TRANSLUCENT); // 新建的图像根据模板颜色赋值,源图生成遮罩 cutByTemplate(oriImageNew, imageTemplate, newImage, widthRandom, heightRandom); // 设置“抗锯齿”的属性 graphics.setRenderingHint(RenderingHints.KEY_ANTIALIASING, RenderingHints.VALUE_ANTIALIAS_ON); graphics.setStroke(new BasicStroke(BOLD, BasicStroke.CAP_BUTT, BasicStroke.JOIN_BEVEL)); graphics.drawImage(newImage, 0, 0, null); graphics.dispose(); // 新建流。 ByteArrayOutputStream newImageOs = new ByteArrayOutputStream(); // 利用ImageIO类提供的write方法,将bi以png图片的数据模式写入流。 ImageIO.write(newImage, TEMP_IMG_FILE_TYPE, newImageOs); byte[] newImageByte = newImageOs.toByteArray(); // 新建流。 ByteArrayOutputStream oriImagesOs = new ByteArrayOutputStream(); // 利用ImageIO类提供的write方法,将bi以jpg图片的数据模式写入流。 ImageIO.write(oriImageNew, IMG_FILE_TYPE, oriImagesOs); byte[] oriImageByte = oriImagesOs.toByteArray(); VerificationDto verificationVO = new VerificationDto(); verificationVO.setOriginalImage(AppConfigUtil.getStringValue(TwoFactorAuthConstant.MICROSOFT_AUTH_BASE64_IMAGE) + Base64.encode(oriImageByte)); verificationVO.setSlidingImage(AppConfigUtil.getStringValue(TwoFactorAuthConstant.MICROSOFT_AUTH_BASE64_IMAGE) + Base64.encode(newImageByte)); verificationVO.setXWidth(widthRandom); verificationVO.setYHeight(heightRandom); return verificationVO; } /** * 添加水印 * @param oriImage 图片 */ private static BufferedImage addWatermark(BufferedImage oriImage) { Graphics2D graphics2D = oriImage.createGraphics(); graphics2D.setRenderingHint(RenderingHints.KEY_INTERPOLATION, RenderingHints.VALUE_INTERPOLATION_BILINEAR); // 设置水印文字颜色 graphics2D.setColor(Color.WHITE); // 设置水印文字 graphics2D.setFont(new java.awt.Font("SimSun", Font.BOLD, 15)); //设置水印文字透明度 graphics2D.setComposite(AlphaComposite.getInstance(AlphaComposite.SRC_ATOP, 0.5f)); // 第一参数->设置的内容,后面两个参数->文字在图片上的坐标位置(x,y) graphics2D.drawString("Gant Software", 180, 145); graphics2D.dispose(); //释放 return oriImage; } /** * 切图 * @param oriImage 原图 * @param templateImage 模板图 * @param newImage 新抠出的小图 * @param x 随机扣取坐标X * @param y 随机扣取坐标y * @throws Exception */ private static void cutByTemplate(BufferedImage oriImage, BufferedImage templateImage, BufferedImage newImage, int x, int y) { // 临时数组遍历用于高斯模糊存周边像素值 int[][] martrix = new int[3][3]; int[] values = new int[9]; int xLength = templateImage.getWidth(); int yLength = templateImage.getHeight(); // 模板图像宽度 for (int i = 0; i < xLength; i++) { // 模板图片高度 for (int j = 0; j < yLength; j++) { // 如果模板图像当前像素点不是透明色 copy源文件信息到目标图片中 int rgb = templateImage.getRGB(i, j); if (rgb < 0) { newImage.setRGB(i, j, oriImage.getRGB(x + i, y + j)); // 抠图区域高斯模糊 readPixel(oriImage, x + i, y + j, values); fillMatrix(martrix, values); oriImage.setRGB(x + i, y + j, avgMatrix(martrix)); } // 防止数组越界判断 if (i == (xLength - 1) || j == (yLength - 1)) { continue; } int rightRgb = templateImage.getRGB(i + 1, j); int downRgb = templateImage.getRGB(i, j + 1); // 描边处理,,取带像素和无像素的界点,判断该点是不是临界轮廓点,如果是设置该坐标像素是白色 if ((rgb >= 0 && rightRgb < 0) || (rgb < 0 && rightRgb >= 0) || (rgb >= 0 && downRgb < 0) || (rgb < 0 && downRgb >= 0)) { newImage.setRGB(i, j, Color.white.getRGB()); oriImage.setRGB(x + i, y + j, Color.lightGray.getRGB()); } } } } private static void readPixel(BufferedImage img, int x, int y, int[] pixels) { int xStart = x - 1; int yStart = y - 1; int current = 0; for (int i = xStart; i < 3 + xStart; i++) for (int j = yStart; j < 3 + yStart; j++) { int tx = i; if (tx < 0) { tx = -tx; } else if (tx >= img.getWidth()) { tx = x; } int ty = j; if (ty < 0) { ty = -ty; } else if (ty >= img.getHeight()) { ty = y; } pixels[current++] = img.getRGB(tx, ty); } } private static void fillMatrix(int[][] matrix, int[] values) { int filled = 0; for (int i = 0; i < matrix.length; i++) { int[] x = matrix[i]; for (int j = 0; j < x.length; j++) { x[j] = values[filled++]; } } } private static int avgMatrix(int[][] matrix) { int r = 0; int g = 0; int b = 0; for (int i = 0; i < matrix.length; i++) { int[] x = matrix[i]; for (int j = 0; j < x.length; j++) { if (j == 1) { continue; } Color c = new Color(x[j]); r += c.getRed(); g += c.getGreen(); b += c.getBlue(); } } return new Color(r / 8, g / 8, b / 8).getRGB(); } } 3. 给图片一个Y坐标让前端做显示使用工具列传递两张图片,会返回给你一个verificationDto对象,这个对象在返回给前端之前,要先设置一下唯一UUID和将X坐标置空,并将X坐标存入缓存中
这样,前端根据对象中的数据就可以做显示了,剩下的滑块拖动,就是前端的任务了 给大家贴一下这个返回对象的属性的代码 @Data public class VerificationDto implements Serializable { private static final long serialVersionUID = 4061633295778293743L; /** * 滑块图 */ private String slidingImage; /** * 原图 */ private String originalImage; /** * 宽 */ private Integer xWidth; /** * 高 */ private Integer yHeight; /** * 唯一id */ private String uniqueId; } 4. 前端图片的移动距离和后端缓存中的坐标进行对比代码可以直接使用,传入一个x坐标,和一个唯一id。 private Boolean checkCaptcha(Double xPos, String uniqueId) { // 判断验证码是否为空 if (Validator.isEmpty(xPos)) { throw new BusinessException(I18nMsg.tr("横向移动坐标不能为空")); } // 校验验证码 // 缓存key if (verificationCache.get(uniqueId) == null) { throw new BusinessException(I18nMsg.tr("验证码过时或不存在,请重新获取")); } else { // 正确的验证码 Double vCode = verificationCache.get(uniqueId).doubleValue(); if (xPos - vCode > 5 || xPos - vCode < -5) { throw new BusinessException(I18nMsg.tr("验证码不正确")); } else { verificationCache.remove(uniqueId); return true; } } } 5. 问题记录:部署之后,找不到对应的图片文件了 这里我使用了getClass() 来获取相对路径下的图片 private InputStream getResourceAsStream(String dir) { try { //根据路径获取流 InputStream inputStream = getClass().getResourceAsStream(dir); if (inputStream == null) { throw new FileNotFoundException("Resource " + dir + " not found"); } return inputStream; } catch (IOException e) { throw new BusinessException(I18nMsg.tr("根据路径获取文件异常:{0}", e.getMessage())); } } |

【本文地址】
今日新闻 |
推荐新闻 |