JNA |
您所在的位置:网站首页 › jni调用静态库 › JNA |
JNA
|
工作所需,要使用Java调用c/c++的动态库,实现Java程序使用动态库中的函数。 搜索了一番,常用的有JNI、JNA方法。 JNI(Java Native Interface) JNI定义了一种公用的语法,当Java和c/c++都遵循这样的语法时就可以互相调用(也可调用汇编等其余语言)。JNI不能直接调用c/c++的库,必须使用java编写调用函数,生成C头文件,再利用C头文件编写C代码,生成动态库,最后JNI使用新生成的动态库完成执行。 过程繁琐,需增加改动Java和C/C++的程序。 JNA(Java Native Access) JNA提供了一组Java工具类,用于在运行期间动态访问系统本地库(native library:如Window的dll)而不需要编写任何Native/JNI代码,省去了对c/c++程序的再封装。 最终决定选用JNA。 一、引入JNA的引入很方便,使用maven直接导入即可。 net.java.dev.jna jna 4.1.0 调用JNA有很多前提条件 二、前提条件JNA有很多条件限制: JNA只能调用C方式编译出来的动态库,若是C++代码则需进行转换。如何用c的方式编译c++动态库,可见链接:c方式编译c++使用中,Java和c/c++的系统版本必须一致,如都是32位或都是64位。本文章全部使用64位版本 三、使用扯了这么多,终于要开始调用了。免不了先查询文档: API:http://java-native-access.github.io/jna/4.1.0/ github:https://github.com/java-native-access/jna 引入Jna的样例中,基本都会定义一个接口,该接口链接c/c++动态库,生成一个实例,并定义了与动态库中一致的函数名称,用于后续调用。 举个栗子: /******C端代码*********/ #include #include #include #include "demo.h" int hello() { printf("Hello world\n"); return 0; }将如上代码编译成动态库JnaLibrary.dll 编写Java端调用程序: public interface Clibrary extends Library { Clibrary instance = (Clibrary) Native.loadLibrary("JnaLibrary.dll", Clibrary.class); //与动态库中的函数相对应 int hello(); } //调用 public class Test { public static void main(String[] args) { Clibrary.instance.hello(); } }编译执行,就会输出动态库的内容:Hello world 数据类型转换 要定义动态库中的函数,难免会涉及入参及出参,数据格式的处理就尤为重要。先了解Java与C之间的数据映射。 2.1 基本数据类型 根据对应表来定义即可 2.1 基本数据类型 根据对应表来定义即可
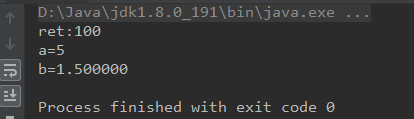
C端代码: ......(省略上述代码) int basicTest(int a, float b) { printf("a=%d\n", a); printf("b=%f\n", b); return 100; }Java端代码: public interface Clibrary extends Library { Clibrary instance = (Clibrary) Native.loadLibrary("JnaLibrary", Clibrary.class); int hello(); int basicTest(int a, float b, String pChar); } public class Test { public static void main(String[] args) { int a=5; float b = 1.5f; int ret = Clibrary.instance.basicTest(a,b); System.out.println("ret:"+ret); } }输出结果: 2.2 指针和数组 说到C自然会用到指针,其转换也花了不少时间。Jna中专门定义了指针类型用来与c对应。 在C中指针与数组一直暧昧不清,传参时,形参定义一个指针,实参则要传入地址,而传一个数组的名称 == 传数组的首元素地址,github中就把两者放在一个demo中。 指针及数组: eg: c端代码 void arrayTest(char * pStr, unsigned char *puStr) { int i = 0; printf("%s\n", pStr); for (i = 0; i < 10; i++) { printf("%c ", puStr[i]); } }Java端: ......(省略其余代码) //定义;其中char *直接使用String类型替代,unsigned char * 可转为byte[]数组 void arrayTest(String pStr, byte[] puStr); //调用 String str = "Banana..."; byte[] bytes = new byte[10]; for(int i = 0;i ppFloatIn[i] = (float*)malloc(sizeof(float*)*column); } for (i = 0; i ppFloatIn[i][j] = i + j; } } *pppFloatOut = ppFloatIn; *pLine = line; *pColumn = column; return; } void free2Dppt(int line, int column, float **ppFloat) { int i, j; for (i = 0; i free(ppFloat[i]); ppFloat[i] = NULL; } } if (ppFloat) { free(ppFloat); ppFloat = NULL; } } /**函数调用****************************************/ float **ppFloat; int line, column; obtain2DArray(&ppFloat, &line, &column); printf("out line:%d column:%d\n", line, column); for (int i = 0; i printf(" %f ", ppFloat[i][j]); } printf("\n"); } free2Dppt(line, column, ppFloat);要注意,多重指针的本质都是指针,因此Jna调用中都可以将类型定义为Pointer,只是需区分函数所需的Pointer指向的内容。 Jna没有三重指针类型,但可以通过二维指针类型的方法getPointer()间接获取。 注意PointerByReference的getPointer()获得指向该类型的指针,getValue()方法获得其指向的值。 Java代码: //方法定义 void obtain2DArray(Pointer pppFloatOut, IntByReference pLine, IntByReference pColumn); void free2Dppt(int line, int column, Pointer ppFloat); //调用 PointerByReference ppFloat = new PointerByReference(); Pointer pppFloat = ppFloat.getPointer(); IntByReference linePt = new IntByReference(); IntByReference columnPt = new IntByReference(); //通过获取二维指针的指针,得到三重指针 Clibrary.instance.obtain2DArray(pppFloat, linePt, columnPt); int line = linePt.getValue(); int column = columnPt.getValue(); System.out.println("line:"+line+",column:"+column); float[][] values = new float[line][column]; //输出一个3行5列的二维数组,即3个指向一行的指针,因此可获取指针数组; // 注意getPointerArray方法必须指明指针数组的数量(此处是line = 3),否则返回的指针数组长度不定,有很多干扰值 Pointer[] pointers = ppFloat.getValue().getPointerArray(0, line); for(int i=0;i for(int j=0;jindex); printf("info:%s\n", pRect->info); return 0; }Java端代码: ...(省略其余代码) public static class Rect extends Structure{ public int index; public byte[] info = new byte[16]; public static class ByReference extends Rect implements Structure.ByReference{} public static class ByValue extends Rect implements Structure.ByValue{ } @Override protected List getFieldOrder(){ List field = new ArrayList(); field.add("index"); field.add("info"); return field; } } //文档demo int readRect(Rect.ByValue rect); int readRectPoint(Rect pRect); //试验 int readRect(Rect rect); int readRectPoint(Rect.ByReference pRect); //调用时 //文档demo调用 Clibrary.Rect rect = new Clibrary.Rect(); rect.index = 1; rect.info = "Hello".getBytes(); Clibrary.instance.readRectPoint(rect); Clibrary.Rect.ByValue rectValue = new Clibrary.Rect.ByValue(); rectValue.index = 2; rectValue.info = "World".getBytes(); Clibrary.instance.readRect(rectValue); //试验内容 Clibrary.instance.readRect(rect); Clibrary.Rect.ByReference rectReference = new Clibrary.Rect.ByReference(); rectReference.index = 3; rectReference.info = "Program".getBytes(); Clibrary.instance.readRectPoint(rectReference);输出结果皆正确 2,传输结构体数组: eg: c端代码: int readRectArray(Rect *pRectArray) == 等同于 int readRectArray(Rect[] RectArray) { int i; for(i=0;i char tableName[32]; int rectNum; Rect *pRectArray; }Table; //函数定义 void obtainTable(Table *pTable, char *pTableName) { Table table; strcpy(pTable->tableName, pTableName); int num = 5; pTable->rectNum = num; Rect *pArray = (Rect*)malloc(num * sizeof(Rect)); for (int i = 0; i if(pTable->pRectArray) { free(pTable->pRectArray); pTable->pRectArray = NULL; } } //函数调用 Table table; obtainTable(&table, "A table"); printf("name:%s\n", table.tableName); int num = table.rectNum; printf("num:%d\n", num); for (int i = 0; i public Rect(){} public int index; public byte[] info = new byte[16]; public static class ByReference extends Rect implements Structure.ByReference{} public static class ByValue extends Rect implements Structure.ByValue{} @Override protected List getFieldOrder(){ return Arrays.asList("index", "info"); } } class Table extends Structure{ public byte[] tableName = new byte[32]; public int rectNum; //此处需使用结构体指针 public Rect.ByReference pRectArray ; public Table(){} public static class ByReference extends Table implements Structure.ByReference{} public static class ByValue extends Table implements Structure.ByValue{} @Override protected List getFieldOrder(){ return Arrays.asList("tableName", "rectNum", "pRectArray"); } } //方法定义 void obtainTable(Table pTable, String tableName); void freeTable(Table pTable); //方法调用 Clibrary.Table table = new Clibrary.Table(); try{ Clibrary.instance.obtainTable(table, "A table"); Clibrary.Rect rectArray[] = (Clibrary.Rect[]) table.pRectArray.toArray(table.rectNum); System.out.println("table_name:"+Native.toString(table.tableName)); for(int i=0;i e.printStackTrace(); }finally { Clibrary.instance.freeTable(table); }输出结果: 注明:以上样例——函数返回结构体数组 指针,是JNA的API文档demo,其中byte[]信息必须用Native.toString(byte[])才能正确输出。 四、Tips最后附上调试、部署时总结的一些经验; 0,上文提到的2个前提条件 1,在idea下调试运行时,将动态库按照系统和位数,在resources下创建相应目录,即可根据系统位数自动加载。 或者新建目录,并将该目录设置为resources属性,同样可行。 如我在项目中创建了library目录,并将其设置为resouces属性 2,当动态库放置于这些文件夹或系统目录时,Clibrary接口的动态库可省去固定路径和后缀名 4,maven打包部署时(springboot项目),需要将动态库也打包到jar包中,所以需在pom文件中进行设置。 有两种方式: 在pom文件中用标签指明放置动态库的目录,则该目录会被作为resources资源目录。因为resources目录拷贝时会进行统一编码,所以还需用标签将dll、so后缀文件进行过滤,否则会破坏原有动态库文件,导致不可用。 5,调用jna报如下的错时,可能是找不到对应的库引起的。 写了这么多,都是硬调试出来的结果… 没有从源码和理论研究,感觉还是不踏实 =_=! |
 此处有个疑问:返回结果比动态库中函数更早输出了,希望有小伙伴能指点


 否则要写固定路径和全名:
  3,设置编码 c里面没有原生字符串,Windows下的LPCTSTR实际上是一个字节数组指针,JNA进行LPCSTR -> String映射的时候会先将LPCSTR映射为byte[],再根据系统属性"jna.encoding"的值返回new String(byte[],jna.encoding),反之亦然。 当"jna.encoding"为null时Java会以默认的UTF-8进行编码,如果这个本地库是非Unicode的就会产生乱码。 可知: Jna默认使用utf-8编码,若动态库中需要其余编码如gbk,需在jna函数调用时手动设置系统编码
 不使用项目的resources目录属性,自己使用标签执行目标配置,将动态库打包到jar包中指定路径。此操作可免去设置编码过滤。
  在Pom文件中指定主类mainClass
 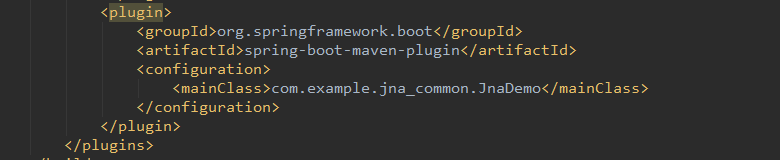 使用maven进行编译打包,如下红框处,先执行clean,再compile,在package; 获得的包在target目录下,如下黄框。
  打包后,即可在linux环境执行:java -jar jna_commonxxxx.jar 执行,会执行pom文件中的的内容
 首先检查下是否将库放在系统路径或设置的resource目录了,即tip第一步; 若已经设置好了仍报错,就需要检查放置在目录中的库是否依赖了其他库(windows可以通过vs的dumpbin.exe来判断,linux可以通过ldd指令),而这些其他库也需要全部放进来。
【本文地址】