|
使用mkcert工具生成受信任的SSL证书,解决局域网本地https访问问题
文章目录
使用mkcert工具生成受信任的SSL证书,解决局域网本地https访问问题1、mkcert简介2、mkcert下载3、mkcert安装配置(1)输入CMD,调出命令提示符(2)初次安装mkcert(3)测试mkcert是否安装成功(4)查看CA证书存放位置(5)生成自签证书,可供局域网内使用其他主机访问。
4、mkcert测试验证Windows系统操作访问演示Linux系统操作访问演示5、mkcert高级设置6、文章参考链接参考链接:[本地https快速解决方案——mkcert](https://blog.dteam.top/posts/2019-04/本地https快速解决方案mkcert.html)官方文档:https://github.com/FiloSottile/mkcert#mkcert下载链接:https://github.com/FiloSottile/mkcert/releases
1、mkcert简介
mkcert 是一个简单的工具,用于制作本地信任的开发证书。它不需要配置。
简化我们在本地搭建 https 环境的复杂性,无需操作繁杂的 openssl 实现自签证书了,这个小程序就可以帮助我们自签证书,在本机使用还会自动信任 CA,非常方便。
使用来自真实证书颁发机构 (CA) 的证书进行开发可能很危险或不可能(对于example.test、localhost或 之类的主机127.0.0.1),但自签名证书会导致信任错误。管理您自己的 CA 是最好的解决方案,但通常涉及神秘的命令、专业知识和手动步骤。
mkcert 在系统根存储中自动创建并安装本地 CA,并生成本地信任的证书。mkcert 不会自动配置服务器以使用证书,但这取决于您。
2、mkcert下载
本实验使用Windows 10 操作系统进行演示说明。mkcert也支持其他噶平台的安装与使用,自行下载对应的版本安装即可。 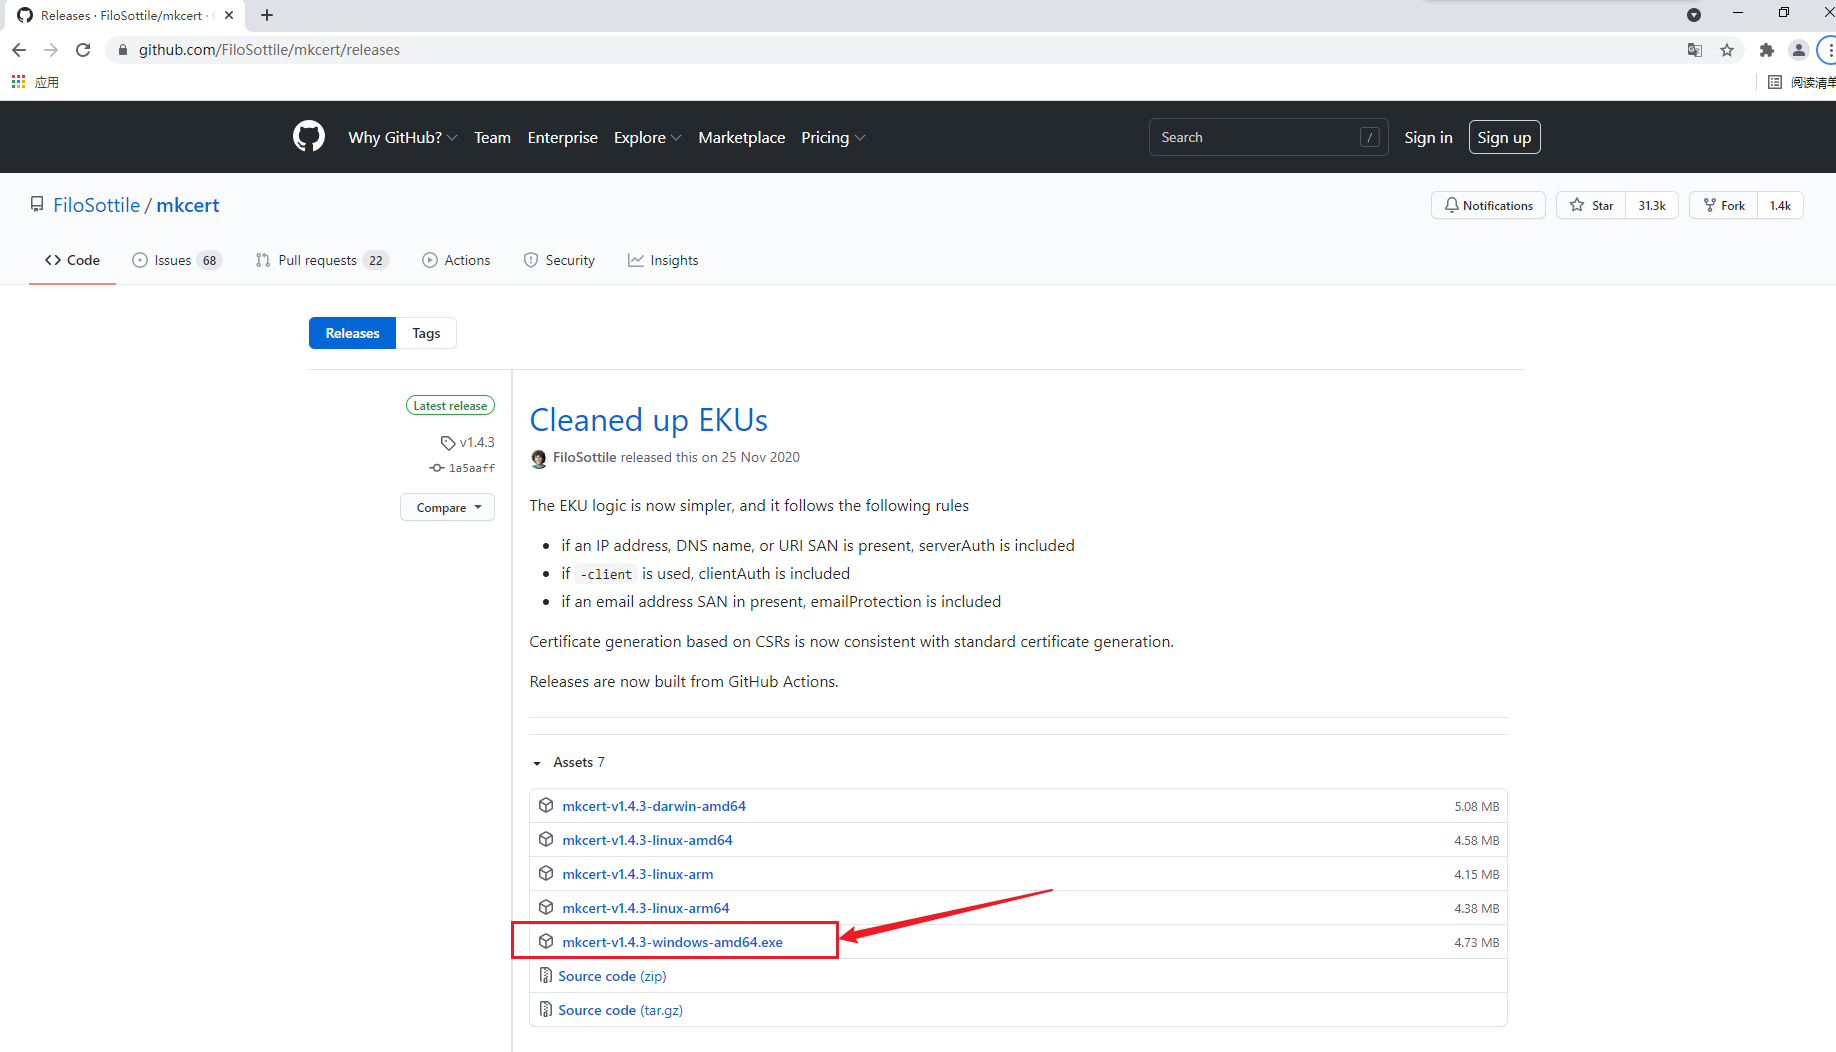 3、mkcert安装配置
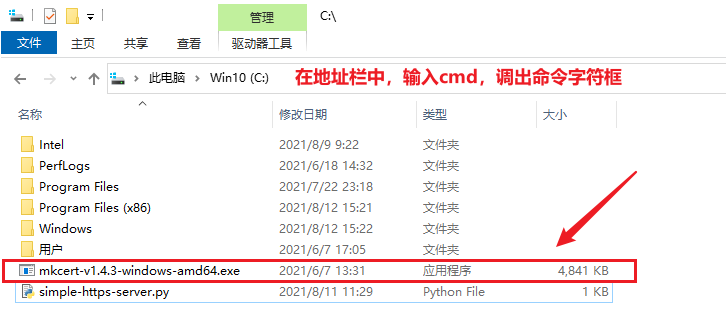
(1)输入CMD,调出命令提示符
3、mkcert安装配置
(1)输入CMD,调出命令提示符
(2)初次安装mkcert
输入mkcert-v1.4.3-windows-amd64.exe -install 命令 ,安装mkcert。将CA证书加入本地可信CA,使用此命令,就能帮助我们将mkcert使用的根证书加入了本地可信CA中,以后由该CA签发的证书在本地都是可信的。卸载命令 mkcert-v1.4.3-windows-amd64.exe -install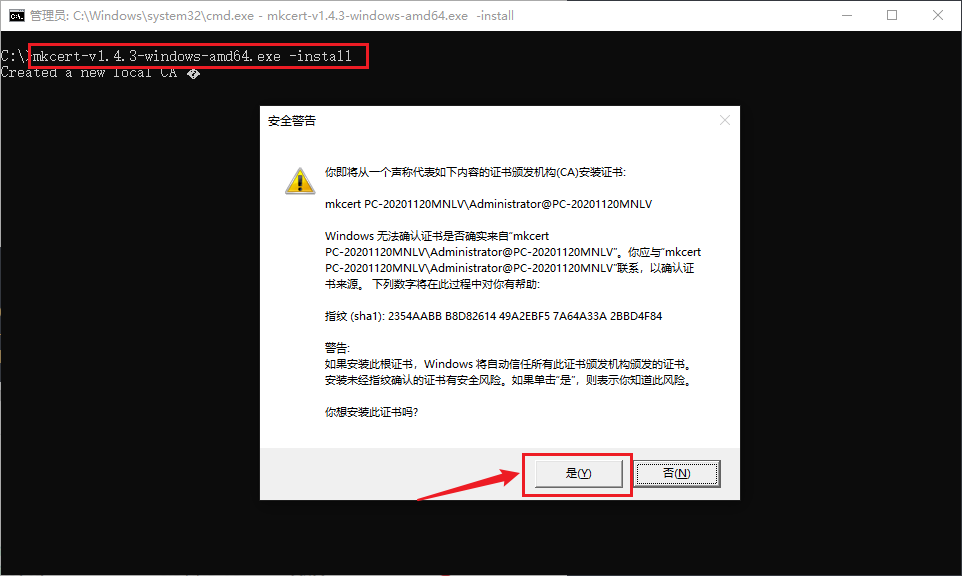 安装成功成功。提示创建一个新的本地CA,本地CA现在已安装在系统信任存储中。 安装成功成功。提示创建一个新的本地CA,本地CA现在已安装在系统信任存储中。 
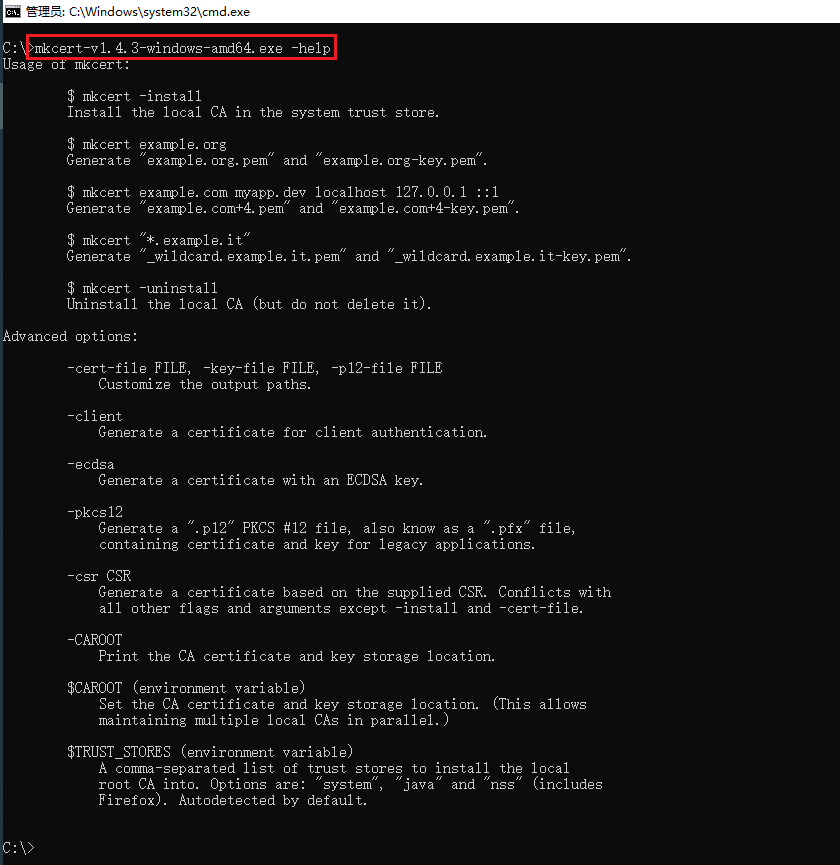
(3)测试mkcert是否安装成功
C:\>mkcert-v1.4.3-windows-amd64.exe --help
Usage of mkcert:
$ mkcert -install
Install the local CA in the system trust store.
$ mkcert example.org
Generate "example.org.pem" and "example.org-key.pem".
$ mkcert example.com myapp.dev localhost 127.0.0.1 ::1
Generate "example.com+4.pem" and "example.com+4-key.pem".
$ mkcert "*.example.it"
Generate "_wildcard.example.it.pem" and "_wildcard.example.it-key.pem".
$ mkcert -uninstall
Uninstall the local CA (but do not delete it).
Advanced options:
-cert-file FILE, -key-file FILE, -p12-file FILE
Customize the output paths.
-client
Generate a certificate for client authentication.
-ecdsa
Generate a certificate with an ECDSA key.
-pkcs12
Generate a ".p12" PKCS #12 file, also know as a ".pfx" file,
containing certificate and key for legacy applications.
-csr CSR
Generate a certificate based on the supplied CSR. Conflicts with
all other flags and arguments except -install and -cert-file.
-CAROOT
Print the CA certificate and key storage location.
$CAROOT (environment variable)
Set the CA certificate and key storage location. (This allows
maintaining multiple local CAs in parallel.)
$TRUST_STORES (environment variable)
A comma-separated list of trust stores to install the local
root CA into. Options are: "system", "java" and "nss" (includes
Firefox). Autodetected by default.
C:\>
(4)查看CA证书存放位置
输入mkcert-v1.4.3-windows-amd64.exe -CAROOT命令。   按“Windows键+R”调出运行框,输入certmgr.msc命令。打开证书控制台。 按“Windows键+R”调出运行框,输入certmgr.msc命令。打开证书控制台。 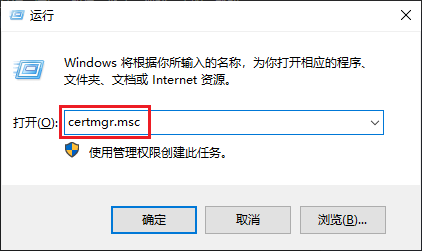 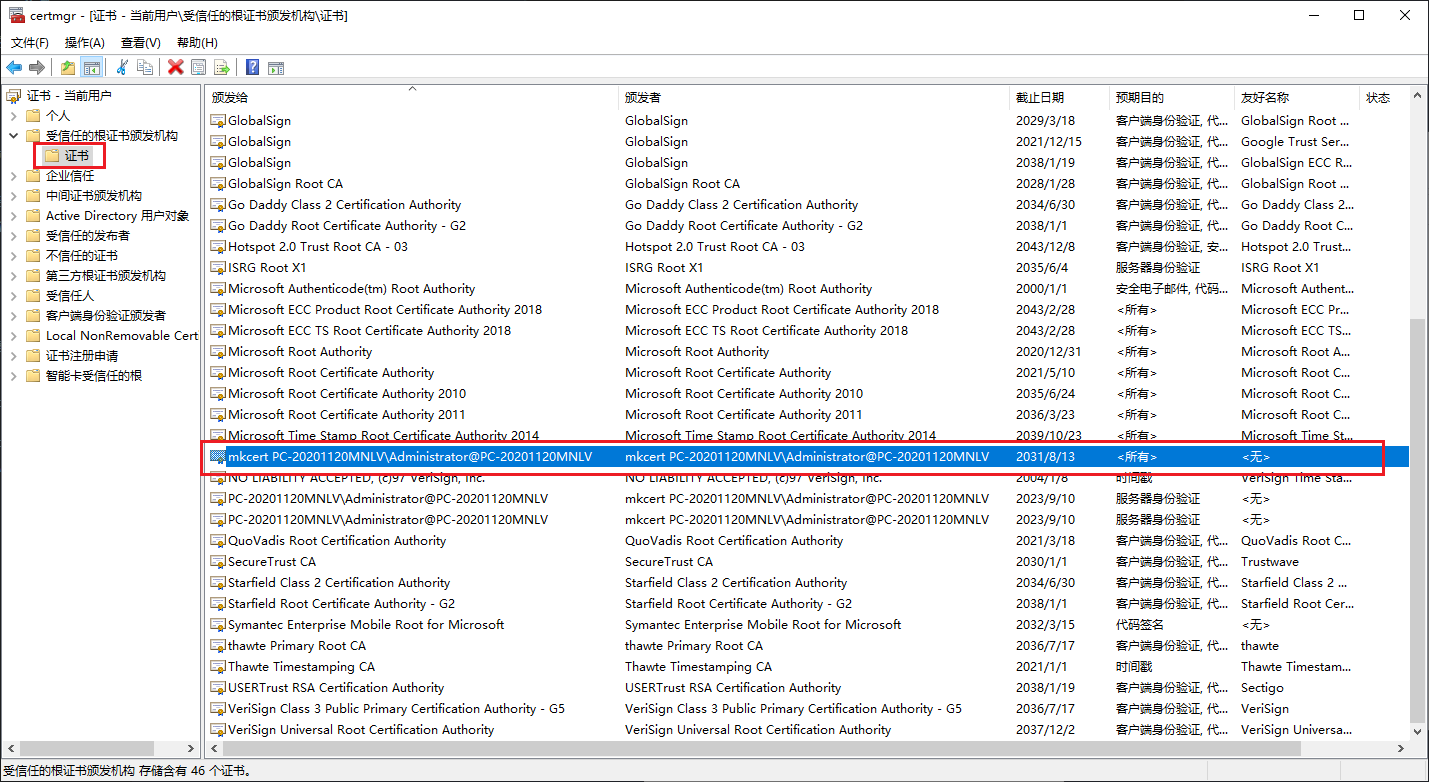 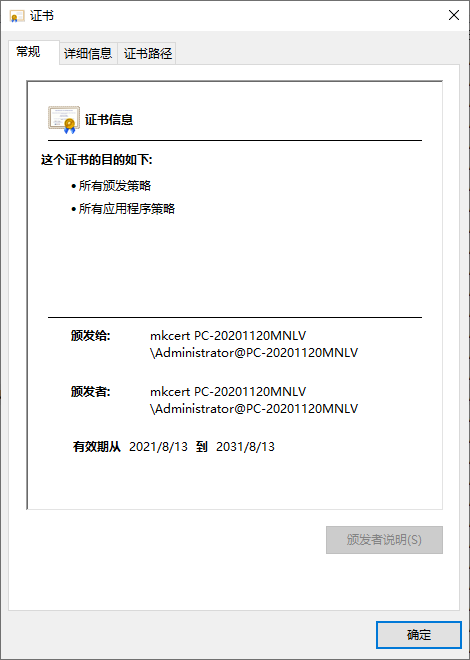
(5)生成自签证书,可供局域网内使用其他主机访问。
直接跟多个要签发的域名或 ip 就行了,比如签发一个仅本机访问的证书(可以通过127.0.0.1和localhost,以及 ipv6 地址::1访问)
需要在局域网内测试 https 应用,这种环境可能不对外,因此也无法使用像Let's encrypt这种免费证书的方案给局域网签发一个可信的证书,而且Let's encrypt本身也不支持认证 Ip。
证书可信的三个要素:
由可信的 CA 机构签发访问的地址跟证书认证地址相符证书在有效期内
如果期望自签证书在局域网内使用,以上三个条件都需要满足。很明显自签证书一定可以满足证书在有效期内,那么需要保证后两条。我们签发的证书必须匹配浏览器的地址栏,比如局域网的 ip 或者域名,此外还需要信任 CA。操作如下。 签发证书,加入局域网IP地址。
C:\>mkcert-v1.4.3-windows-amd64.exe localhost 127.0.0.1 ::1 192.168.2.25
Note: the local CA is not installed in the Java trust store.
Run "mkcert -install" for certificates to be trusted automatically ⚠️
Created a new certificate valid for the following names 📜
- "localhost"
- "127.0.0.1"
- "::1"
- "192.168.2.25"
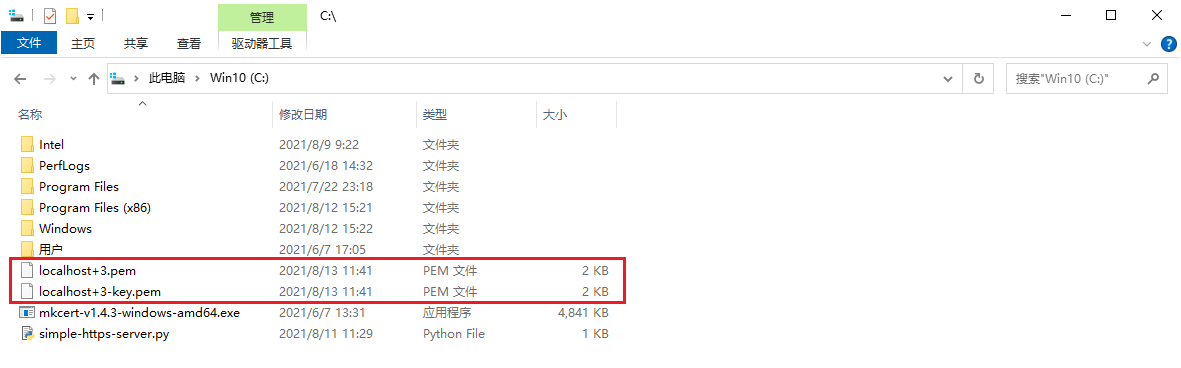
The certificate is at "./localhost+3.pem" and the key at "./localhost+3-key.pem" ✅
It will expire on 13 November 2023 🗓
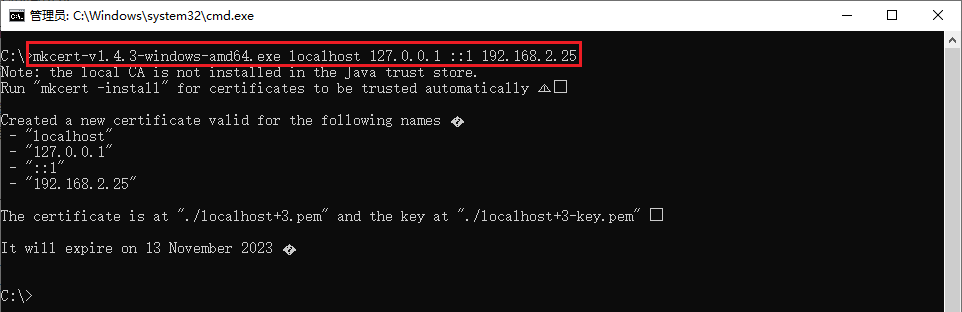
在mkcert软件同目录下,生成了自签证书。如图所示。
通过输出,我们可以看到成功生成了localhost+3.pem证书文件和localhost+3-key.pem私钥文件,只要在 web server 上使用这两个文件就可以了。
4、mkcert测试验证
默认生成的证书格式为PEM(Privacy Enhanced Mail)格式,任何支持PEM格式证书的程序都可以使用。比如常见的Apache或Nginx等,这里我们用 python 自带的SimpleHttpServer演示一下这个证书的效果(代码参考来自:https://gist.github.com/dergachev/7028596)
前提条件:运行此pyhton脚本需要在本地环境中提前安装好python环境 下载链接:https://www.python.org/downloads/windows/ python环境安装参考链接:https://blog.csdn.net/u012106306/article/details/100040680 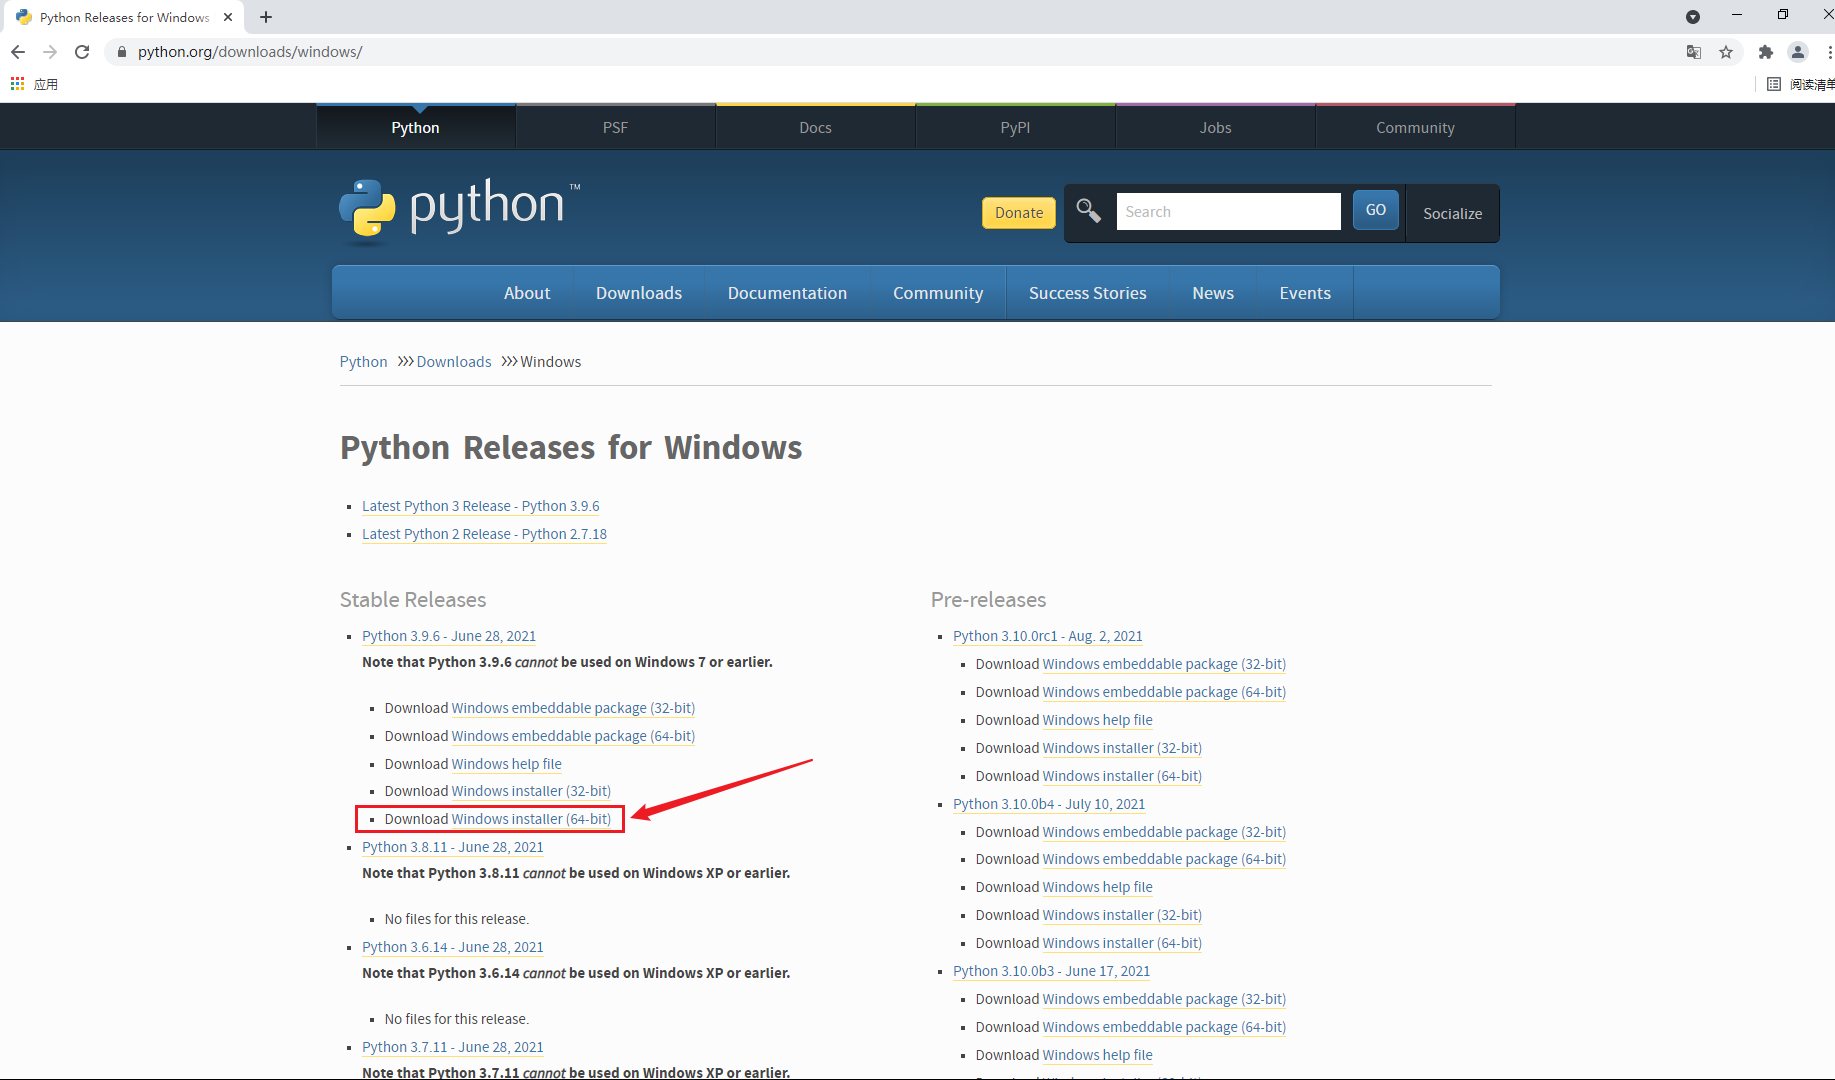  python2 版本 python2 版本
#!/usr/bin/env python2
import BaseHTTPServer, SimpleHTTPServer
import ssl
httpd = BaseHTTPServer.HTTPServer(('0.0.0.0', 443), SimpleHTTPServer.SimpleHTTPRequestHandler)
httpd.socket = ssl.wrap_socket(httpd.socket, certfile='./localhost+2.pem', keyfile='./localhost+2-key.pem', server_side=True, ssl_version=ssl.PROTOCOL_TLSv1_2)
httpd.serve_forever()
python3 版本
#!/usr/bin/env python3
import http.server
import ssl
httpd = http.server.HTTPServer(('0.0.0.0', 443), http.server.SimpleHTTPRequestHandler)
httpd.socket = ssl.wrap_socket(httpd.socket, certfile='./localhost+2.pem', keyfile='./localhost+2-key.pem', server_side=True, ssl_version=ssl.PROTOCOL_TLSv1_2)
httpd.serve_forever()
双击运行simple-https-server.py脚本。
打开浏览器,输入https://192.168.2.5:8000,显示连接是安全的。  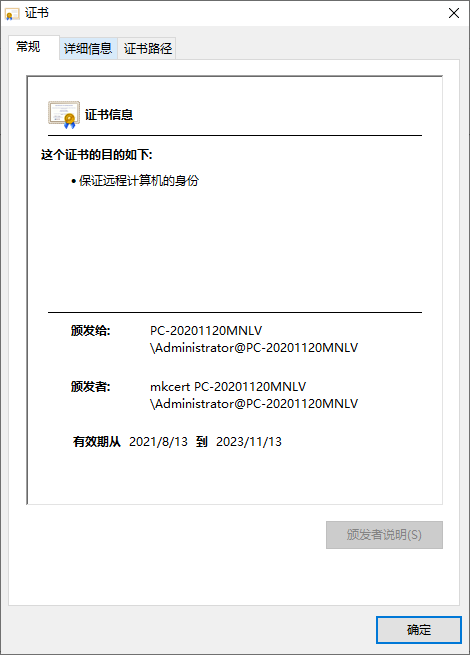 验证发现使用https://192.168.31.170本机访问也是可信的。然后需要将 CA 证书发放给局域网内其他的用户。 验证发现使用https://192.168.31.170本机访问也是可信的。然后需要将 CA 证书发放给局域网内其他的用户。
可以看到 CA 路径下有两个文件rootCA-key.pem和rootCA.pem两个文件,用户需要信任rootCA.pem这个文件。将rootCA.pem拷贝一个副本,并命名为rootCA.crt(因为 windows 并不识别pem扩展名,并且 Ubuntu 也不会将pem扩展名作为 CA 证书文件对待),将rootCA.crt文件分发给其他用户,手工导入。
C:\>mkcert-v1.4.3-windows-amd64.exe -CAROOT
C:\Users\Administrator\AppData\Local\mkcert

Windows系统操作访问演示
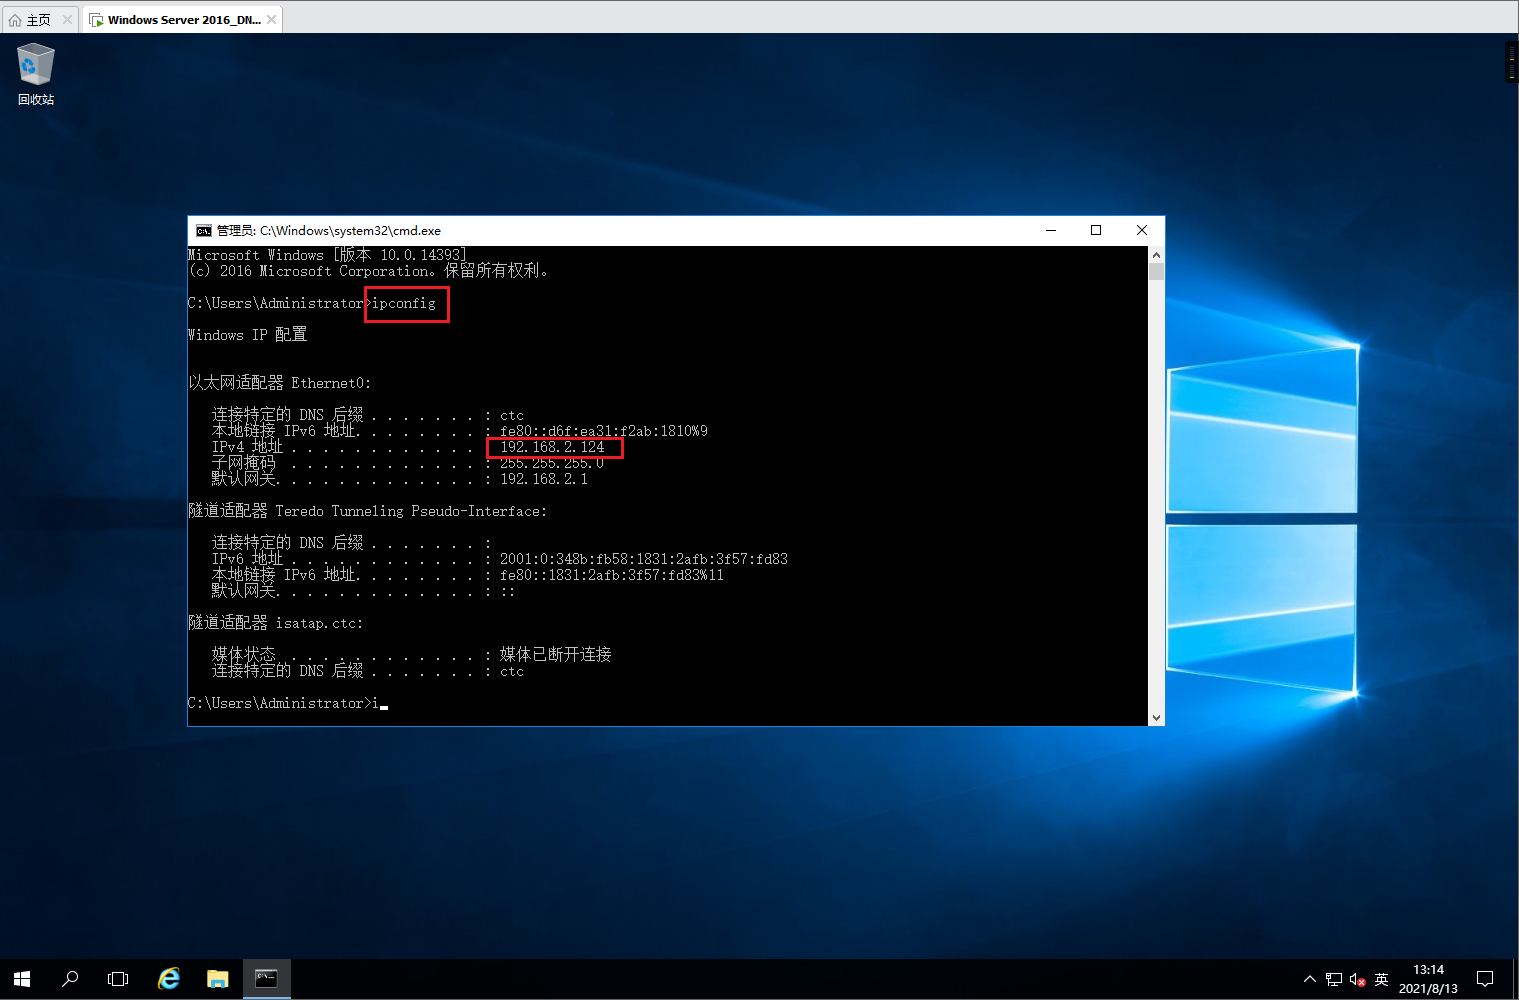 点击“安装证书”。 点击“安装证书”。 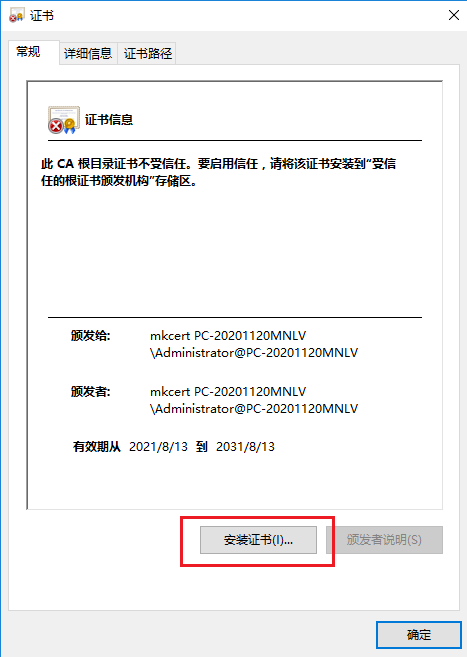 单击下一步。 单击下一步。 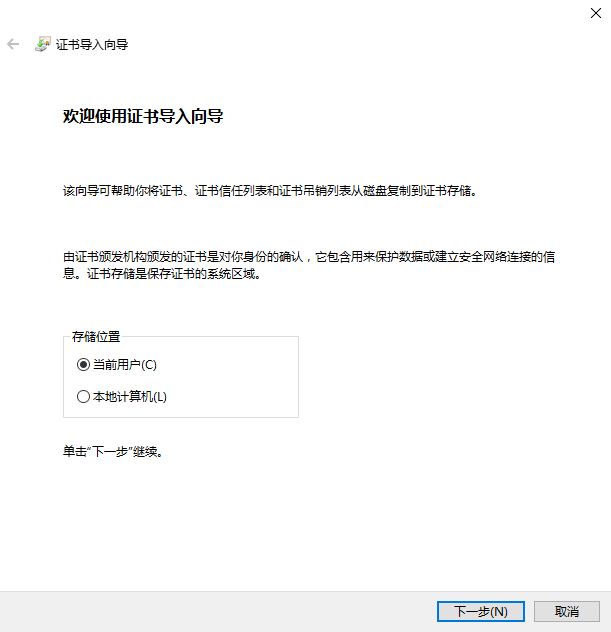 windows 导入证书的方法是双击这个文件,在证书导入向导中将证书导入`受信任的根证书颁发机构。 windows 导入证书的方法是双击这个文件,在证书导入向导中将证书导入`受信任的根证书颁发机构。 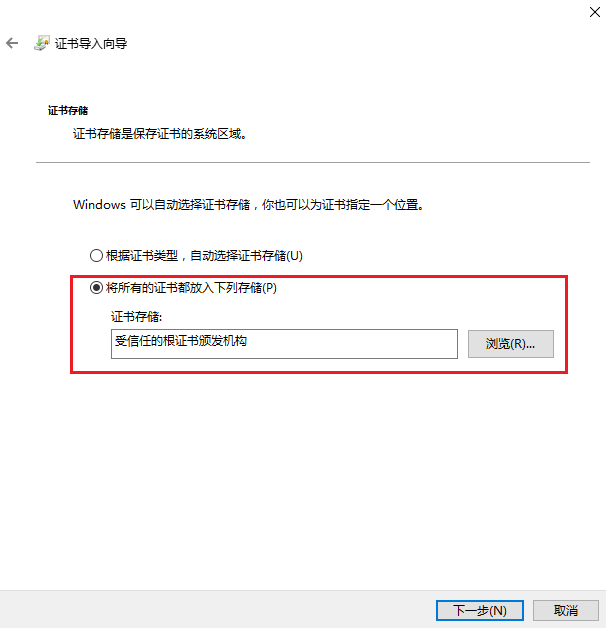 点击“完成”。 点击“完成”。 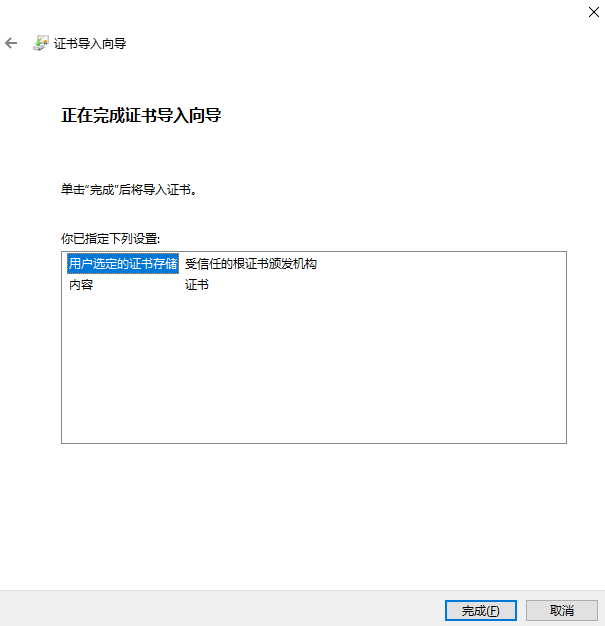 点击“是”。 点击“是”。  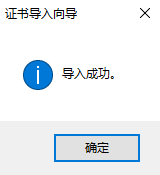 再次点击此证书。已被添加为信任。 再次点击此证书。已被添加为信任。 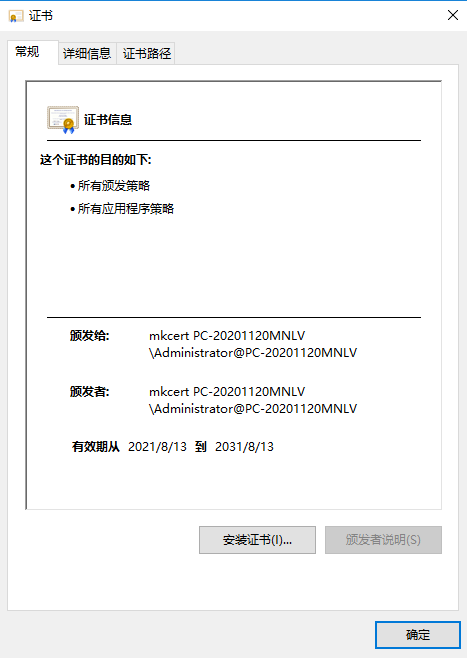 使用浏览器验证。输入https://192.168.2.25:8000,发现可信任。 使用浏览器验证。输入https://192.168.2.25:8000,发现可信任。 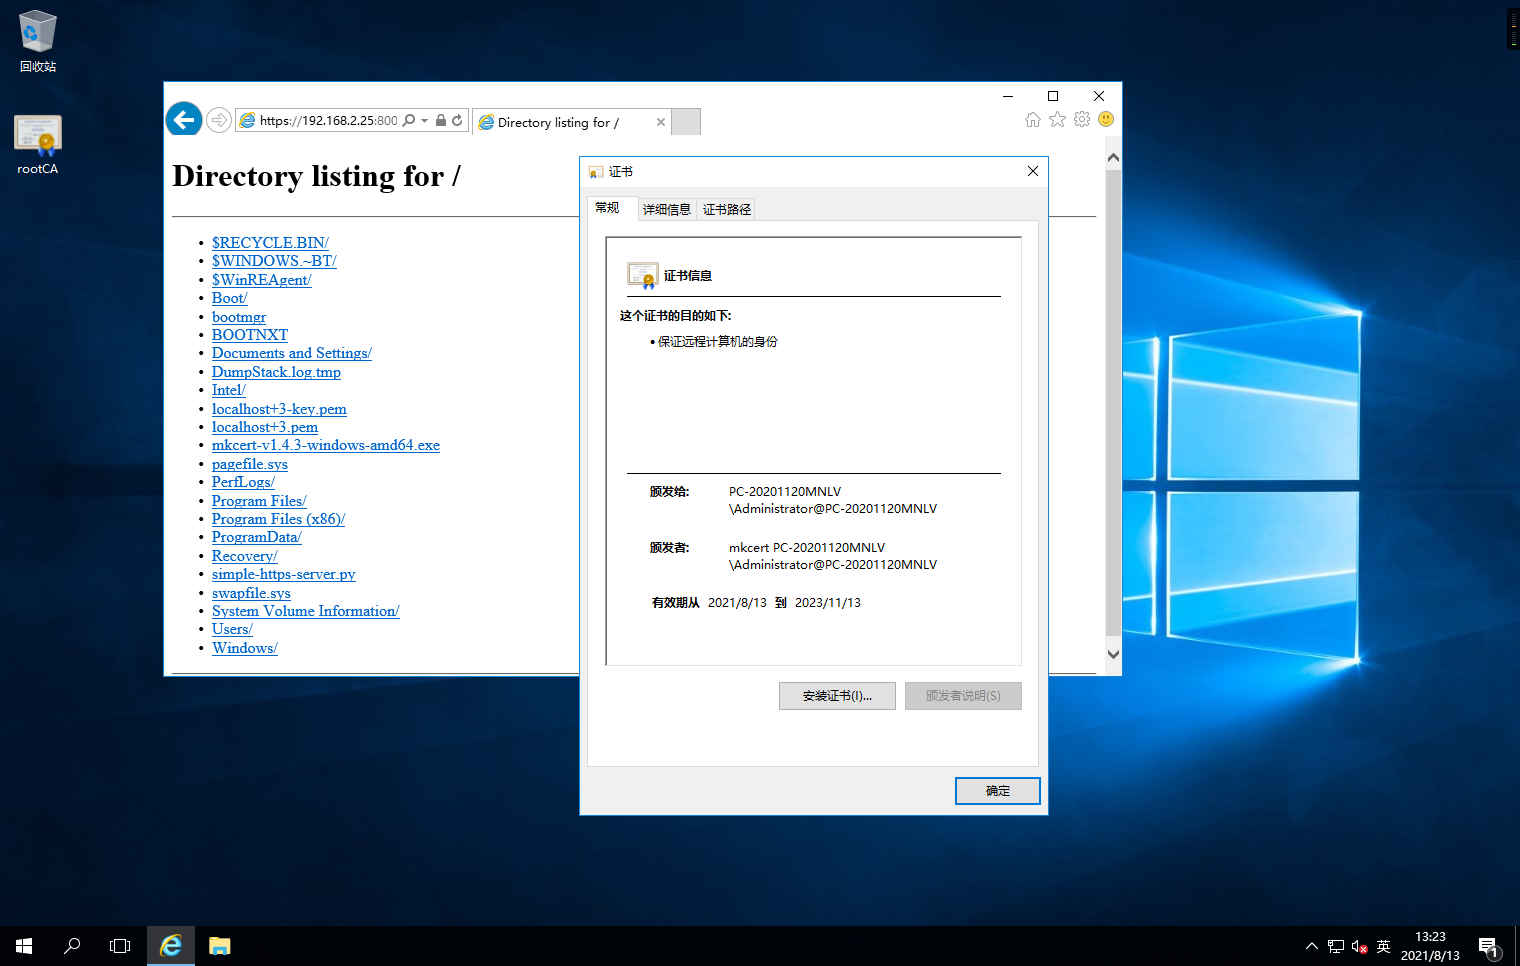
Linux系统操作访问演示
[root@server ~]# ifconfig
ens32: flags=4163 mtu 1500
inet 192.168.2.115 netmask 255.255.255.0 broadcast 192.168.2.255
inet6 fe80::5ccf:c1e4:1339:b7b6 prefixlen 64 scopeid 0x20
ether 00:0c:29:5b:bd:72 txqueuelen 1000 (Ethernet)
RX packets 22455 bytes 19633664 (18.7 MiB)
RX errors 0 dropped 0 overruns 0 frame 0
TX packets 6252 bytes 693732 (677.4 KiB)
TX errors 0 dropped 0 overruns 0 carrier 0 collisions 0
lo: flags=73 mtu 65536
inet 127.0.0.1 netmask 255.0.0.0
inet6 ::1 prefixlen 128 scopeid 0x10
loop txqueuelen 1000 (Local Loopback)
RX packets 87 bytes 9353 (9.1 KiB)
RX errors 0 dropped 0 overruns 0 frame 0
TX packets 87 bytes 9353 (9.1 KiB)
TX errors 0 dropped 0 overruns 0 carrier 0 collisions 0
[root@server ~]# ls -l
total 8
-rw-------. 1 root root 1532 Jul 9 05:13 anaconda-ks.cfg
-rw-r--r-- 1 root root 1793 Aug 12 23:22 rootCA.pem
[root@server ~]# cp -a rootCA.pem /etc/pki/ca-trust/source/anchors/ #将ca证书放在此路径下
[root@server ~]# /bin/update-ca-trust #执行此命令更新
[root@server ~]#
[root@server ~]# curl -I https://192.168.2.25:8000
HTTP/1.0 200 OK
Server: SimpleHTTP/0.6 Python/3.9.6
Date: Fri, 13 Aug 2021 06:51:54 GMT
Content-type: text/html; charset=utf-8
Content-Length: 1536
[root@server ~]#
[root@server ~]# curl -Iv https://192.168.2.25:8000 #加上-v参数输出还会告诉证书是可信的。
* About to connect() to 192.168.2.25 port 8000 (#0)
* Trying 192.168.2.25...
* Connected to 192.168.2.25 (192.168.2.25) port 8000 (#0)
* Initializing NSS with certpath: sql:/etc/pki/nssdb
* CAfile: /etc/pki/tls/certs/ca-bundle.crt
CApath: none
* SSL connection using TLS_ECDHE_RSA_WITH_AES_256_GCM_SHA384
* Server certificate:
* subject: OU=PC-20201120MNLV\\Administrator@PC-20201120MNLV,O=mkcert development certificate
* start date: Aug 13 03:41:36 2021 GMT
* expire date: Nov 13 03:41:36 2023 GMT
* common name: (nil)
* issuer: CN=mkcert PC-20201120MNLV\\Administrator@PC-20201120MNLV,OU=PC-20201120MNLV\\Administrator@PC-20201120MNLV,O=mkcert development CA
> HEAD / HTTP/1.1
> User-Agent: curl/7.29.0
> Host: 192.168.2.25:8000
> Accept: */*
>
* HTTP 1.0, assume close after body
< HTTP/1.0 200 OK
HTTP/1.0 200 OK
< Server: SimpleHTTP/0.6 Python/3.9.6
Server: SimpleHTTP/0.6 Python/3.9.6
< Date: Fri, 13 Aug 2021 07:05:13 GMT
Date: Fri, 13 Aug 2021 07:05:13 GMT
< Content-type: text/html; charset=utf-8
Content-type: text/html; charset=utf-8
< Content-Length: 1536
Content-Length: 1536
<
* Closing connection 0
5、mkcert高级设置
可以使用打开 mkcert-v1.4.3-windows-amd64.exe –help 查看帮助,会发现很多高级用法。
比如 -cert-file FILE, -key-file FILE, -p12-file FILE 可以定义输出的证书文件名。
-client 可以产生客户端认证证书,用于SSL双向认证。之前的文章介绍过使用openssl脚本的(Nginx SSL快速双向认证配置 3),可以对比下。
-pkcs12 命令可以产生 PKCS12 格式的证书。java程序通常不支持 PEM 格式的证书,但是支持 PKCS12 格式的证书。通过这个程序我们可以很方便的产生 PKCS12 格式的证书直接给Java程序使用。
mkcert 127.0.0.1 localhost //后面还可以继续空格添加其他域名或IP地址,默认是pem格式
mkcert -pkcs12 192.168.10.123 //生成p12格式的正式iis可以用,默认密码为:“changeit”
mkcert -client 192.168.10.123 //客户端证书,默认是pem格式
mkcert -pkcs12 -client 192.168.10.123 //生成p12格式客户端证书,win用户可以直接导入,默认密码为:“changeit”
C:\>mkcert-v1.4.3-windows-amd64.exe -help
Usage of mkcert:
$ mkcert -install
Install the local CA in the system trust store.
$ mkcert example.org
Generate "example.org.pem" and "example.org-key.pem".
$ mkcert example.com myapp.dev localhost 127.0.0.1 ::1
Generate "example.com+4.pem" and "example.com+4-key.pem".
$ mkcert "*.example.it"
Generate "_wildcard.example.it.pem" and "_wildcard.example.it-key.pem".
$ mkcert -uninstall
Uninstall the local CA (but do not delete it).
Advanced options:
-cert-file FILE, -key-file FILE, -p12-file FILE
Customize the output paths.
-client
Generate a certificate for client authentication.
-ecdsa
Generate a certificate with an ECDSA key.
-pkcs12
Generate a ".p12" PKCS #12 file, also know as a ".pfx" file,
containing certificate and key for legacy applications.
-csr CSR
Generate a certificate based on the supplied CSR. Conflicts with
all other flags and arguments except -install and -cert-file.
-CAROOT
Print the CA certificate and key storage location.
$CAROOT (environment variable)
Set the CA certificate and key storage location. (This allows
maintaining multiple local CAs in parallel.)
$TRUST_STORES (environment variable)
A comma-separated list of trust stores to install the local
root CA into. Options are: "system", "java" and "nss" (includes
Firefox). Autodetected by default.
C:\>
6、文章参考链接
参考链接:本地https快速解决方案——mkcert
官方文档:https://github.com/FiloSottile/mkcert#mkcert
下载链接:https://github.com/FiloSottile/mkcert/releases
|