Python 如何优雅地生成 HTML 文档 Dominate |
您所在的位置:网站首页 › html用什么打开文档 › Python 如何优雅地生成 HTML 文档 Dominate |
Python 如何优雅地生成 HTML 文档 Dominate
|
引言
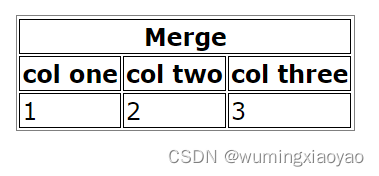
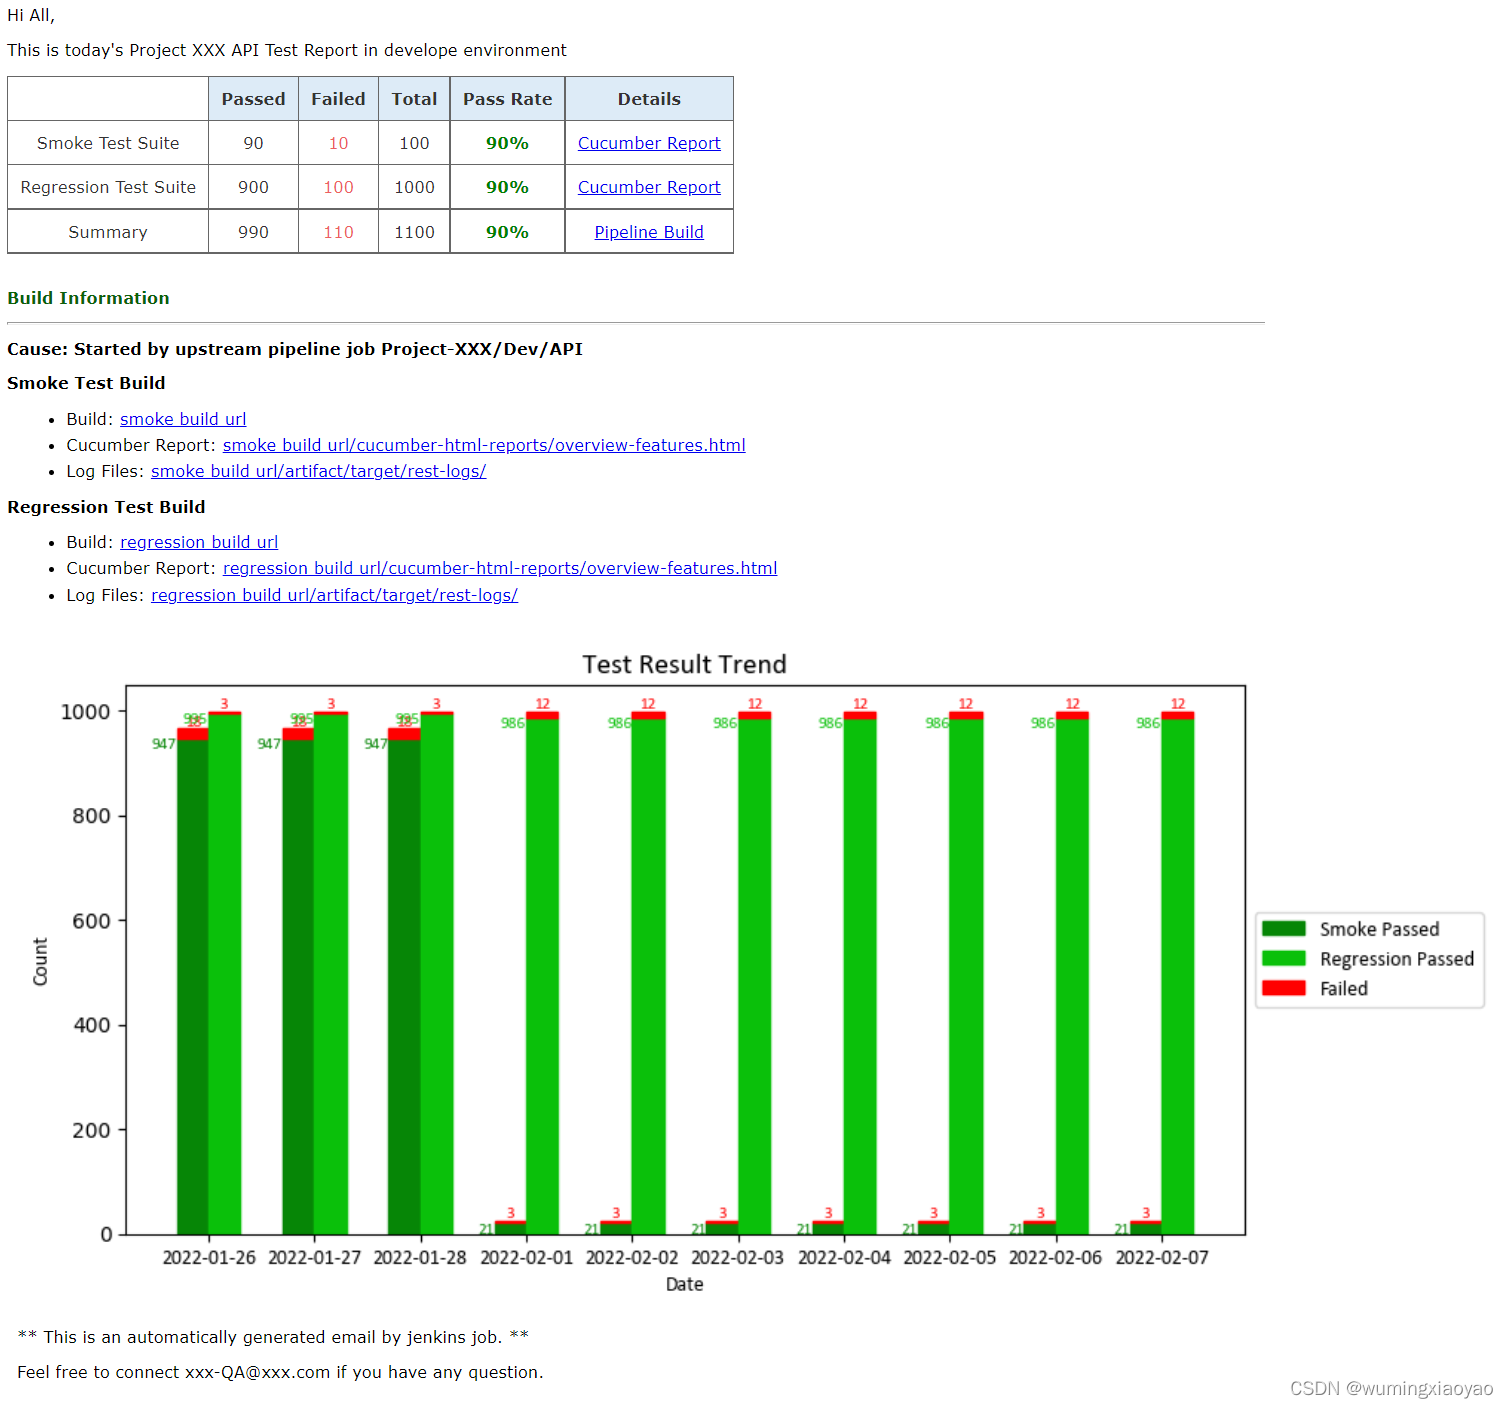
工作中有需要创建一个 HTML 报告,比如测试用例运行报告等。如何优雅地,简洁地创建 HTML 文档,经过一番调研,发现 Python 中的 Dominate 最佳。本文通过介绍 Donimate 的用法,最后再结合一个具体的 html 测试报告实例。 内容提要: Dominate 简介创建一个空的 html 文档streamline 流式添加 html 元素添加/更改 attributes 属性创建复杂结构的 html 元素 += 操作 .add() 迭代器添加 Comment 注释with 上下文管理器添加 html 元素 简单的 with 语句 嵌套的 with 语句 更改 属性 更改 textDecorators 修饰器添加 html 元素应用样式 style css创建一个 html 测试报告实例 Dominate 简介Dominate 是一个 Python 库,利用优雅的 DOM API 来创建和操作 HTML 文档。使用 Dominate 可以用简洁的纯 Pyhon 语句编写 HTML 页面。这消除了学习模板语言的需要,还可以充分利用 Python 的强大功能。 首先需要安装 Dominate 库,然后再导入对应的模块: pip install dominate from dominate.tags import * import dominate 创建一个空的 html 文档doc = dominate.document() from dominate.tags import * import dominate doc = dominate.document(title='hello') # save as html file with open('test.html', 'w') as f: f.write(doc.render())默认render() 将 html 内容按人类可读的形式输出,每个 html 元素一行,按2个空格的缩进。 生成的文档是这样的 DOCTYPE html> hello如果 f.write(doc.render(pretty=False)),则输出: DOCTYPE html> hello最简单的 html 文档 doc = html() 就只生成 html tag streamline 流式添加 html 元素Dominate 最基本的特征就是 HTML 每个元素都是一个类,它的构造函数就是接受它的子元素,text 或 一些属性。注意这种形式通常是最后一层元素接受一些属性定义,其父类只能接收子元素。 print(html(body(h1('Hello, World!'))))输出 Hello, World! 添加/更改 attributes 属性Dominate 可以用关键字参数来添加 tag 的属性。大多数属性是直接从 HTML spec 拷贝过来,当然也有少数不一样。 添加属性 print(label('label text', cls='classname anothername', fr='someinput'))输出: label text 更改属性当然也可以通过下面的方式去更改属性 from dominate.tags import * header = div(id='header') header['id'] = 'newHeader' print(header)输出: 更改 text from dominate.tags import * d = div('hello') d[0] = 'ni hao' print(d)输出: ni hao 应用属性实现表格 table 单元格合并表格单元格的合并,可以通过属性 colspan 来实现 来实现一下面的 table 效果: 生成的 HTML 标签: Merge col one col two col three 1 2 3 创建复杂结构的 html 元素通过使用 += 操作和 .add() 方法,可以很容易地创建更复杂的结构。 += 操作 from dominate.tags import * list = ul() for item in range(4): list += li('Item #', item) print(list)输出: Item #0 Item #1 Item #2 Item #3 迭代器 from dominate.tags import * menu_items = {'Home':'/home', 'About':'/about', 'Download':'/download', 'Link':'link'} print(ul(li(a(name, href=link), __pretty=False) for name, link in menu_items.items()))输出: Home About Download Link .add() 方法 from dominate.tags import * _html = html() _body = _html.add(body()) header = _body.add(div(id='header')) content = _body.add(div(id='content')) footer = _body.add(div(id='footer')) print(_html)输出: 添加 Comment 注释 from dominate.tags import * print(comment('BEGIN HEADER')) print(comment(p('Upgrade to newer IE!'), condition='lt IE9')) with 上下文管理器添加 html 元素可以用 Python 的 with 语句来添加子元素。 简单的 with 语句 from dominate.tags import * h = ul() with h: li('One') li('Two') li('Three') print(h)输出: One Two Three 嵌套的 with 语句 from dominate.tags import * h = html() with h.add(body()).add(div(id='content')): h1('Hello World!') p('Lorem ipsum ...') with table().add(tbody()): l = tr() l += td('One') l.add(td('Two')) with l: td('Three') print(h)输出: Hello World! Lorem ipsum ... One Two Three 更改属性 from dominate.tags import * d = div(id='header') with d: attr(id='newHeader') print(d)输出: 更改 text需要导入 dominate.util.text 函数: from dominate.tags import * from dominate.util import text para = p('hi,\n', pretty=False) with para: text('Have a look at our ') a('other products', href='/products') print(para)输出: hi, Have a look at our other products Decorators 修饰器添加 html 元素可以用这种模式创建反复利用的小工具: def widget(parameters): with tag() as t: ... return t例如: from dominate.tags import * def greeting(name): with div() as d: p('Hello, %s' % name) return d print(greeting('Bob'))输出: Hello, Bob用 tag 作为装饰器,也可以取到相同的效果 from dominate.tags import * @div def greeting(name): p('Hello %s' % name) print(greeting('Bob'))再来看一下例子: from dominate.tags import * @div(h2('Welcome'), cls='greeting') def greeting(name): p('Hello %s' % name) print(greeting('Bob'))输出: Welcome Hello Bob 应用样式 style css为了生成更漂亮的 html,我们会定义 html tag 的样式即 CSS,Dominate 怎样应用样式呢,很简单,跟生成 html 其它 tag 一样,只是样式就要应用到 style 添加到 head 部分。 如下,我们定义 html tag p 和 div 的样式(字体,颜色等等)。 from dominate.tags import * style_applied = ''' p{ font-family: verdana; font-size:11px; color:red; background-color: #DDEBF7; } div{ font-family: arial; font-size:20px; color:blue; } ''' def generate_html(): html_root = html() # html head with html_root.add(head()): style(style_applied, type='text/css') # html body with html_root.add(body()): p("this p tag content") font("this is font tag content") div("this is div tag content") # save as html file with open('css_test.html', 'w') as f: f.write(html_root.render()) if __name__ == "__main__": generate_html()生成 html 效果: 结合上面的知识点,我们来创建一个测试报告,数据是 mock 的,有关直方图的生成,请参考 Python 绘制直方图 效果如下: |
 代码:
代码: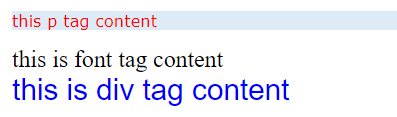
 完整代码:
完整代码:【本文地址】
今日新闻 |
推荐新闻 |