Flutter 嵌套滚动 CustomScrollView 示例 |
您所在的位置:网站首页 › html嵌套列表图 › Flutter 嵌套滚动 CustomScrollView 示例 |
Flutter 嵌套滚动 CustomScrollView 示例
|
文章目录
CustomScrollView添加头部视差滑动监听滑动ScrollControllerNotificationListener回到顶部功能
CustomScrollView
来源: CustomScrollView 是可以使用Sliver来自定义滚动模型(效果)的组件。举个例子,假设有一个页面,顶部需要一个GridView,底部需要一个ListView,而要求整个页面的滑动效果是统一的,即它们看起来是一个整体。如果使用GridView+ListView来实现的话,就不能保证一致的滑动效果,而CustomScrollView 就可以实现这个效果。
简易版代码如下: class CustomScrollViewTestRoute extends StatelessWidget { @override Widget build(BuildContext context) { return Material( child: CustomScrollView( slivers: [ SliverAppBar( //AppBar,包含一个导航栏 ), SliverPadding( padding: const EdgeInsets.all(8.0), sliver: new SliverGrid( //Grid 内容 ), ), new SliverFixedExtentList( // ListView 内容 ), ], ), ); } } 添加头部可以使用 SliverPersistentHeader 来实现,也可以直接在ListView顶部添加一个 Head来实现。 效果如下: 参考:Flutter:Slivers大家族,让滑动视图的组合变得很简单! 使用 SliverPersistentHeader 来实现需要自定义类继承SliverPersistentHeaderDelegate class _SliverAppBarDelegate extends SliverPersistentHeaderDelegate{ _SliverAppBarDelegate({ @required this.minHeight, @required this.maxHeight, @required this.child, }); final double minHeight; final double maxHeight; final Widget child; @override double get minExtent => minHeight; @override double get maxExtent => math.max(maxHeight, minHeight); @override Widget build( BuildContext context, double shrinkOffset, bool overlapsContent) { return new SizedBox.expand(child: child); } @override bool shouldRebuild(_SliverAppBarDelegate oldDelegate) { return maxHeight != oldDelegate.maxHeight || minHeight != oldDelegate.minHeight || child != oldDelegate.child; } }使用的时候直接添加到sliver里面即可 SliverPersistentHeader( pinned: false, floating: false, delegate: _SliverAppBarDelegate( minHeight: 60.0, maxHeight: 250.0, child: Container( color: Colors.blue, child: Center( child: Text('header',style: TextStyle(color: Colors.white),), ) ), ), ), 视差滑动视差滚动是指让多层背景以不同的速度移动,在形成立体滚动效果的同时,还能保证良好的视觉体验。 效果图如下: 做过Android 开发的都知道CollapsingToolbarLayout控件,它可以实现页面头部展开、合并的视差效果。在Flutter中是通过SliverAppBar组件实现类似的效果。 直接查看SliverAppBar组件支持的字段吧: const SliverAppBar({ Key key, this.leading,// 左侧的widget this.automaticallyImplyLeading = true, this.title,//标题 this.actions,//标题右侧的操作 this.flexibleSpace,// 背景widget,如 FlexibleSpaceBar 可设置标题,背景图片,标题边距等 this.bottom, // 底部区 this.elevation,//阴影 this.forceElevated = false,//是否显示阴影 this.backgroundColor,//背景颜色 this.brightness,//状态栏主题 this.iconTheme,// 图标主题 this.actionsIconTheme,//action图标主题 this.textTheme,//文字主题 this.primary = true,//是否显示在状态栏的下面,false就会占领状态栏的高度 this.centerTitle,//标题居中显示 this.titleSpacing = NavigationToolbar.kMiddleSpacing,//标题横向间距 this.expandedHeight,//合并的高度,默认是状态栏的高度加AppBar的高度 this.floating = false,//滑动时是否悬浮 this.pinned = false,// 滑动时标题栏是否固定 this.snap = false,// 滑动时标题栏跟随移动并固定在顶部, pinned 和 floating 效果的组合 this.stretch = false,// 标题跟随滑动时拉伸,收缩 this.stretchTriggerOffset = 100.0,// 标题跟随滑动时拉伸,收缩的偏移量 this.onStretchTrigger,// 跟随滑动时拉伸,收缩的回调 this.shape,// 阴影形状,elevation 大于0 才会显示 })在字段的后面都写明了相应的介绍,只需要在使用的时候设置相关的参数即可实现效果。 监听滑动 ScrollController使用列表提供的controller字段,并调用监听方法监听滑动距离 _controller.addListener((){ print('_controller offset : ${_controller.offset}'); }); NotificationListener 使用ScrollNotification控件去监听滚动列表。 @override Widget build(BuildContext context) { return Material( child: NotificationListener( onNotification: (scrollNotification) { //注册通知回调 if (scrollNotification is ScrollStartNotification) { //滚动开始 print('Scroll Start: ${scrollNotification.metrics.pixels}'); }else if (scrollNotification is ScrollUpdateNotification) { //滚动位置更新 print('Scroll Update: ${scrollNotification.metrics.pixels}'); } else if (scrollNotification is ScrollEndNotification) { //滚动结束 print('Scroll End: ${scrollNotification.metrics.pixels}'); } return false; }, child: CustomScrollView( controller: _controller, // 滑动列表 widget ), ) ); } 回到顶部功能在新闻列表,或者列表数据很多的时候,我们往后翻好几页之后,突然想回到列表的顶部,这时候该如何实现呢?
实现源码如下: class _CustomScrollViewPageState extends State { //滑动控制器 ScrollController _controller; @override void initState() { //初始化控制器 _controller = ScrollController(); super.initState(); } @override void dispose() { //销毁控制器 _controller.dispose(); super.dispose(); } @override Widget build(BuildContext context) { return Material( child: CustomScrollView( controller: _controller, slivers: [ //AppBar,包含一个导航栏 SliverAppBar( pinned: true, expandedHeight: 250.0, actions: [ RaisedButton( child: Text('返回顶部'), onPressed: (){ _controller.animateTo(.0, duration: Duration(milliseconds: 200), curve: Curves.ease); }, ) ], flexibleSpace: FlexibleSpaceBar( title: const Text('CustomScrollView'), background: Image.network( "https://ssyerv1.oss-cn-hangzhou.aliyuncs.com/picture/389e31d03d36465d8acd9939784df6f0.jpg!sswm", fit: BoxFit.cover,), ), ), //List new SliverFixedExtentList( itemExtent: 50.0, delegate: new SliverChildBuilderDelegate( (BuildContext context, int index) { //创建列表项 return new Container( alignment: Alignment.center, color: Colors.lightBlue[100 * (index % 9)], child: new Text('list item $index'), ); }, childCount: 50 //50个列表项 ), ), ], ), ); } }完~ |
 实现源码请查看原文:CustomScrollView
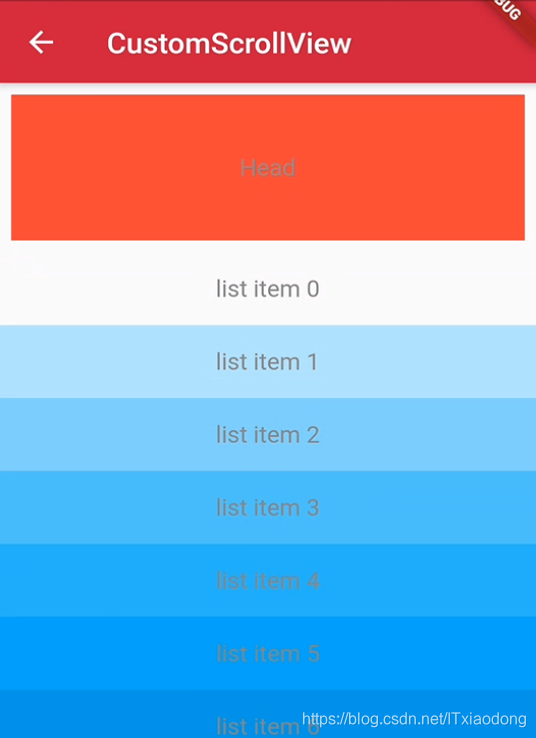 源码实现也很简单,这里直接在CustomScrollView里面嵌套两个SliverFixedExtentList,一个显示Head 头部,一个显示List 列表。
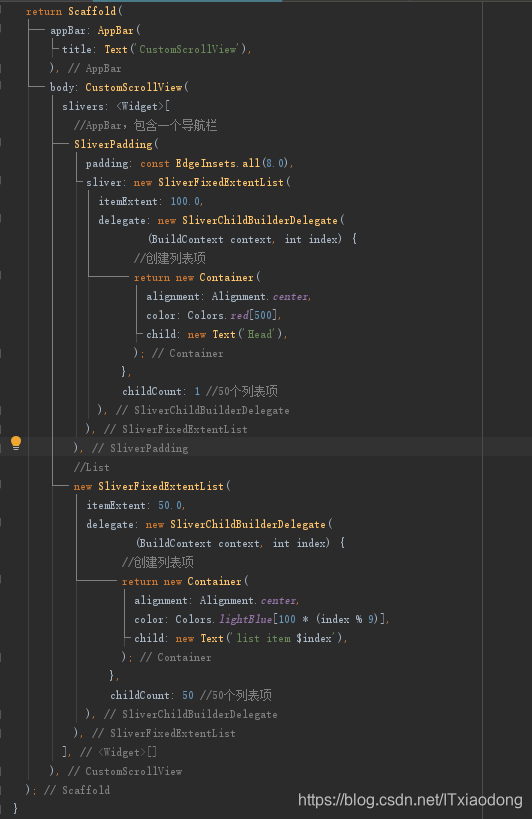
 要实现该效果主要用到了SliverAppBar组件。
【本文地址】
今日新闻 |
推荐新闻 |