|
文章目录
前言
一、数据集的准备
1.标注工具的安装
2.数据集的准备
3.标注数据
4.解释xml文件的内容
二、数据转换
1.解析XML文件
2.转换得到hdev文件
1.变量定义
2.读取种类
3.解析trainList.txt
4.生成字典
三、模型训练
1.参数定义
2.创建目标检测模型
3.数据预处理
4.显示标注文件
5.模型训练
1.学习率设置
2.初始化训练模型
3.模型训练
四、模型评估
1.初始化模型
2.创建模型及训练模型
四、模型评估及验证
五、模型预测
1.载入模型
2.载入预测
总结
前言
本文讲解使用halcon的目标检测是使用步骤,标注工具不使用halcon提供的标注工具,而是使用各个深度学习框架都使用的labelImg工具,然后使用hde脚本以及python脚本转化为标准的halcon训练及文件 本文涉及数据标注、数据转化、训练、评估、预测几个模块。
一、数据集的准备
首先我是用的是halcon数据集里边的药片,去了前边的100张做标注,后面的300张做测试,其中100张里边选择90张做训练集,10张做验证集。
1.标注工具的安装
pip install labelimg
进入cmd,输入labelimg,会出现如图的标注工具: 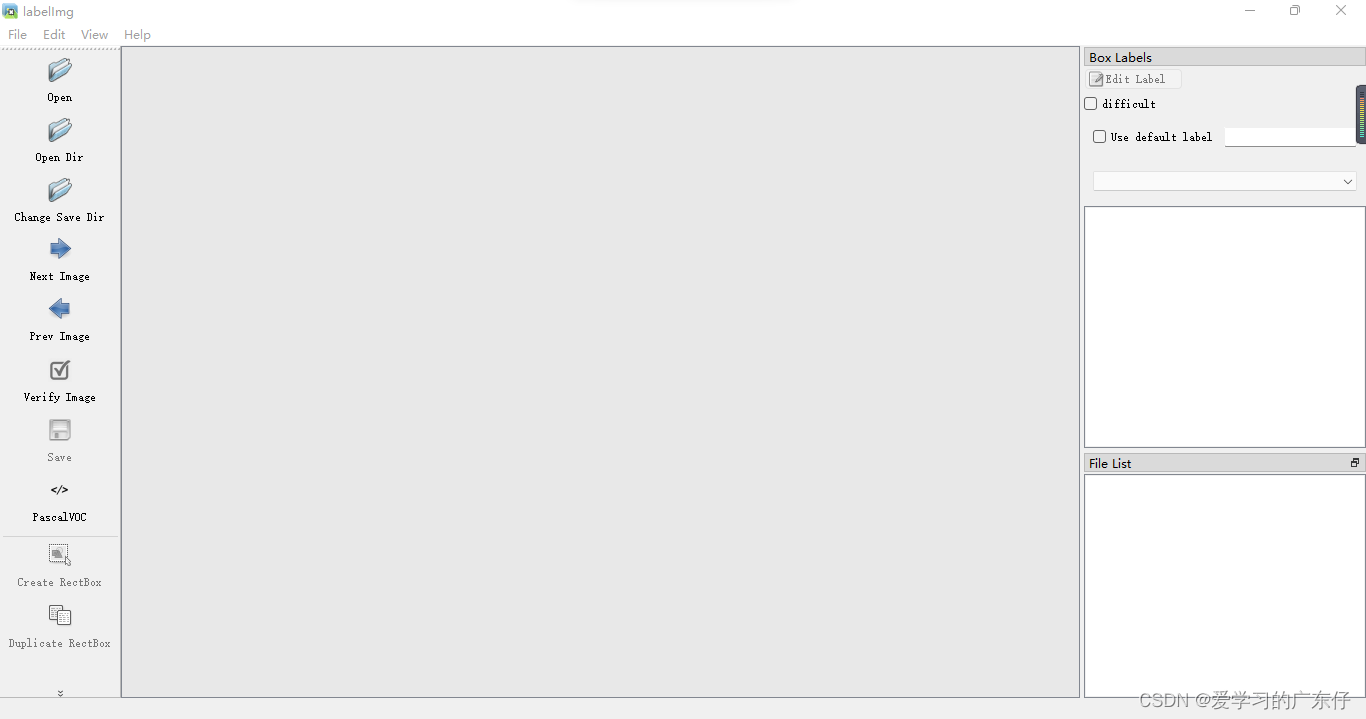
2.数据集的准备
首先我们先创建3个文件夹,如图: 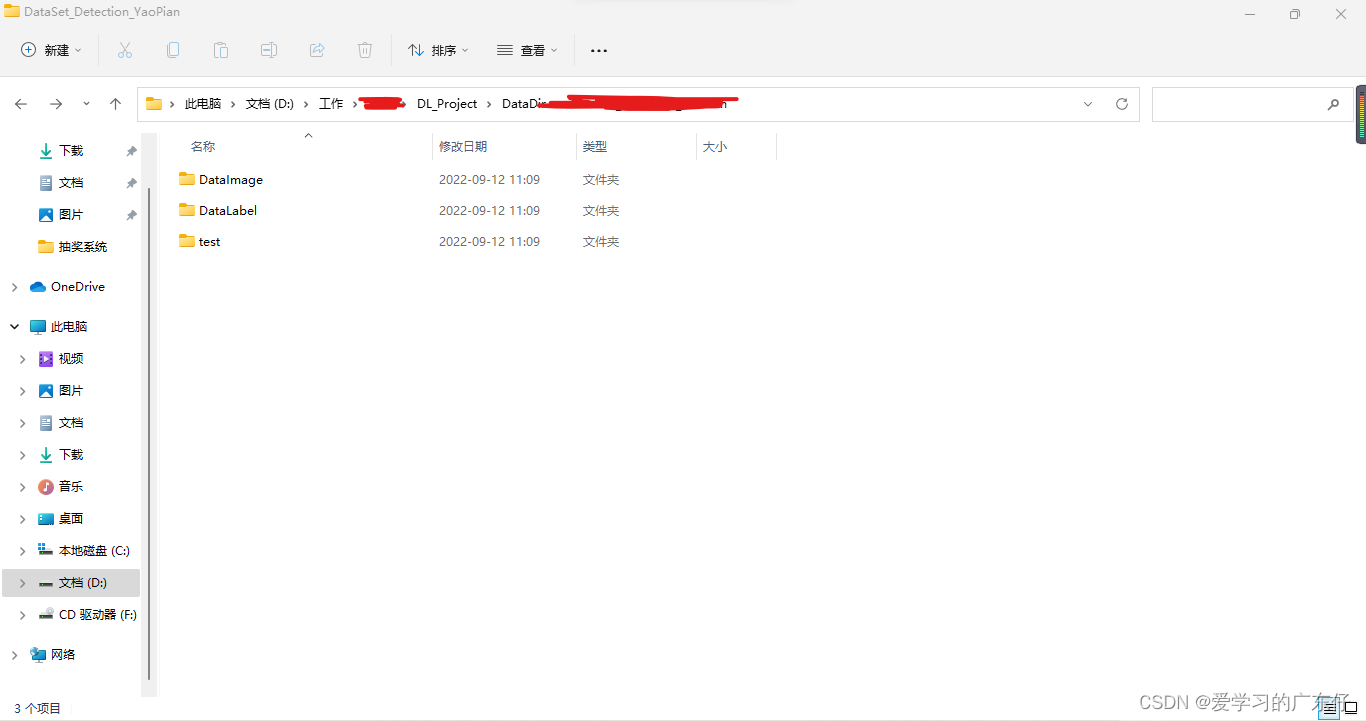 DataImage:100张需要标注的图像 DataLabel:空文件夹,主要是存放标注文件,这个在labelimg中生成标注文件 test:存放剩下的300张图片,不需要标注 DataImage目录下和test目录的存放样子是这样的(以DataImage为例): DataImage:100张需要标注的图像 DataLabel:空文件夹,主要是存放标注文件,这个在labelimg中生成标注文件 test:存放剩下的300张图片,不需要标注 DataImage目录下和test目录的存放样子是这样的(以DataImage为例): 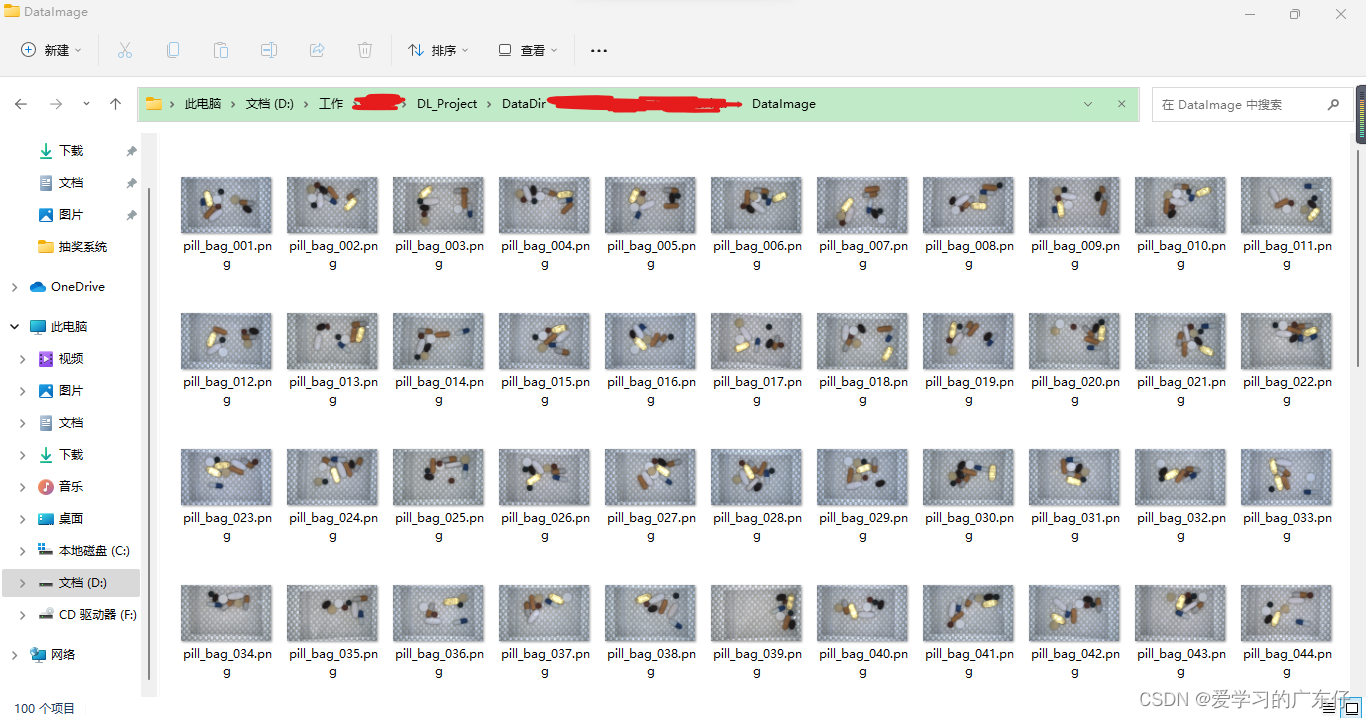
3.标注数据
首先我们需要在labelimg中设置图像路径和标签存放路径,如图:  然后先记住快捷键:w:开始编辑,a:上一张,d:下一张。这个工具只需要这三个快捷键即可完成工作。 开始标注工作,首先按下键盘w,这个时候进入编辑框框的模式,然后在图像上绘制框框,输入标签(框框属于什么类别),即可完成物体1的标注,一张物体可以多个标注和多个类别,但是切记不可摸棱两可,比如这张图像对于某物体标注了,另一张图像如果出现同样的就需要标注,或者标签类别不可多个,比如这个图象A物体标注为A标签,下张图的A物体标出成了B标签,最终的效果如图: 然后先记住快捷键:w:开始编辑,a:上一张,d:下一张。这个工具只需要这三个快捷键即可完成工作。 开始标注工作,首先按下键盘w,这个时候进入编辑框框的模式,然后在图像上绘制框框,输入标签(框框属于什么类别),即可完成物体1的标注,一张物体可以多个标注和多个类别,但是切记不可摸棱两可,比如这张图像对于某物体标注了,另一张图像如果出现同样的就需要标注,或者标签类别不可多个,比如这个图象A物体标注为A标签,下张图的A物体标出成了B标签,最终的效果如图: 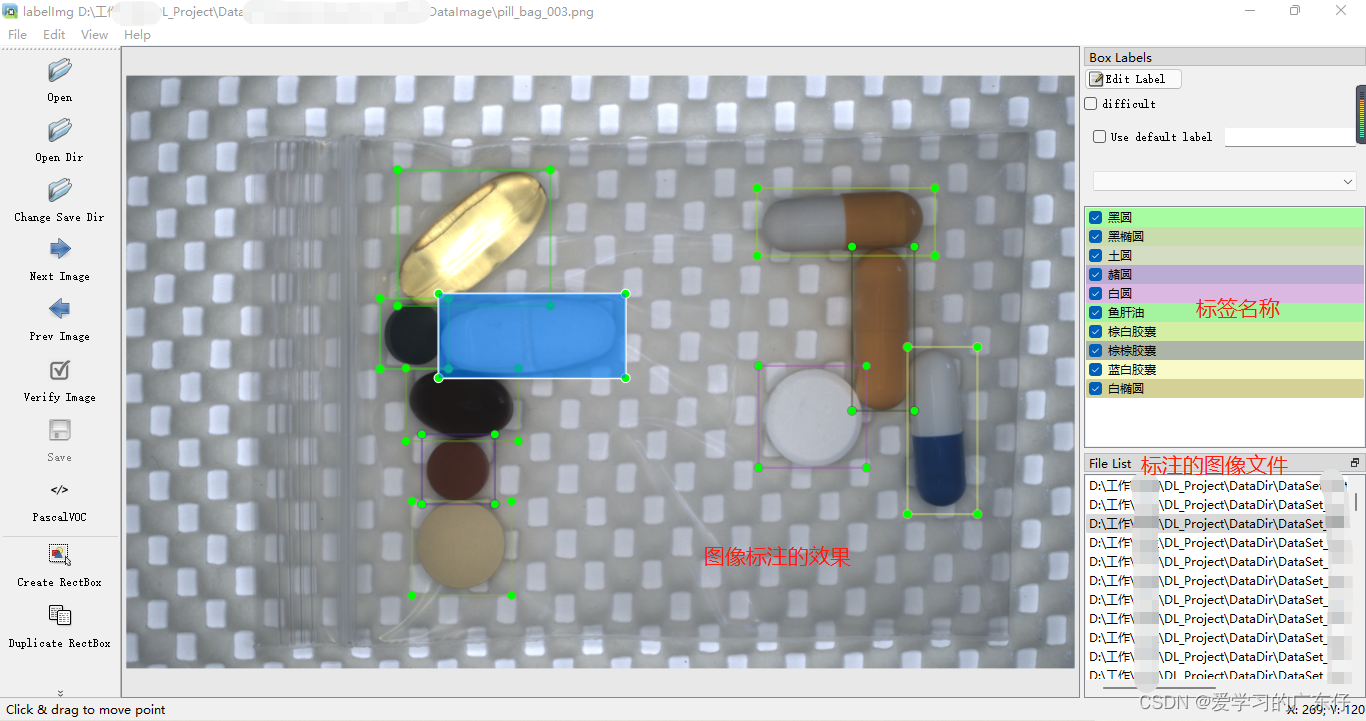 最后标注完成会在DataLabel中看到标注文件,json格式: 最后标注完成会在DataLabel中看到标注文件,json格式: 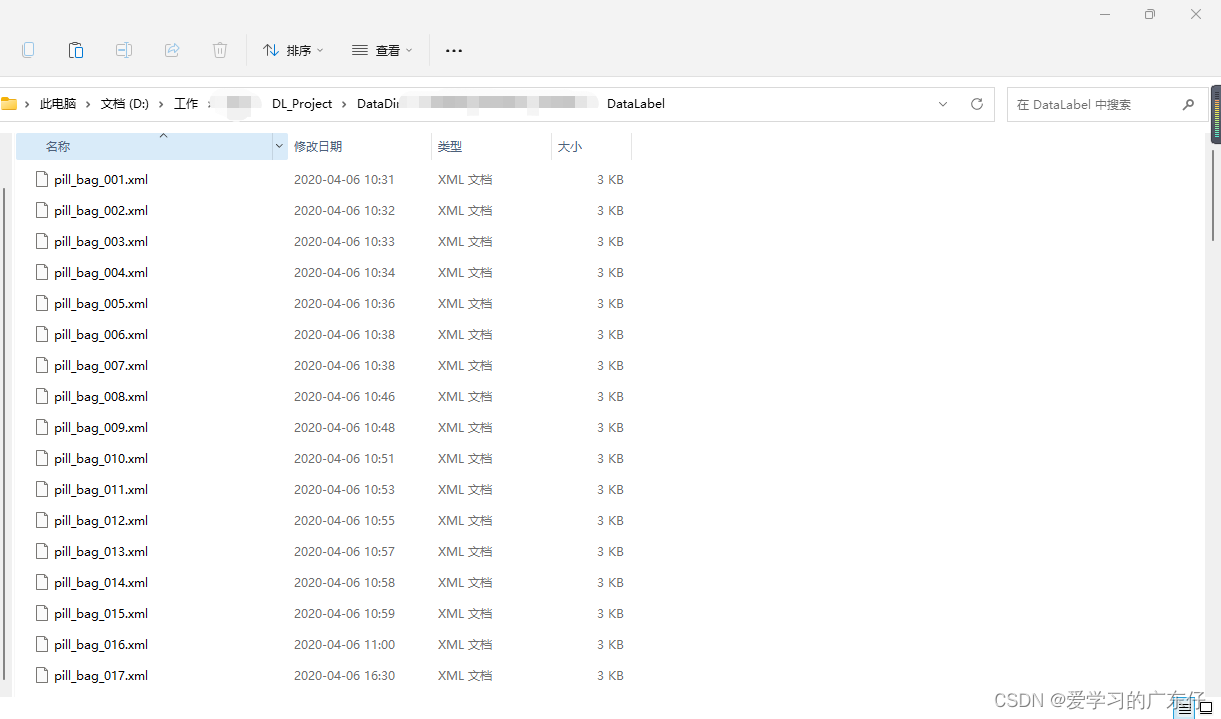
4.解释xml文件的内容
 xml标签文件如图,我们用到的就只有object对象,对其进行解析即可。 xml标签文件如图,我们用到的就只有object对象,对其进行解析即可。
二、数据转换
数据转换分为两步,首先使用python脚本解析xml文件,然后使用hdev脚本实现halcon训练所需要的训练文件
1.解析XML文件
此处解析xml,提取每张图像的目标类别及位置
with open(xmlfile, "r", encoding="utf-8") as in_file:
tree = ET.parse(in_file)
root = tree.getroot()
for obj in root.iter('object'):
cls = obj.find('name').text
if cls not in classes:
classes.append(cls)
cls_id = classes.index(cls)
xmlbox = obj.find('bndbox')
b = (int(xmlbox.find('xmin').text),int(xmlbox.find('ymin').text), int(xmlbox.find('xmax').text),int(xmlbox.find('ymax').text))
list_file += " " + ",".join([str(a) for a in b]) + ',' + str(cls_id)
if cls not in label_name_dict:
label_name_dict[cls]=0
label_name_dict[cls]+=1
TrainDataList.append(list_file)
with open(os.path.join(SaveDir,'classes.txt'), encoding="utf-8", mode="w") as f:
for each in range(len(classes)):
f.write(classes[each] + "\n")
with open(os.path.join(SaveDir,'TrainList.txt'), encoding="utf-8", mode="w") as f:
for each in TrainDataList:
f.write(each + "\n")
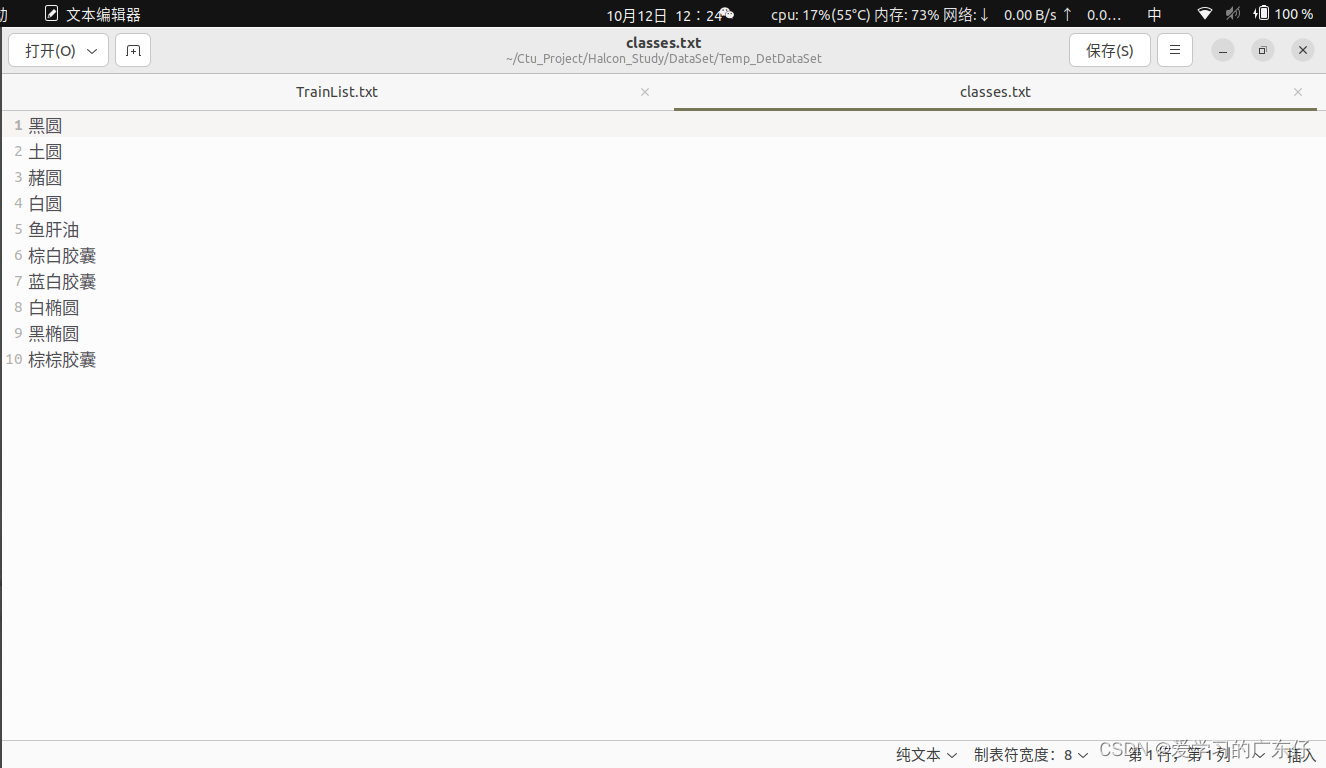
最 后得到的效果主要是两个txt文件: ‘TrainList.txt’:训练数据 ‘classes.txt’:类别数据 如图: 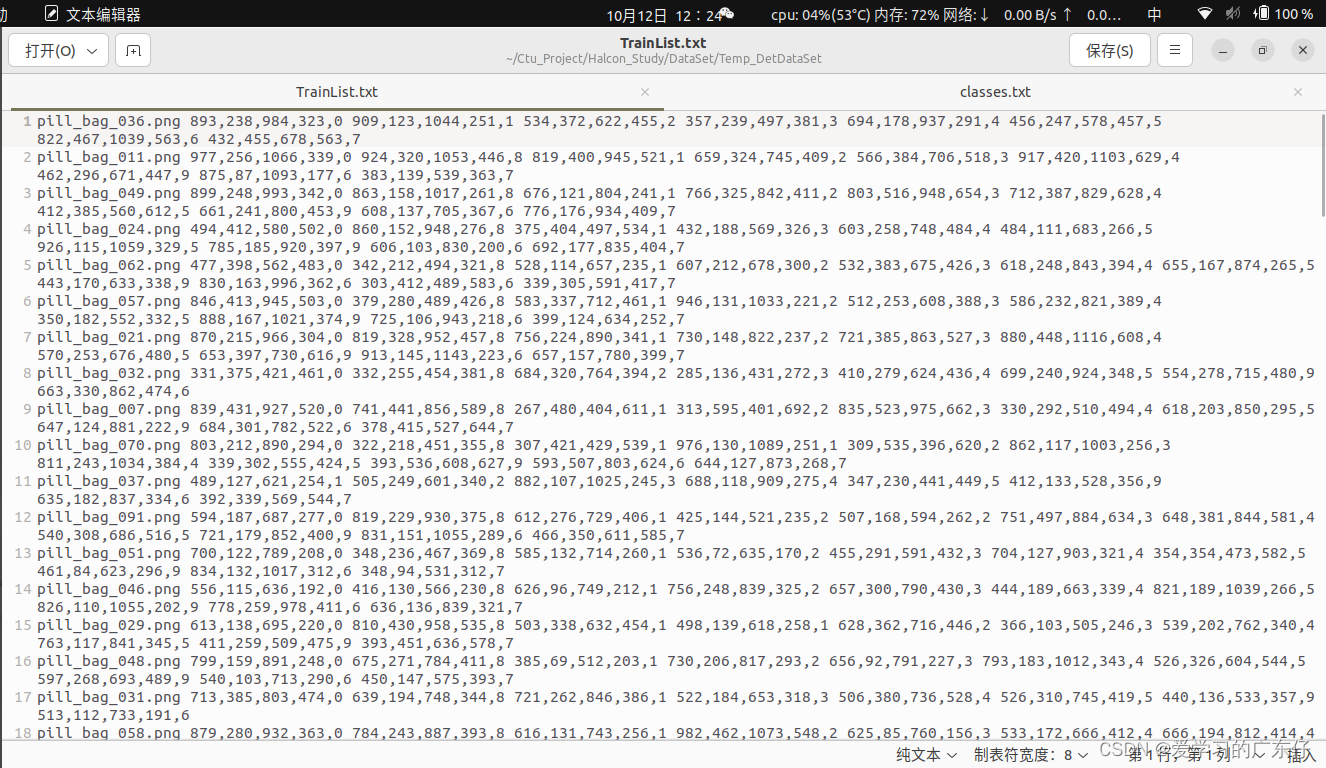
2.转换得到hdev文件
1.变量定义
* 前边生成的类别文件
class_txt:='../DataSet/Temp_DetDataSet/classes.txt'
* 前边生成的数据标注文件
train_txt:='../DataSet/Temp_DetDataSet/TrainList.txt'
* 基于halcon转化脚本下的图像保存路径
ImageDir:='../DataSet/DataImage'
* 基于halcon训练脚本下的图像保存路径
BaseImgDir:='./DataSet/DataImage'
* 保存为halcon识别的训练文件
dict_File:='../DataSet/Temp_DetDataSet/dl_dataset.hdict'
2.读取种类
open_file (class_txt, 'input', FileHandle)
repeat
fread_line(FileHandle, oneline, IsEOF)
if(IsEOF == 1)
break
endif
if(oneline == ' ' or oneline=='\n')
continue
endif
tuple_regexp_replace (oneline, '\n', '', oneline)
tuple_length (ClassID, Length)
ClassID[Length]:=Length+1
tuple_concat (ClassName, oneline, ClassName)
until (IsEOF)
3.解析trainList.txt
TrainDataList:=[]
open_file (train_txt, 'input', FileHandle)
repeat
fread_line(FileHandle, oneline, IsEOF)
if(IsEOF == 1)
break
endif
if(oneline == ' ' or oneline=='\n')
continue
endif
tuple_regexp_replace (oneline, '\n', '', oneline)
tuple_concat (TrainDataList, oneline, TrainDataList)
until (IsEOF)
4.生成字典
for Index := 0 to |TrainDataList|-1 by 1
EachTrainList:=TrainDataList[Index]
tuple_split (EachTrainList, ' ', DataList)
imageFile:=DataList[0]
tuple_length (DataList, Length)
DataList:=DataList[1:Length-1]
create_dict (SampleImage)
set_dict_tuple (SampleImage, 'image_id', Index+1)
set_dict_tuple (SampleImage, 'image_file_name', imageFile)
bbox_label_id:=[]
bbox_row1:=[]
bbox_col1:=[]
bbox_row2:=[]
bbox_col2:=[]
for bbox_index:=0 to |DataList|-1 by 1
bbox_data:=DataList[bbox_index]
tuple_split (bbox_data, ',', bbox_data_list)
tuple_number (bbox_data_list[4], Number)
tuple_concat (bbox_label_id, Number+1, bbox_label_id)
tuple_number (bbox_data_list[1], Number)
tuple_concat (bbox_row1, Number, bbox_row1)
tuple_number (bbox_data_list[0], Number)
tuple_concat (bbox_col1, Number, bbox_col1)
tuple_number (bbox_data_list[3], Number)
tuple_concat (bbox_row2, Number, bbox_row2)
tuple_number (bbox_data_list[2], Number)
tuple_concat (bbox_col2, Number, bbox_col2)
endfor
set_dict_tuple (SampleImage, 'bbox_label_id', bbox_label_id)
set_dict_tuple (SampleImage, 'bbox_row1', bbox_row1)
set_dict_tuple (SampleImage, 'bbox_col1', bbox_col1)
set_dict_tuple (SampleImage, 'bbox_row2', bbox_row2)
set_dict_tuple (SampleImage, 'bbox_col2', bbox_col2)
tuple_concat (AllSamples, SampleImage, AllSamples)
endfor
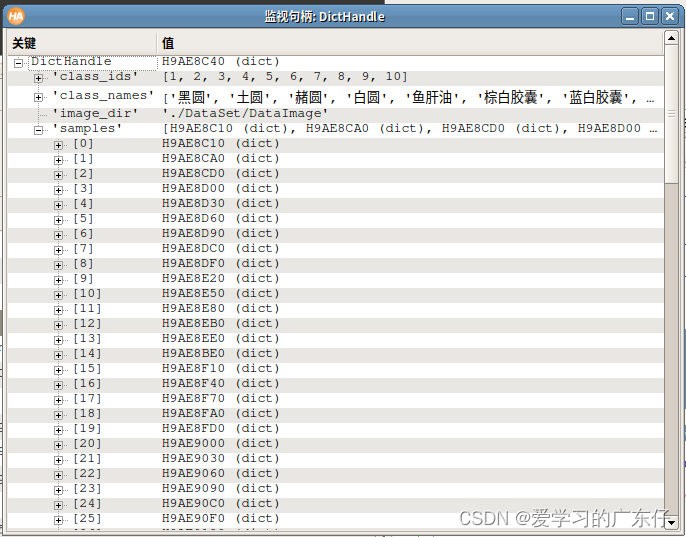
最后得到的字典结构如图所示:
三、模型训练
1.参数定义
* 主干网络结构
Base_ModelFile := ['pretrained_dl_classifier_compact.hdl','pretrained_dl_classifier_enhanced.hdl','pretrained_dl_classifier_resnet50.hdl']
* 先验框的设置
MinLevel := 2
MaxLevel := 4
NumSubscales := 3
AspectRatios := [1.0,0.5,2.0]
Capacity := 'medium'
* 显示预训练数据效果
showExample:=true
* 模型选择
ModelType := 1
* 输入网络结构的图像大小及通道
ImageWidth := 416
ImageHeight := 416
ImageNumChannels := 3
*上边脚本生成的训练文件
TrainDict:='./DataSet/Temp_DetDataSet/dl_dataset.hdict'
* 原图路径
ImgDir:='./DataSet/DataImage'
* 训练时生成的临时文件都放入此文件夹内
OutPutDir:='./DataSet/Temp_DetDataSet/Output'
DataDirectory := OutPutDir + '/dldataset_pill_bag_' + ImageWidth + 'x' + ImageHeight
* 保存最后训练模型以及效果最好模型
BestModelBaseName := OutPutDir + '/best_dl_model_detection'
FinalModelBaseName := OutPutDir + '/final_dl_model_detection'
DLDatasetFileName := DataDirectory + '/dl_dataset.hdict'
* 自定义保存最后的模型
ModelFile:='./best_Det.dat'
* 保存数据预处理的模型参数
ModelParams:='./det_params.hdict'
* 每次迭代的图片量
batch_size := 2
* 学习率
learning_rate := 0.001
* 优化器
Momentum := 0.9
* 迭代次数
NumEpochs := 600
2.创建目标检测模型
create_dict (DLModelDetectionParam)
set_dict_tuple (DLModelDetectionParam, 'image_width', ImageWidth)
set_dict_tuple (DLModelDetectionParam, 'image_height', ImageHeight)
set_dict_tuple (DLModelDetectionParam, 'image_num_channels', ImageNumChannels)
set_dict_tuple (DLModelDetectionParam, 'min_level', MinLevel)
set_dict_tuple (DLModelDetectionParam, 'max_level', MaxLevel)
set_dict_tuple (DLModelDetectionParam, 'num_subscales', NumSubscales)
set_dict_tuple (DLModelDetectionParam, 'aspect_ratios', AspectRatios)
set_dict_tuple (DLModelDetectionParam, 'capacity', Capacity)
create_dl_model_detection (Base_ModelFile[ModelType], NumClasses, DLModelDetectionParam, DLModelHandle)
set_dl_model_param (DLModelHandle, 'class_ids', class_ids)
3.数据预处理
TrainingPercent := 85
ValidationPercent := 15
SeedRand := 42
set_system ('seed_rand', SeedRand)
split_dl_dataset (DictHandle, TrainingPercent, ValidationPercent, [])
create_dl_preprocess_param_from_model (DLModelHandle, 'false', 'full_domain', [], [], [], DLPreprocessParam)
4.显示标注文件
dev_display_dl_data (DLSampleBatchDisplay[Index], [], DictHandle, 'bbox_ground_truth', GenParam, WindowHandleDict)
get_dict_tuple (WindowHandleDict, 'bbox_ground_truth', WindowHandles)
* 显示信息
dev_set_window (WindowHandles[0])
get_dict_object (Image, DLSampleBatchDisplay[Index], 'image')
get_image_size (Image, ImageWidth, ImageHeight)
dev_disp_text ('New image size after preprocessing: ' + ImageWidth + ' x ' + ImageHeight, 'window', 'bottom', 'right', 'black', [], [])
dev_set_window (WindowHandles[1])
dev_disp_text ('Press Run (F5) to continue', 'window', 'bottom', 'right', 'black', [], [])
5.模型训练
1.学习率设置
ChangeLearningRateEpochs :=[]
ChangeLearningRateValues :=[]
IndexNum:=0
for Index:=1 to 600 by 50
ChangeLearningRateEpochs[IndexNum] :=50*(IndexNum+1)
* 现在学习率 = 上一次学习率*0.5 每ChangeLearningRateEpochs次修改一次学习率
tuple_pow (0.9, (IndexNum+1), Pow)
ChangeLearningRateValues[IndexNum]:=learning_rate*Pow
IndexNum :=IndexNum + 1
endfor
2.初始化训练模型
read_dict (DLDatasetFileName, [], [], DLDataset)
set_dl_model_param (DLModelHandle, 'learning_rate', learning_rate)
set_dl_model_param (DLModelHandle, 'momentum', Momentum)
set_dl_model_param (DLModelHandle, 'batch_size', batch_size)
if (|WeightPrior| > 0)
set_dl_model_param (DLModelHandle, 'weight_prior', WeightPrior)
endif
set_dl_model_param (DLModelHandle, 'runtime_init', 'immediately')
3.模型训练
create_dl_train_param (DLModelHandle, NumEpochs, EvaluationIntervalEpochs, DisplayEvaluation, SeedRandom, GenParamName, GenParamValue, TrainParam)
train_dl_model (DLDataset, DLModelHandle, TrainParam, 0.0, TrainResults, TrainInfos, EvaluationInfos)
训练过程如图: 
四、模型评估
1.初始化模型
read_dict (DLDatasetFileName, [], [], DLDataset)
set_dl_model_param (DLModelHandle, 'learning_rate', learning_rate)
set_dl_model_param (DLModelHandle, 'momentum', Momentum)
set_dl_model_param (DLModelHandle, 'batch_size', batch_size)
if (|WeightPrior| > 0)
set_dl_model_param (DLModelHandle, 'weight_prior', WeightPrior)
endif
set_dl_model_param (DLModelHandle, 'runtime_init', 'immediately')
2.创建模型及训练模型
create_dl_train_param (DLModelHandle, NumEpochs, EvaluationIntervalEpochs, DisplayEvaluation, SeedRandom, GenParamName, GenParamValue, TrainParam)
train_dl_model (DLDataset, DLModelHandle, TrainParam, 0.0, TrainResults, TrainInfos, EvaluationInfos)
训练模型过程如图: 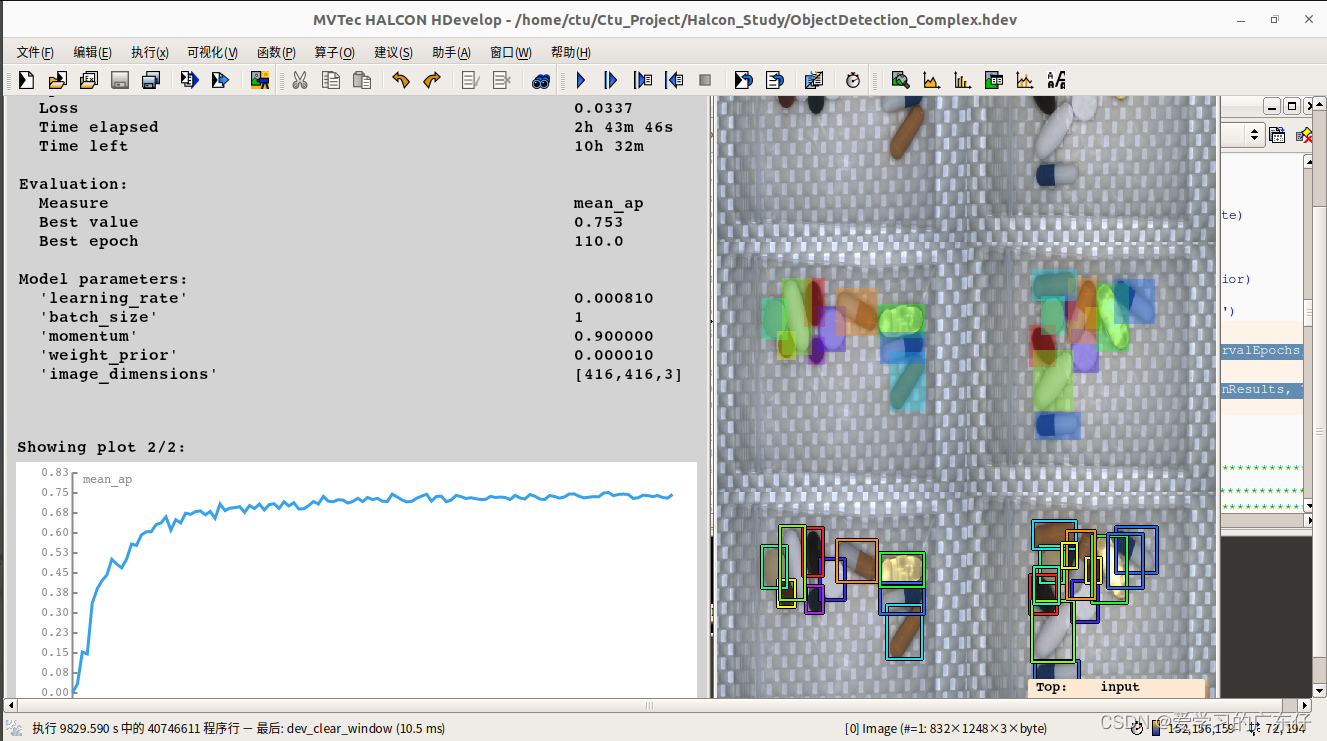
四、模型评估及验证
for Index := 0 to 5 by 1
read_dl_samples (DLDataset, DLSampleIndicesShuffled[Index], DLSampleBatch)
apply_dl_model (DLModelHandle, DLSampleBatch, [], DLResultBatch)
dev_display_dl_data (DLSampleBatch, DLResultBatch, DLDataset, 'bbox_both', GenParam, WindowHandleDict)
dev_disp_text ('Press Run (F5) to continue', 'window', 'bottom', 'right', 'black', [], [])
stop ()
endfor
效果如图: 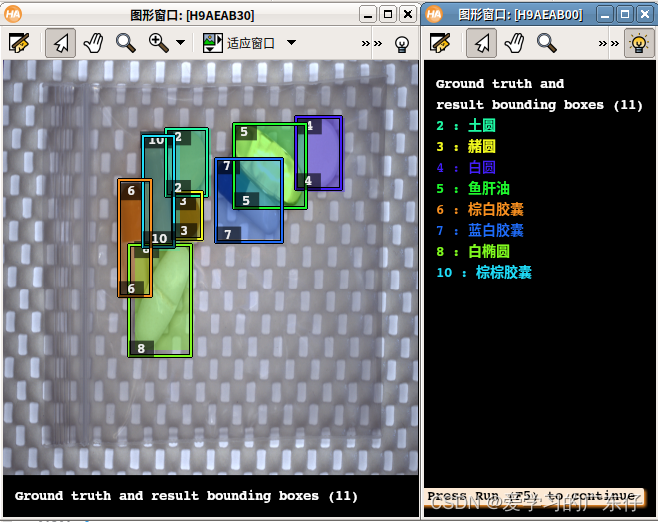 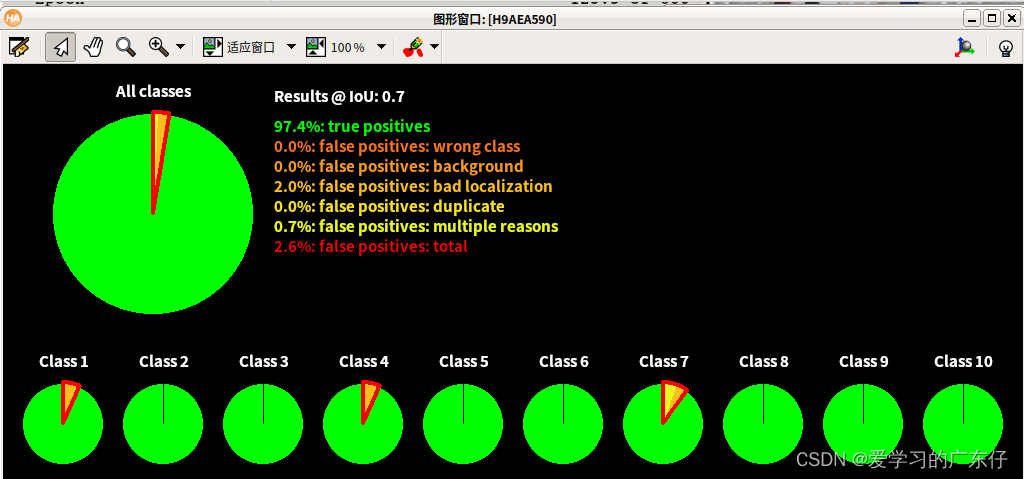 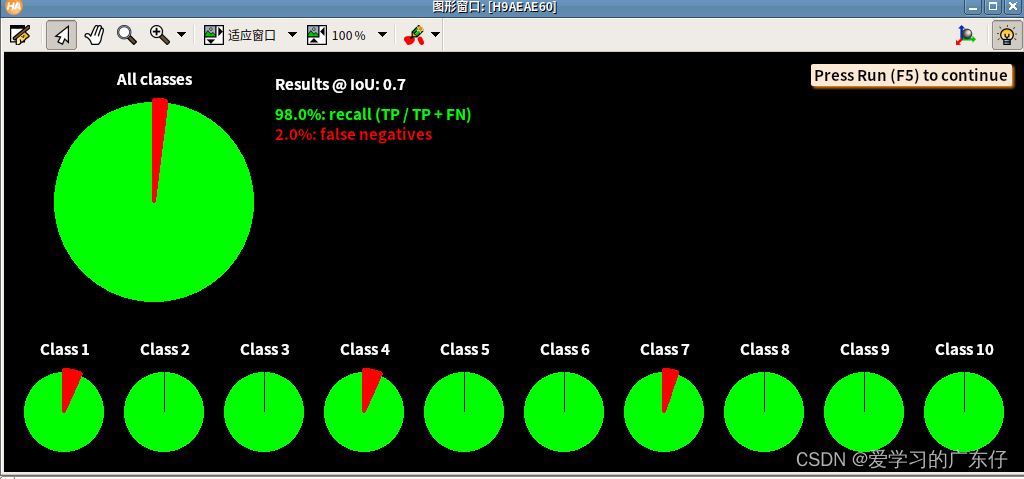 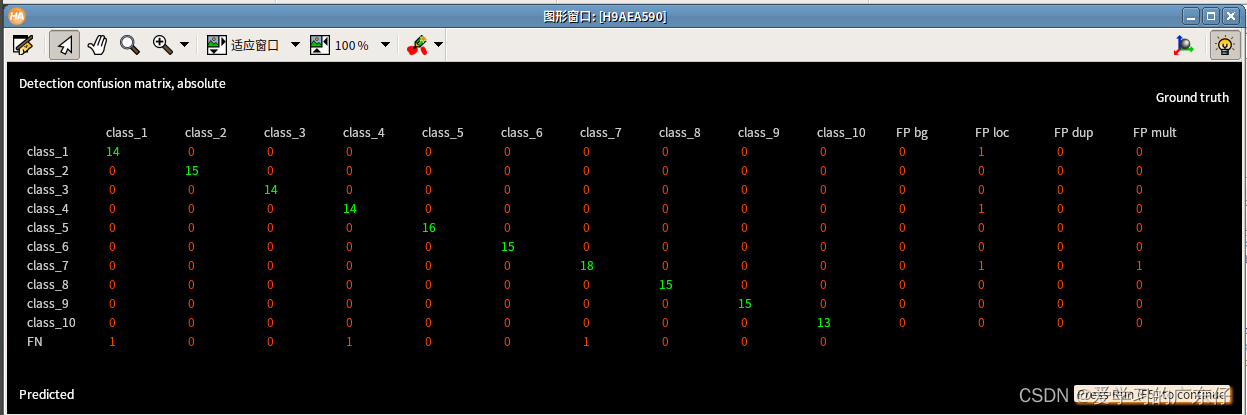
五、模型预测
1.载入模型
open_file (ModelFile, 'input_binary', FileHandle)
fread_serialized_item (FileHandle, SerializedItemHandle)
close_file (FileHandle)
deserialize_dl_model (SerializedItemHandle, DLModelHandle)
read_dict (TrainDict, [], [], DictHandle)
get_dict_tuple (DictHandle, 'class_ids', class_ids)
get_dict_tuple (DictHandle, 'class_names', class_names)
2.载入预测
read_image (ImageBatch, ImageFiles[Index1])
gen_dl_samples_from_images (ImageBatch, DLSampleBatch)
preprocess_dl_samples (DLSampleBatch, DLPreprocessParam)
apply_dl_model (DLModelHandle, DLSampleBatch, [], DLResultBatch)
效果如图: 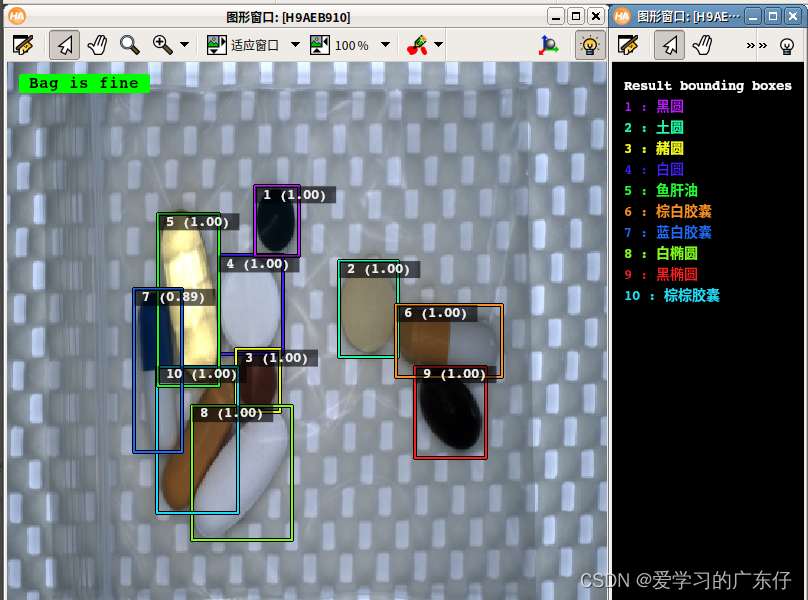 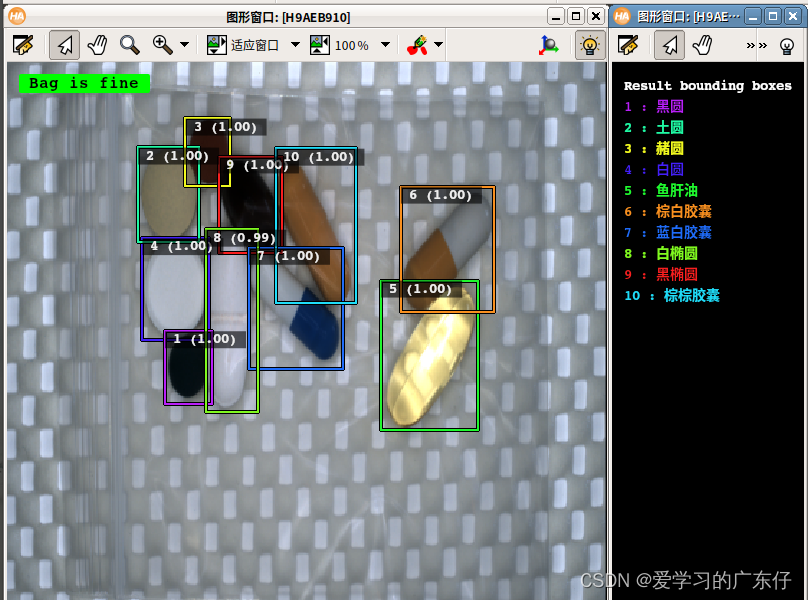
总结
无
|