Windows 系统如何在 C++ 项目中使用第三方库 |
您所在的位置:网站首页 › gcc路径增加第三方库 › Windows 系统如何在 C++ 项目中使用第三方库 |
Windows 系统如何在 C++ 项目中使用第三方库
|
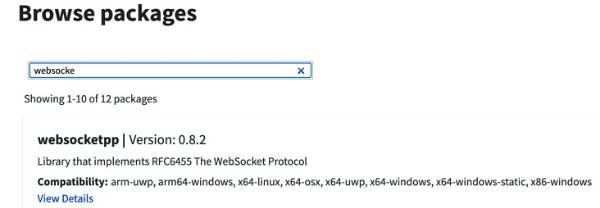
要使用第三方库, 首先需要进行安装. 在没有 vcpkg 以前, 安装第三方库需要在本地进行编译与链接, 而如果我们是新手, 则必然会遇到这样或那样难以解决的问题. 但有了 vcpkg 以后就不一样, vcpkg 会自动的替我们完成这一切. 参考:Visual Studio开源库集成器Vcpkg全教程--利用Vcpkg轻松集成开源第三方库_chenjm的专栏-CSDN博客_vcpkg 安装 vcpkg 以管理员权限运行 powershell, 执行进行 clone 项目, 运行批处理文件, 运行集成安装命令: PS C:\Users\panjie\GitHub> Git clone https://github.com/microsoft/vcpkg --depth=1 PS C:\Users\panjie\GitHub> cd .\vcpkg\ PS C:\Users\panjie\GitHub\vcpkg> .\Bootstrap-vcpkg.bat稍等一会, 待安装成功的提示. vcpkg 应该是 vc++ package manager 的简称, 即 vc++ 包管理器, 它的作用同其它的包管理器. 但可能是由于 c++ 出现的比较早, 所以其包管理器做的没有 NPM 这样的管理器那么优秀. 安装第三方包 使用 vcpkg 安装第三方包非常简单, 只需要执行 vcpkg install 包的名称即可. 如果我们不知道包的具体名称, 还可以使用 vcpkg search 包的名称来进行搜索, 比如我们想实现 websocket 功能, 则可以执行:.\vcpkg.exe search websocket. C:\opensmile3\vcpkg>.\vcpkg.exe search websocket beast 0 HTTP/1 and WebSocket, header-only using Boost.Asio and C++11 brynet 1.11.0 A C++ header only cross platform high performance tcp network library, and sup... bsio 1.0.0 networking library, ans support HTTP/WebSocket, based on asio. cpprestsdk[websockets] Websockets support ixwebsocket 11.2.3 Lightweight WebSocket Client and Server + HTTP Client and Server ixwebsocket[mbedtls] SSL support (mbedTLS) ixwebsocket[openssl] SSL support (OpenSSL) ixwebsocket[sectransp] SSL support (sectransp) ixwebsocket[ssl] Default SSL backend libdatachannel 0.12.2 libdatachannel is a standalone implementation of WebRTC Data Channels, WebRTC ... libdatachannel[srtp] Use Cisco's libSRTP for media transport. libdatachannel[stdcall] Use stdcall convention in callbacks libdatachannel[ws] Web Socket support libwebsockets 4.1.6#2 Libwebsockets is a lightweight pure C library built to use minimal CPU and mem... microsoft-signalr[cpprestsdk] Add default Http and WebSocket implementations using CppRestSDK nanomsg 1.1.5-2 a simple high-performance implementation of several "scalability protocols". nanomsg[tool] nanomsg tool (nanocat) oatpp-websocket 1.2.0#1 Oat++ websocket module. qt5[websockets] qt5-websockets 5.15.2 Qt5 Web Sockets Module - provides WebSocket communication compliant with RFC 6455 restinio 0.6.13 A header-only C++14 library that gives you an embedded HTTP/Websocket server t... uwebsockets 19.0.0.5 Simple, secure & standards compliant web I/O for the most demanding of applica... websocketpp 0.8.2#1 Library that implements RFC6455 The WebSocket Protocol websocketpp[recommended] Use recommended dependencies zeromq[websockets-sha1] Enable WebSocket transport through builtin sha1 (libzmq#3676) If your library is not listed, please open an issue at and/or consider making a pull request: https://github.com/Microsoft/vcpkg/issues或者也可以打开 https://vcpkg.io/en/packages.html 进行搜索.
该页面给出了包的名称, 版本号, 主要功能描述以及兼容性. 点击 View Details 还会给出安装命令. 比如我们此时在 Windows 系统中安装 websocketpp, 按点击 View Details 给出的提示执行: .\vcpkg install websocketpp
在这里需要特别注意的是: vcpkg 默认安装的包是 32 位即 x86-Windows, 如若我们当前计算机是 64 位的, 则需要在对应的包名后面增加: x64-Windows 后缀. 比如此时我们正确的命令应该是:.\vcpkg install websocketpp:x64-Windows 如果你仅仅是为了学习, 则可以尝试使用 vcpkg install libzip:x64-Windows来安装一个较小的包: libzip. 如果你的操作系统是 32 位的, 则需要移除: x64-Windows 后缀. 安装过程中的错误, 大多是由于网络原因造成的. 安装的快与慢取决于计算机的 CPU 编译速度, 我们要做的仅仅是耐心等待. 如果在安装过程中停留在了哪个界面, 则需要查看 vcpkg 是否在进行数据下载 (查看网络情况), 或是进行编译 (查看 CPU 占用情况), 如果两者都不是, 则需要我们按下回车来帮助一下它. vcpkg install 依赖于 cmake, 如若当前计算机中未安装 cmake,vcpkg 将自动下载并安装. 我们所需要保证的是当前计算机的网络是畅通的. 安装成功后 vcpkg 将提示如何在 cmake 项目中配置当前包: Elapsed time for package websocketpp::x64-Windows: 10.13 s Total elapsed time: 32.09 min The package websocketpp:x64-Windows provides CMake targets: find_package(websocketpp CONFIG REQUIRED) target_link_libraries(main PRIVATE websocketpp::websocketpp)如果我们用的是 cmake 项目, 则仅需要把上述两条命令复制下来, 添加到 CMakeLists.txt 中. 第三方包成功安装并不是最终目的, 我们的最终目标是将第三方包加载到我们的项目中. 至于项目有两类: 第一类是使用 visio studio 开发的应用程序, 该程序基于 MSBuild 构建; 第二类是使用其它工具开发的基于 cmake 的应用程序. Cmake若要在 cmake 中使用第三方包, 就需要让 cmake 能够成功找到第三方包. vcpkg 使用了一种为 cmake 添加参数的方法来实现这一功能. 执行 vcpkg integrate install 后, 将得到如下提示信息: PS C:\Users\panjie\GitHub\vcpkg> .\vcpkg.exe integrate install ... // 如果在 cmkae 项目下, 添加对应的参数即可 CMake projects should use: "-DCMAKE_TOOLCHAIN_FILE=C:/Users/panjie/github/vcpkg/scripts/buildsystems/vcpkg.cmake"比如在存在 CMakeLists.txt 的路径上执行: cmake -DCMAKE_TOOLCHAIN_FILE=C:/Users/panjie/GitHub/vcpkg/scripts/buildsystems/vcpkg.cmake.同时还可以为 IDE 添加编译参数, 这样 IDE 在执行编译时便会自动加入上述参数, 以 Clion 为例:
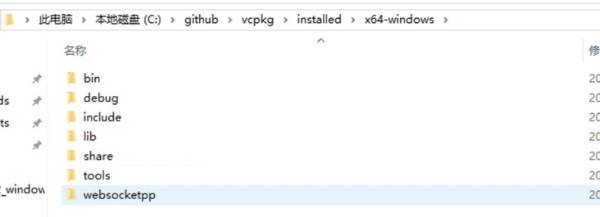
若要在 Visio Studio 使用 vcpkg 管理的第三方包, 就需要让 Visio Studio 能够成功的找到第三方包. 由于 vcpkg 也是微软自己的东西, 所以使用起来也相当方便. 只要我们使用的 Visio Studio 的版本大于 2015, 便可以使用 vcpkg.exe integrate install 来将 vs 与 vcpkg 结合在一起. PS C:\Users\panjie\GitHub\vcpkg> .\vcpkg.exe integrate install Applied user-wide integration for this vcpkg root. // 所有的 MSBuild c++ 工程可以使用 #include 来使用任意安装的第三方库了, 言外之意在说, 我们以后在 visio studio 中可以直接使用 #include 的方式来引用第三方库 All MSBuild C++ projects can now #include any installed libraries. Linking will be handled automatically. Installing new libraries will make them instantly available. ...需要注意的是: 如果我们在使用 visio studio, 则需要保障当前的 VS 中安装了英文的语言包. 否则将得到如下警告信息: Warning: The following VS instances are excluded because the English language pack is unavailable. C:\Program Files (x86)\Microsoft Visual Studio\2017\Community Please install the English language pack. No suitable Visual Studio instances were found以时则需要为 vs 安装英文语言包, 然后重新执行: vcpkg integrate install使用安装包完成后, 在项目中使用可以使用如下命令使用第三方包了: #include或 #include比如: #include需要注意上述格式为 #include . 如果你使用的 IDE 提示没有找到相关头文件, 则可能需要重新启动一下. 但是 正常来讲, 上述的操作全部按照官方文档来的, 是应该没有问题的. 但是就是有但是, 有些时候它就是不行. vcpkg 安装后并没有使用 visio studio 自动找到相关的头文件. 仍然提示: can not open source file "xxx.h"有人说那重新执行下 vcpkg.exe integrate install 这个集成的命令是不是就解决了? 答案是否定的, 因为 vcpkg.exe integrate install 命令的作用是为 visio studio 添加第三方依赖的功能上增加了一个指向 vcpkg 的链接, 也就是说只要 vcpkg 安装了新的包, visio studio 便会立即更新. 所以如果 visio studio 没有立即更新, 多数是由于我们未安装成功造成的. 判断某个包是否安装成功的标准也很简单, 我们打开 vcpkg 文件夹, 找到 installed 子文件夹, 如果当前系统是 64 位的, 则点击 x64-Windows 查看; 如果是 32 位的, 则点击 x86-Windows 查看. 如果有对应生成的以第三方名称命名的文件夹, 则说明 vcpkg 安装成功, 问题应该现 visio studio 集成的环节.
如果没有对应相应的文件夹, 则说明安装出现了问题. 这个问题大多是由于在安装时忘记添加: x64-Windows 后缀造成的. 如果出现: No suitable Visual Studio instances were found 请确认安装了: 1. MSVC C/C++ compiler and linker 2. English language pack如果还是不行,卸载VS,重新安装VS2019(WIN11系统上) |


【本文地址】
今日新闻 |
推荐新闻 |