最简单的基于 FFmpeg 的 AVDevice 例子(屏幕录制) |
您所在的位置:网站首页 › ffmpeg录像过程中预览image2pipe › 最简单的基于 FFmpeg 的 AVDevice 例子(屏幕录制) |
最简单的基于 FFmpeg 的 AVDevice 例子(屏幕录制)
|
最简单的基于 FFmpeg 的 AVDevice 例子(屏幕录制)
最简单的基于 FFmpeg 的 AVDevice 例子(屏幕录制)简介libavdevice 使用抓屏方法gdigrabdshow
源程序结果工程文件下载参考链接
最简单的基于 FFmpeg 的 AVDevice 例子(屏幕录制)
参考雷霄骅博士的文章,链接:最简单的基于FFmpeg的AVDevice例子(屏幕录制) 简介FFmpeg 中有一个和多媒体设备交互的类库:libavdevice。使用这个库可以读取电脑(或者其他设备上)的多媒体设备的数据,或者输出数据到指定的多媒体设备上。 libavdevice 支持以下设备作为输入端: alsa avfoundation bktr dshow dv1394 fbdev gdigrab iec61883 jack lavfi libcdio libdc1394 openal oss pulse qtkit sndio video4linux2, v4l2 vfwcap x11grab decklinklibavdevice 支持以下设备作为输出端: alsa caca decklink fbdev opengl oss pulse sdl sndio xv libavdevice 使用本文记录一个基于 FFmpeg 的 libavdevice 类库录制屏幕的例子。本文程序读取计算机上的摄像头的数据并且解码显示出来。有关解码显示方面的代码本文不再详述,可以参考文章: 《 100行代码实现最简单的基于FFMPEG+SDL的视频播放器(SDL1.x)》。 本文主要记录使用 libavdevice 需要注意的步骤。 首先,使用 libavdevice 的时候需要包含其头文件: #include "libavdevice/avdevice.h"然后,在程序中需要注册 libavdevice: avdevice_register_all();接下来就可以使用 libavdevice 的功能了。 使用 libavdevice 读取数据和直接打开视频文件比较类似。因为系统的设备也被 FFmpeg 认为是一种输入的格式(即 AVInputFormat)。使用 FFmpeg 打开一个普通的视频文件使用如下函数: AVFormatContext *pFormatCtx = avformat_alloc_context(); avformat_open_input(&pFormatCtx, "test.h265", NULL, NULL);使用 libavdevice 的时候,唯一的不同在于需要首先查找用于输入的设备。在这里使用 av_find_input_format() 完成: AVFormatContext *pFormatCtx = avformat_alloc_context(); AVInputFormat *ifmt=av_find_input_format("vfwcap"); avformat_open_input(&pFormatCtx, 0, ifmt, NULL);上述代码首先指定了 vfw 设备作为输入设备,然后在 URL 中指定打开第 0 个设备(在我自己计算机上即是摄像头设备)。 在 Windows 平台上除了使用 vfw 设备作为输入设备之外,还可以使用 DirectShow 作为输入设备: AVFormatContext *pFormatCtx = avformat_alloc_context(); AVInputFormat *ifmt=av_find_input_format("dshow"); avformat_open_input(&pFormatCtx,"video=Integrated Camera",ifmt,NULL) ; 抓屏方法在 Windows 系统使用 libavdevice 抓取屏幕数据有两种方法:gdigrab 和 dshow。下文分别介绍。 gdigrabgdigrab 是 FFmpeg 专门用于抓取 Windows 桌面的设备,非常适合用于屏幕录制。它通过不同的输入 URL 支持两种方式的抓取: “desktop”:抓取整张桌面。或者抓取桌面中的一个特定的区域。“title={窗口名称}”:抓取屏幕中特定的一个窗口(目前中文窗口还有乱码问题)。gdigrab 另外还支持一些参数,用于设定抓屏的位置: offset_x:抓屏起始点横坐标。offset_y:抓屏起始点纵坐标。video_size:抓屏的大小。framerate:抓屏的帧率。参考的代码如下: //Use gdigrab AVDictionary* options = NULL; //Set some options //grabbing frame rate //av_dict_set(&options,"framerate","5",0); //The distance from the left edge of the screen or desktop //av_dict_set(&options,"offset_x","20",0); //The distance from the top edge of the screen or desktop //av_dict_set(&options,"offset_y","40",0); //Video frame size. The default is to capture the full screen //av_dict_set(&options,"video_size","640x480",0); AVInputFormat *ifmt=av_find_input_format("gdigrab"); if(avformat_open_input(&pFormatCtx,"desktop",ifmt,&options)!=0){ printf("Couldn't open input stream.(无法打开输入流)\n"); return -1; } dshow使用 dshow 抓屏需要安装抓屏软件:screen-capture-recorder 软件地址:http://sourceforge.net/projects/screencapturer/ 下载软件安装完成后,可以指定 dshow 的输入设备为“screen-capture-recorder”即可。有关 dshow 设备的使用方法在文章 最简单的基于FFmpeg的AVDevice例子(读取摄像头)中已经有详细叙述,这里不再重复。
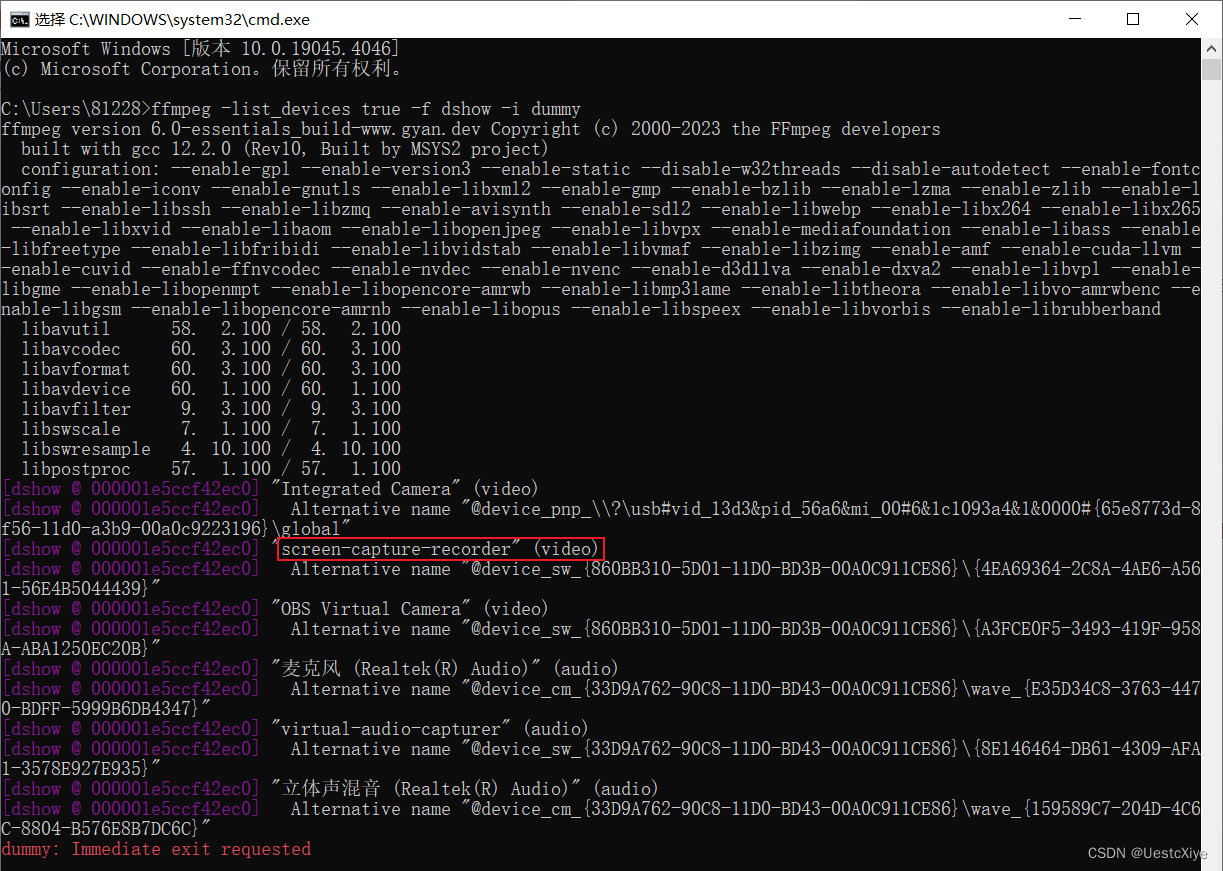
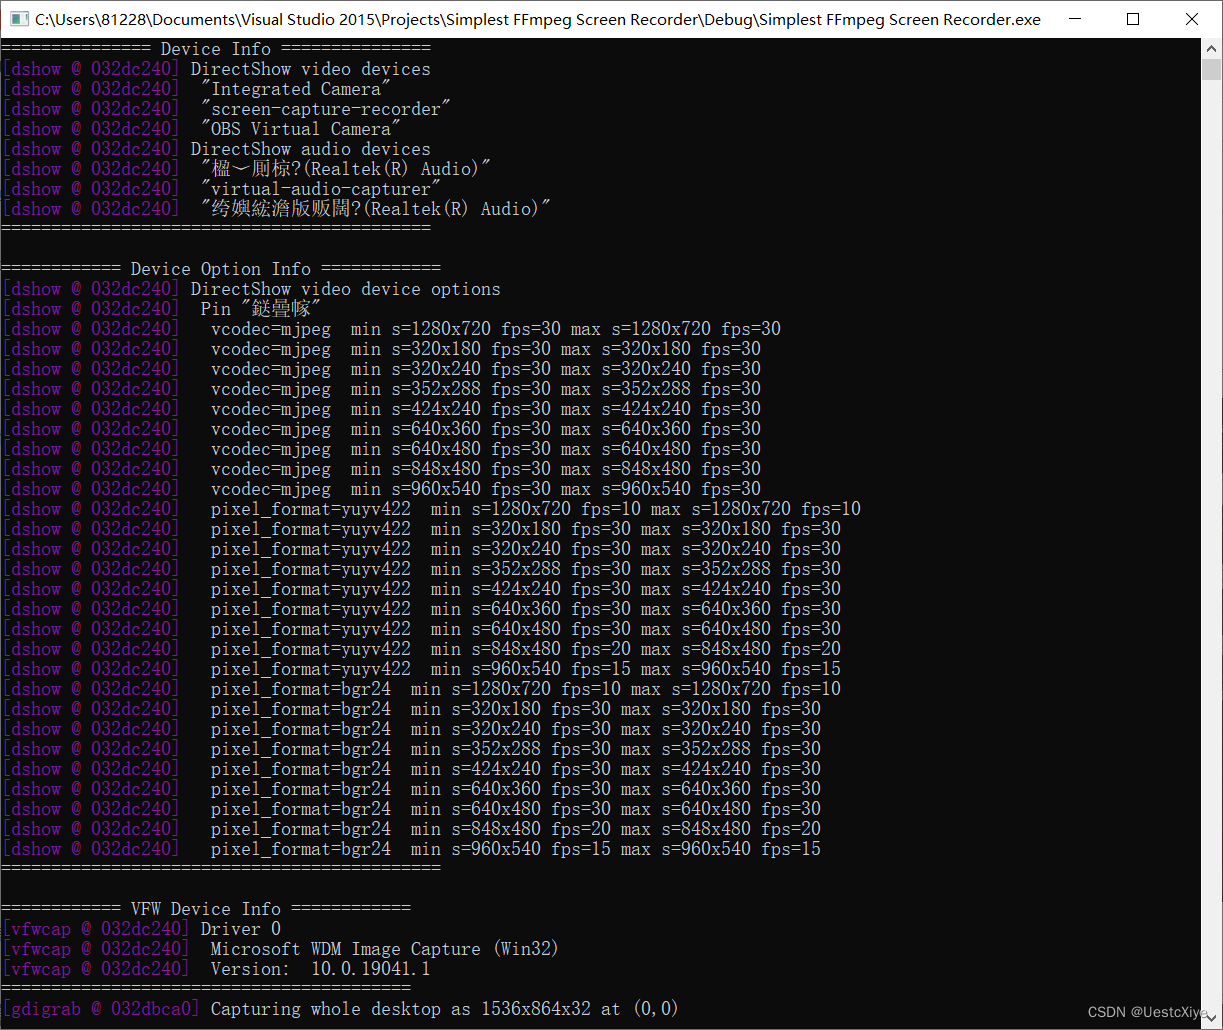
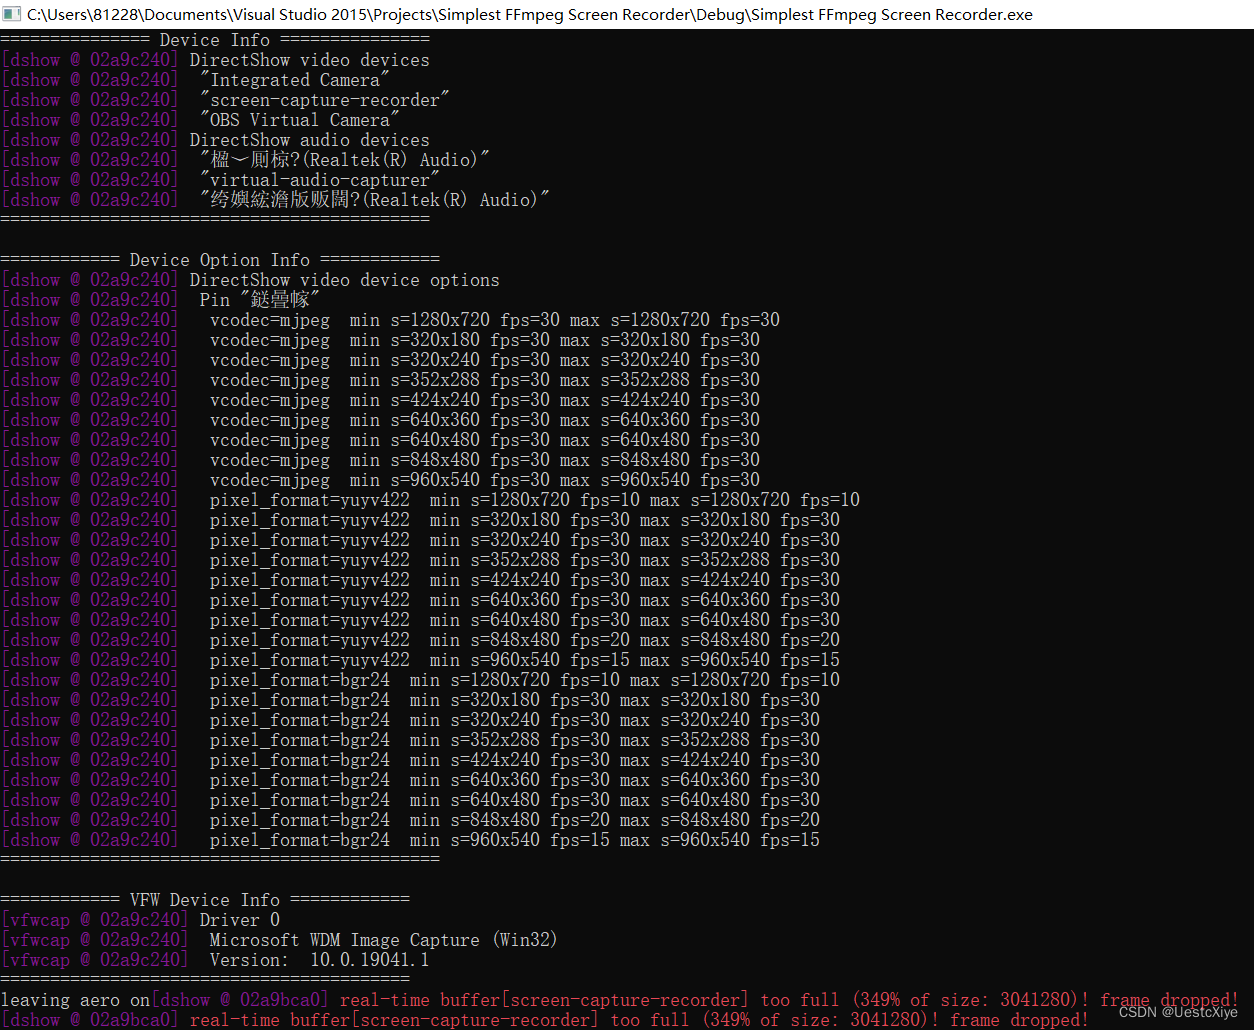
参考的代码如下: AVInputFormat *ifmt=av_find_input_format("dshow"); if(avformat_open_input(&pFormatCtx,"video=screen-capture-recorder",ifmt,NULL)!=0){ printf("Couldn't open input stream.(无法打开输入流)\n"); return -1; }使用 ffmpeg.exe 打开 vfw 设备和 Directshow 设备的方法可以参考文章:《FFmpeg获取DirectShow设备数据(摄像头,录屏)》。 在 Linux 平台上可以使用 x11grab 抓屏;在 MacOS 上,可以使用 avfoundation 抓屏,这里不再详述。 源程序 // Simplest FFmpeg Screen Recorder.cpp : 定义控制台应用程序的入口点。 // /** * 最简单的基于 FFmpeg 的 AVDevice 例子(屏幕录制) * Simplest FFmpeg Screen Recorder * * 源程序: * 雷霄骅 Lei Xiaohua * [email protected] * 中国传媒大学/数字电视技术 * Communication University of China / Digital TV Technology * http://blog.csdn.net/leixiaohua1020 * * 修改: * 刘文晨 Liu Wenchen * [email protected] * 电子科技大学/电子信息 * University of Electronic Science and Technology of China / Electronic and Information Science * https://blog.csdn.net/ProgramNovice * * 本程序实现了屏幕录制功能,可以录制并播放桌面数据。 * 是基于 FFmpeg 的 libavdevice 类库最简单的例子。 * 通过该例子,可以学习 FFmpeg 中 libavdevice 类库的使用方法。 * * 本程序在 Windows 下可以使用 2 种方式录制屏幕: * 1. gdigrab: Win32 下的基于 GDI 的屏幕录制设备。抓取桌面的时候,输入URL为“desktop”。 * 2. dshow: 使用 Directshow。注意需要安装额外的软件 screen-capture-recorder。 * * 在 Linux 下可以使用 x11grab 录制屏幕。 * 在 MacOS 下可以使用 avfoundation 录制屏幕。 * * This software capture screen of computer. It's the simplest example * about usage of FFmpeg's libavdevice Library. * It's suiltable for the beginner of FFmpeg. * This software support 2 methods to capture screen in Microsoft Windows: * 1.gdigrab: Win32 GDI-based screen capture device. * Input URL in avformat_open_input() is "desktop". * 2.dshow: Use Directshow. Need to install screen-capture-recorder. * It use x11grab to capture screen in Linux. * It use avfoundation to capture screen in MacOS. */ #include "stdafx.h" #include #include // 解决报错:'fopen': This function or variable may be unsafe.Consider using fopen_s instead. #pragma warning(disable:4996) // 解决报错:无法解析的外部符号 __imp__fprintf,该符号在函数 _ShowError 中被引用 #pragma comment(lib, "legacy_stdio_definitions.lib") extern "C" { // 解决报错:无法解析的外部符号 __imp____iob_func,该符号在函数 _ShowError 中被引用 FILE __iob_func[3] = { *stdin, *stdout, *stderr }; } #define __STDC_CONSTANT_MACROS #ifdef _WIN32 // Windows extern "C" { #include "libavcodec/avcodec.h" #include "libavformat/avformat.h" #include "libswscale/swscale.h" #include "libavdevice/avdevice.h" #include "SDL/SDL.h" }; #else // Linux... #ifdef __cplusplus extern "C" { #endif #include #include #include #include #include #ifdef __cplusplus }; #endif #endif // Output YUV420P #define OUTPUT_YUV420P 0 // 1:Use Dshow; 0: Use GDIgrab #define USE_DSHOW 1 // Refresh Event #define SFM_REFRESH_EVENT (SDL_USEREVENT + 1) #define SFM_BREAK_EVENT (SDL_USEREVENT + 2) int thread_exit = 0; int sfp_refresh_thread(void *opaque) { thread_exit = 0; while (!thread_exit) { SDL_Event event; event.type = SFM_REFRESH_EVENT; SDL_PushEvent(&event); SDL_Delay(40); } thread_exit = 0; // Break SDL_Event event; event.type = SFM_BREAK_EVENT; SDL_PushEvent(&event); return 0; } // Show Dshow Device void show_dshow_device() { AVFormatContext *pFormatCtx = avformat_alloc_context(); AVDictionary* options = NULL; av_dict_set(&options, "list_devices", "true", 0); AVInputFormat *iformat = av_find_input_format("dshow"); printf("=============== Device Info ===============\n"); avformat_open_input(&pFormatCtx, "video=dummy", iformat, &options); printf("===========================================\n"); } // Show Dshow Device Option void show_dshow_device_option() { AVFormatContext *pFormatCtx = avformat_alloc_context(); AVDictionary* options = NULL; av_dict_set(&options, "list_options", "true", 0); AVInputFormat *iformat = av_find_input_format("dshow"); printf("\n============ Device Option Info ============\n"); avformat_open_input(&pFormatCtx, "video=Integrated Camera", iformat, &options); printf("============================================\n"); } // Show VFW Device void show_vfw_device() { AVFormatContext *pFormatCtx = avformat_alloc_context(); AVInputFormat *iformat = av_find_input_format("vfwcap"); printf("\n============ VFW Device Info ============\n"); avformat_open_input(&pFormatCtx, "list", iformat, NULL); printf("=========================================\n"); } // Show AVFoundation Device void show_avfoundation_device() { AVFormatContext *pFormatCtx = avformat_alloc_context(); AVDictionary* options = NULL; av_dict_set(&options, "list_devices", "true", 0); AVInputFormat *iformat = av_find_input_format("avfoundation"); printf("\n======= AVFoundation Device Info =======\n"); avformat_open_input(&pFormatCtx, "", iformat, &options); printf("========================================\n"); } int main(int argc, char* argv[]) { AVFormatContext *pFormatCtx; int videoindex; int ret; AVCodecContext *pCodecCtx; AVCodec *pCodec; av_register_all(); avformat_network_init(); pFormatCtx = avformat_alloc_context(); // Open File //char filepath[] = "src01_480x272_22.h265"; //avformat_open_input(&pFormatCtx, filepath, NULL, NULL); // Register Device avdevice_register_all(); // Windows #ifdef _WIN32 // Show Dshow Device show_dshow_device(); // Show Device Options show_dshow_device_option(); // Show VFW Options show_vfw_device(); #if USE_DSHOW AVInputFormat *ifmt = av_find_input_format("dshow"); // Set own video device's name // Need to Install screen-capture-recorder // Website: http://sourceforge.net/projects/screencapturer/ if (avformat_open_input(&pFormatCtx, "video=screen-capture-recorder", ifmt, NULL) != 0) { printf("Couldn't open input stream.\n"); return -1; } #else // Use gdigrab AVDictionary* options = NULL; // Set some options // grabbing frame rate //av_dict_set(&options, "framerate", "5", 0); // The distance from the left edge of the screen or desktop //av_dict_set(&options, "offset_x", "20", 0); // The distance from the top edge of the screen or desktop //av_dict_set(&options, "offset_y", "40", 0); // Video frame size. The default is to capture the full screen //av_dict_set(&options, "video_size", "640x480", 0); AVInputFormat *ifmt = av_find_input_format("gdigrab"); if (avformat_open_input(&pFormatCtx, "desktop", ifmt, &options) != 0) { printf("Couldn't open input stream.\n"); return -1; } #endif #elif defined linux // Linux AVDictionary* options = NULL; // Set some options // grabbing frame rate //av_dict_set(&options, "framerate", "5", 0); // Make the grabbed area follow the mouse //av_dict_set(&options, "follow_mouse", "centered", 0); // Video frame size. The default is to capture the full screen //av_dict_set(&options, "video_size", "640x480", 0); AVInputFormat *ifmt = av_find_input_format("x11grab"); // Grab at position 10, 20 if (avformat_open_input(&pFormatCtx, ":0.0+10,20", ifmt, &options) != 0) { printf("Couldn't open input stream.\n"); return -1; } #else show_avfoundation_device(); // MacOS AVInputFormat *ifmt = av_find_input_format("avfoundation"); // Avfoundation // [video]:[audio] if (avformat_open_input(&pFormatCtx, "1", ifmt, NULL) != 0) { printf("Couldn't open input stream.\n"); return -1; } #endif ret = avformat_find_stream_info(pFormatCtx, NULL); if (ret streams[i]->codec->codec_type == AVMEDIA_TYPE_VIDEO) { videoindex = i; break; } if (videoindex == -1) { printf("Couldn't find a video stream.\n"); return -1; } pCodecCtx = pFormatCtx->streams[videoindex]->codec; pCodec = avcodec_find_decoder(pCodecCtx->codec_id); if (pCodec == NULL) { printf("Codec not found.\n"); return -1; } ret = avcodec_open2(pCodecCtx, pCodec, NULL); if (ret width, pCodecCtx->height)); //avpicture_fill((AVPicture *)pFrameYUV, out_buffer, AV_PIX_FMT_YUV420P, // pCodecCtx->width, pCodecCtx->height); // ------------------------ SDL 1.2 ------------------------ if (SDL_Init(SDL_INIT_VIDEO | SDL_INIT_AUDIO | SDL_INIT_TIMER)) { printf("Could not initialize SDL - %s.\n", SDL_GetError()); return -1; } int screen_w = 640, screen_h = 360; const SDL_VideoInfo *vi = SDL_GetVideoInfo(); // Half of the Desktop's width and height. screen_w = vi->current_w / 2; screen_h = vi->current_h / 2; SDL_Surface *screen; // 初始化屏幕(SDL 绘制的窗口) screen = SDL_SetVideoMode(screen_w, screen_h, 0, 0); if (!screen) { printf("SDL: could not set video mode - exiting:%s.\n", SDL_GetError()); return -1; } SDL_Overlay *bmp; // Now we create a YUV overlay on that screen so we can input video to it bmp = SDL_CreateYUVOverlay(pCodecCtx->width, pCodecCtx->height, SDL_YV12_OVERLAY, screen); SDL_Rect rect; rect.x = 0; rect.y = 0; rect.w = screen_w; rect.h = screen_h; // ------------------------ SDL End ------------------------ int got_picture; AVPacket *packet = (AVPacket *)av_malloc(sizeof(AVPacket)); #if OUTPUT_YUV420P FILE *fp_yuv = fopen("output.yuv", "wb+"); #endif struct SwsContext *img_convert_ctx; img_convert_ctx = sws_getContext(pCodecCtx->width, pCodecCtx->height, pCodecCtx->pix_fmt, pCodecCtx->width, pCodecCtx->height, AV_PIX_FMT_YUV420P, SWS_BICUBIC, NULL, NULL, NULL); // SDL 线程 SDL_Thread *video_tid = SDL_CreateThread(sfp_refresh_thread, NULL); // 设置窗口标题 SDL_WM_SetCaption("Simplest FFmpeg Screen Recorder", NULL); // Event Loop SDL_Event event; for (;;) { // Wait SDL_WaitEvent(&event); if (event.type == SFM_REFRESH_EVENT) { // Get an AVpacket if (av_read_frame(pFormatCtx, packet) >= 0) { if (packet->stream_index == videoindex) { ret = avcodec_decode_video2(pCodecCtx, pFrame, &got_picture, packet); if (ret data[0] = bmp->pixels[0]; pFrameYUV->data[1] = bmp->pixels[2]; pFrameYUV->data[2] = bmp->pixels[1]; pFrameYUV->linesize[0] = bmp->pitches[0]; pFrameYUV->linesize[1] = bmp->pitches[2]; pFrameYUV->linesize[2] = bmp->pitches[1]; sws_scale(img_convert_ctx, (const unsigned char* const*)pFrame->data, pFrame->linesize, 0, pCodecCtx->height, pFrameYUV->data, pFrameYUV->linesize); #if OUTPUT_YUV420P int y_size = pCodecCtx->width * pCodecCtx->height; fwrite(pFrameYUV->data[0], 1, y_size, fp_yuv); // Y fwrite(pFrameYUV->data[1], 1, y_size / 4, fp_yuv); // U fwrite(pFrameYUV->data[2], 1, y_size / 4, fp_yuv); // V #endif SDL_UnlockYUVOverlay(bmp); SDL_DisplayYUVOverlay(bmp, &rect); } } av_free_packet(packet); } else { // Exit Thread thread_exit = 1; } } else if (event.type == SDL_QUIT) { thread_exit = 1; } else if (event.type == SFM_BREAK_EVENT) { break; } } sws_freeContext(img_convert_ctx); #if OUTPUT_YUV420P fclose(fp_yuv); #endif SDL_Quit(); // av_free(out_buffer); av_free(pFrameYUV); avcodec_close(pCodecCtx); avformat_close_input(&pFormatCtx); system("pause"); return 0; } 结果可以通过下面的宏定义来确定是否将解码后的 YUV420P 数据输出成文件: #define OUTPUT_YUV420P 0可以通过下面的宏定义来确定使用 VFW 或者是 Dshow 打开摄像头: //'1' Use Dshow //'0' Use GDIgrab #define USE_DSHOW 0运行程序,输出如下:
使用 dshow 时:
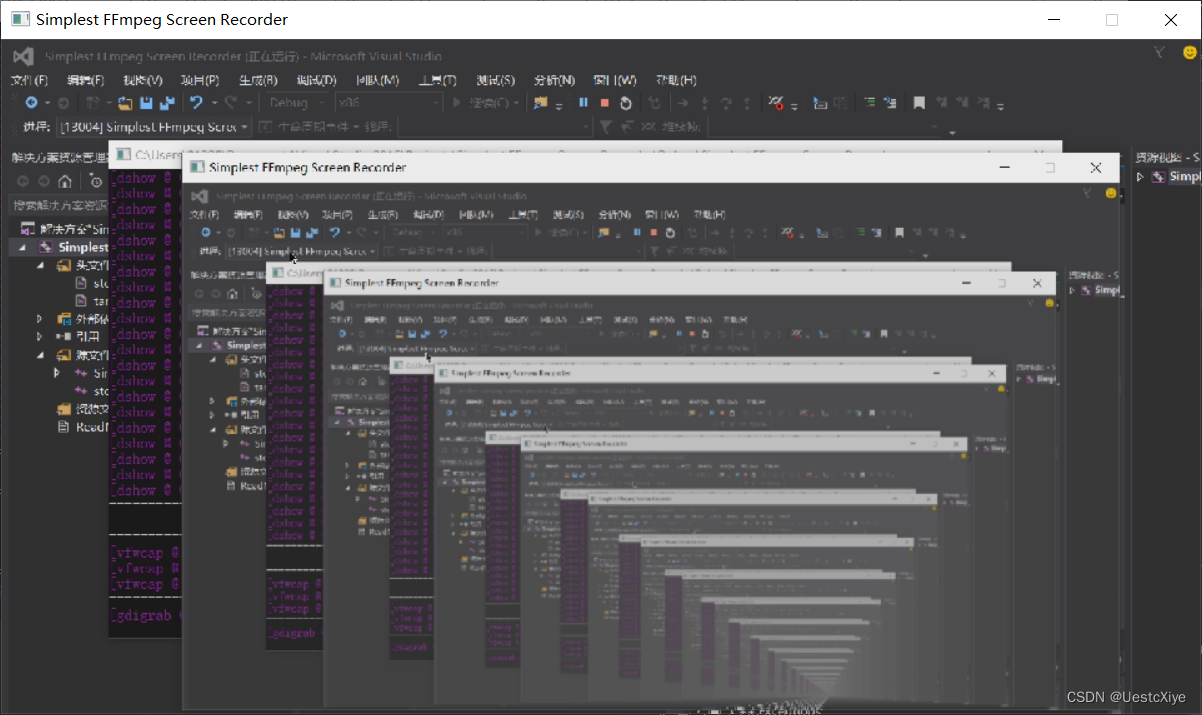
程序的运行效果如下。这个运行结果还是十分有趣的,会出现一个屏幕“嵌套”在另一个屏幕里面的现象,环环相套:
GitHub:UestcXiye / Simplest-FFmpeg-Screen-Recorder CSDN:Simplest FFmpeg Screen Recorder.zip 参考链接 《 100行代码实现最简单的基于FFMPEG+SDL的视频播放器(SDL1.x)》《FFmpeg获取DirectShow设备数据(摄像头,录屏)》 |
【本文地址】
今日新闻 |
推荐新闻 |