Fix: Screen Brightness Control Not Working on Windows 10 or 11 |
您所在的位置:网站首页 › featuretestcontrol联想 › Fix: Screen Brightness Control Not Working on Windows 10 or 11 |
Fix: Screen Brightness Control Not Working on Windows 10 or 11
|
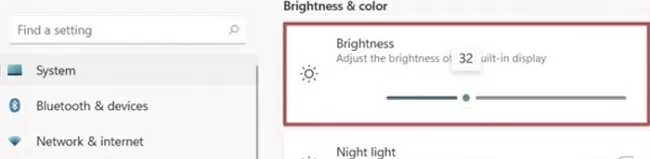
The problem with adjusting the screen brightness can occur in both Windows 10 and Windows 11. Typically, users complain that they cannot increase or decrease the screen brightness on a Windows laptop from the Control Panel or with the keyboard functional keys (Fn + F5/F6/F11/F12). In most cases, the problem with adjusting the brightness in Windows is related to the display or video card drivers (most often the problem occurs on devices with Intel Graphics and AMD Radeon graphics cards). However, there are other reasons as well. Let’s take a look at a few simple ways to fix the problem when you can’t adjust the brightness on a laptop running Windows 10 or 11. Contents:How to Change Screen Brightness in Windows 10 and 11?Enable Generic PnP Monitor on WindowsCan’t Adjust Screen Brightness After Installing TeamViewerUpdate Your Video Card DriverFN Keys Not Working for Screen BrightnessEnable Screen Brightness Control with Registry TweakUnable to Change Screen Brightness on a Laptop with Intel HD GraphicsCheck Windows Adaptive Brightness SettingsHow to Change Screen Brightness in Windows 10 and 11?First, check if you can change the screen brightness using the standard Windows brightness adjustment tools. Option 1. Adjust the Screen Brightness from Windows SettingsIn Windows 10 and 11, you can change the display brightness from the Settings panel. Go to Settings -> System -> Display (you can open this Settings item by running the ms-settings:display or desk.cpl command). Use the Brightness slider to adjust the screen brightness.
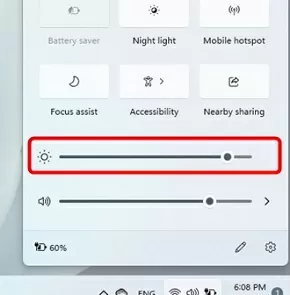
On Windows 10 and 11, you can use the quick settings (action center ) to change the screen brightness. Click on any system icon in the taskbar (Wi-Fi, sound, battery, or press Win + A). Adjust the display brightness using the slider. If the brightness slider is missing or inactive: You may be using a computer with an external monitor (use the buttons on the monitor to change the brightness);Try updating your video adapter driver (described below).
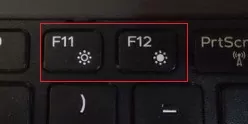
Most laptops have special function keys labeled 🔆 and 🔅. Press the Fn button + the brightness up/down function key and verify that the display brightness has changed.
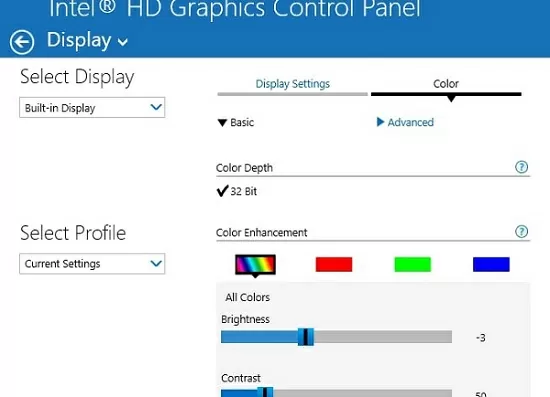
Fn+F11 and Fn+F12 keys used on my laptop to adjust brightness. These combinations may differ from manufacturer to manufacturer. Option 4. Screen Brightness Settings in Video Card Control PanelYou can change the screen brightness in the settings of the video card. In my example, this is the Intel HD Graphics Control Panel, accessible from the desktop context menu.
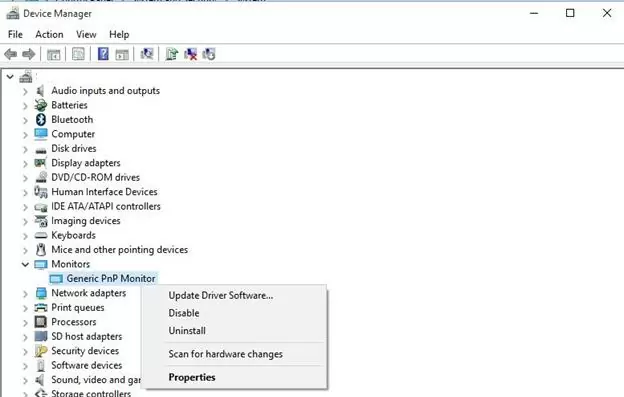
The following PowerShell command allows you to set a specific display brightness level from the command prompt: (Get-WmiObject -Namespace root/WMI -Class WmiMonitorBrightnessMethods).WmiSetBrightness(1,80) The brightness is set as a percentage of the maximum in the range from 0 to 100. In this example, I set the brightness to 80%. Enable Generic PnP Monitor on WindowsIf you can’t change the screen brightness in Windows, check whether the Generic Pnp Monitor is not disabled on your device. This is the most common problem on Lenovo and HP Pavilion laptops. Open the Device Manager (devmgmt.msc) and in the Monitors section check if the Generic PnP Monitor is enabled. If it is not, right-click and enable it.
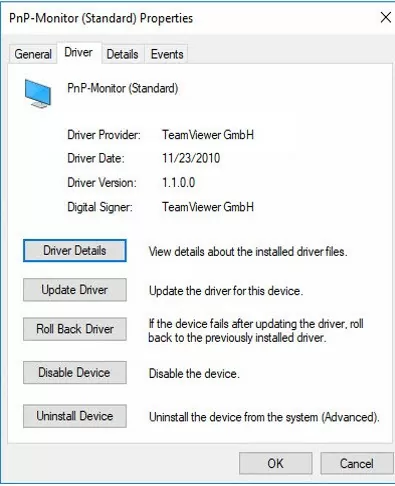
Restart your computer and try to adjust the screen brightness. In some cases, you need to try updating/reinstalling the Generic PnP Monitor driver in the device manager via Update Driver (right-click Generic PnP-Monitor -> Update Driver Software -> Search automatically for updated driver software). Can’t Adjust Screen Brightness After Installing TeamViewerThere is a known issue that the screen brightness control stops working in Windows after installing TeamViewer. The fact is that TeamViewer installs its own Pnp-Monitor Standard display driver, which is used to compress graphics and optimize traffic.
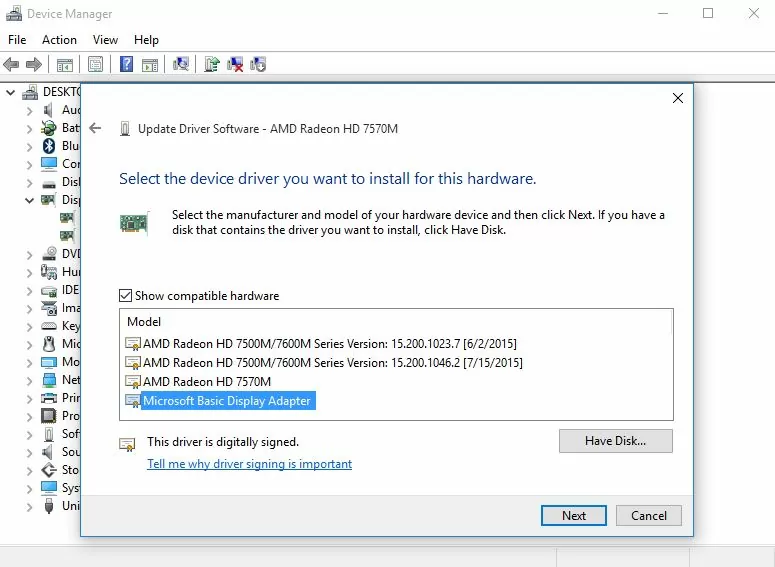
Try to replace the driver for this device to “Generic PnP Monitor” (Right Click -> Update Drivers -> and select the “Generic PnP Monitor” from the list of already installed drivers). Update Your Video Card DriverThe brightness issue may be related to the current graphics card driver. First, check that your display adapter is enabled in the device manager (similar to the method above). If the previous method did not help, try updating the video adapter driver automatically (if not disabled). Open the Device Manager (devmgmt.msc console), expand the Display adapters section, and find your video card. Right-click it and select Update Driver Software. Then select Search automatically for updated driver software and wait till Windows 10 finds and installs the latest driver version (of course, your computer has to be connected to the Internet). If the automatic driver update didn’t fix the brightness control problem, try removing the current driver and installing the latest driver version from the manufacturer’s website. In some cases, on the contrary, you need to roll back the version of the video adapter to the previous one: Update driver -> Browse my computers for drivers -> Let me pick from a list of available drivers on my computer -> enable Show compatible hardware. Select the previous version of the display adapter driver.
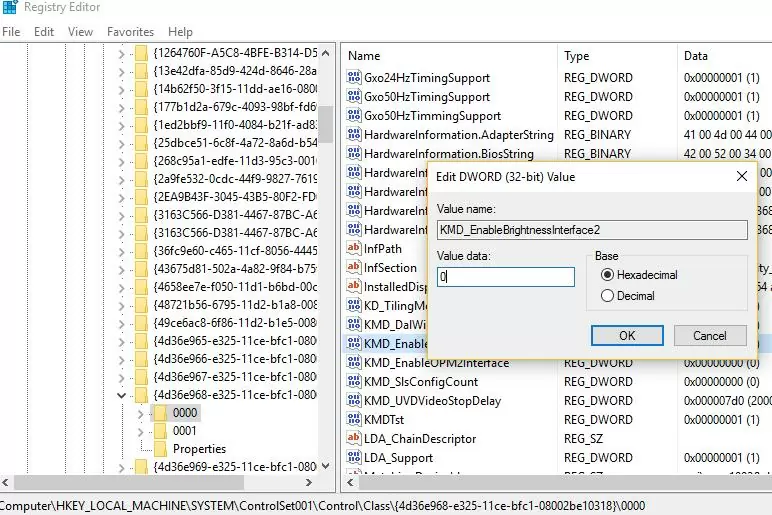
If updating or rolling back the video driver doesn’t resolve the brightness issue, try switching to the default Microsoft Basic Display Adapter driver for your video card (see screenshot above). FN Keys Not Working for Screen BrightnessIf you find that adjusting the screen brightness through Windows settings works fine, but the function keys (Fn) for brightness control on the laptop keyboard don’t work, most likely you need to install additional software from the laptop manufacturer. Each vendor has its own keyboard tool. Below are the names of the keyboard tools for popular laptop models: ASUS – ATK Hotkey UtilitySony Vaio – Sony Notebook UtilitiesDell – QuickSetHP – HP Software Framework and HP Hotkey SupportLenovo – Hotkey Features Integration for Windows 10 or AIO Hotkey Utility DriverDownload the program from the manufacturer’s official website and install it. Try changing the brightness using the laptop Fn keys. Enable Screen Brightness Control with Registry TweakYou can enable screen brightness control in Windows by using the KMD_EnableBrightnessInterface2 registry parameter under the reg key HKEY_LOCAL_MACHINE\SYSTEM\ControlSet001\Control\Class\{4d36e968-e325-11ce-bfc1-08002be10318}\0000. Open the Registry Editor (regedit.exe), go to the registry key above, find the DWORD parameter KMD_EnableBrightnessInterface2 and change its value from 1 to 0
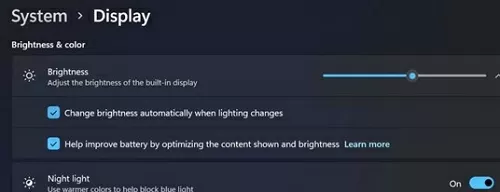
There can be several KMD_EnableBrightnessInterface2 parameters in the registry. So use the search (F3) and find all the other parameters named KMD_EnableBrightnessInterface. For all found parameters, you need to change the value from 1 to 0. Reboot your laptop. Unable to Change Screen Brightness on a Laptop with Intel HD GraphicsOn Windows laptops with integrated Intel HD Graphics video cards, you need to disable brightness correction through the registry. Go to the reg key HKEY_LOCAL_MACHINE\SYSTEM\ControlSet001\Control\Class\{4d36e968-e325-11ce-bfc1-08002be10318}\0000 (0001 in some cases) and look for the FeatureTestControl DWORD parameter. Change its value from f000 to f008 and restart your computer. Sometimes the value FeatureTestControl = fb20 helps.Or use the following reg file: Windows Registry Editor Version 5.00 [HKEY_LOCAL_MACHINE\SYSTEM\ControlSet001\Control\Class\{4d36e968-e325-11ce-bfc1-08002be10318}\0000] "FeatureTestControl"=dword:0000f008 "KMD_EnableBrightnessInterface2"=dword:00000000 "KMD_EnableBrightnesslf2"=dword:00000000 [HKEY_LOCAL_MACHINE\SYSTEM\ControlSet001\Control\Class\{4d36e968-e325-11ce-bfc1-08002be10318}\0001] "FeatureTestControl"=dword:0000f008 [HKEY_LOCAL_MACHINE\SYSTEM\ControlSet001\Control\Class\{4d36e968-e325-11ce-bfc1-08002be10318}\0002] "FeatureTestControl"=dword:0000f008 [HKEY_LOCAL_MACHINE\SYSTEM\ControlSet001\Services\intelkmd] "FeatureTestControl"=dword:0000f008Check Windows Adaptive Brightness SettingsWindows can use your laptop’s light sensors (available on almost all modern tablets and laptops) to adjust the screen brightness. The brightness of the screen is set according to the ambient light (adaptive brightness). You can enable/disable adaptive display brightness from the System -> Brightness -> Change brightness automatically when lighting changes.
There is also another option used to reduce the brightness of the display if the device is running on battery (Help improve battery by optimizing the content shown and brightness). This feature is called CABC (Content Adaptive Brightness Control). Also, you can disable adaptive brightness in Windows power settings: Control Panel -> Power Options -> in the properties of the selected power plan, click the Change advanced power settings -> Change advanced power settings -> expand Display. In the Enable adaptive brightness item, you must disable the adaptive brightness for the “On battery” and “Plugged in” modes. If adaptive brightness is enabled, won’t be able to significantly increase the screen brightness Also, try changing the brightness level under the items: Dimmed display brightnessDisplay brightness
|

【本文地址】
今日新闻 |
推荐新闻 |