虚拟机(Vmware)磁盘扩容 |
您所在的位置:网站首页 › fdisk存储lun › 虚拟机(Vmware)磁盘扩容 |
虚拟机(Vmware)磁盘扩容
|
磁盘的扩容分两种方式,进行分区后挂载形成新的空间 或 原先使用的空间出现内存不足,扩大利用空间
我理解的大概常见类型:
1.新增加的空间,增加到已有分区空间中(此处又分为两种情况,1是通过卷组进行分配扩容,2是未划分卷组的空间,直接进行默认扩容);
2.新增加的空间,成一个独立分区进行使用;
虚拟机扩容有两种:在设备内部操作会不一样
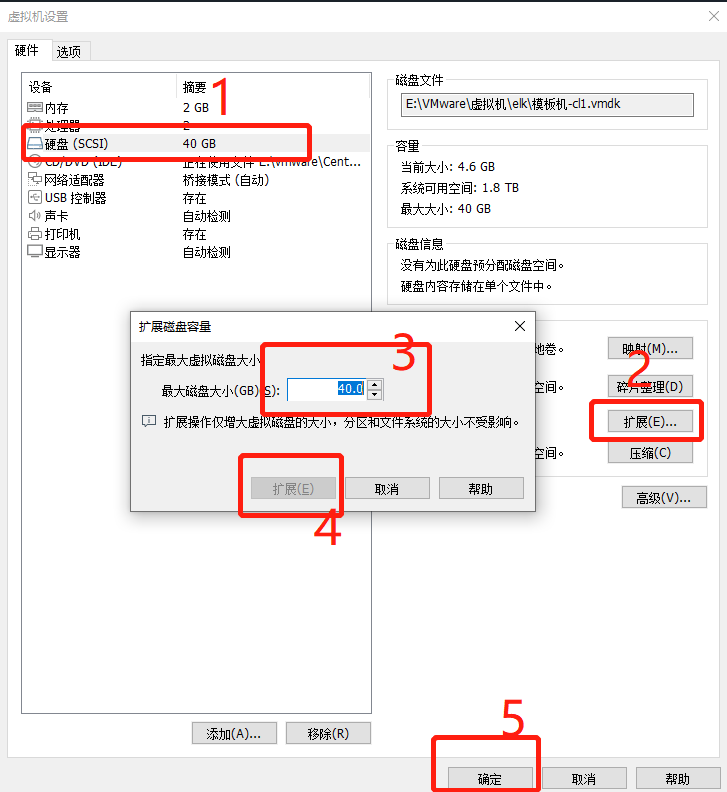
1.在磁盘设置位置,将原内存扩大(见图1);图1的方法是直接进行的更改磁盘大小,需要1个前提条件:没有快照。
2.在磁盘设置位置,挂载一块新的磁盘上去
现在进入虚拟机进行设置。 一:将同一磁盘下新增的空间,扩大到已用空间中1.是xfs格式配置设置 df -PTh #(disk free) 命令用于显示目前在 Linux 系统上的文件系统磁盘使用情况统计。 文件-P, --portability 使用 POSIX 输出格式 文件-T, --print-type 显示文件系统的形式 xfs_growfs # XFS格式已被最新的CentOS/RHEL 7采用,成为其默认的文件系统。 xfs_growfs,在大多数Linux默认可用。XFS支持在线调整大小,目标文件系统可以挂载,也可以不挂载。在已经挂载的情况下可以进行扩展,缩减却还没有支持。 例子: [root@centos ~]# xfs_growfs /dev/sda3 meta-data=/dev/sda3 isize=512 agcount=4, agsize=1166784 blks = sectsz=512 attr=2, projid32bit=1 = crc=1 finobt=0 spinodes=0 data = bsize=4096 blocks=4667136, imaxpct=25 = sunit=0 swidth=0 blks naming =version 2 bsize=4096 ascii-ci=0 ftype=1 log =internal bsize=4096 blocks=2560, version=2 = sectsz=512 sunit=0 blks, lazy-count=1 realtime =none extsz=4096 blocks=0, rtextents=0 data blocks changed from 4667136 to 125314561)查看当前空间分配情况 lsblk 2)进入sda磁盘进行设置 fdisk /dev/sda(具体干什么?注意什么?) ps:内存扩大后不能缩小 (1)fdisk /dev/sda进入磁盘配置; p (print) 输出当前磁盘分区情况; d(delete) 删除sda3磁盘(空间大小为:4605952--41943039) 。 (2)n(new) 新建磁盘; p(primary) 进行新建主分区磁盘;(一块硬盘顶多只能分四块主分区) 3新建磁盘空间名3新建磁盘(空间大小为:4605952-104857599); (3) w (write)保存,保存写入新的配置,磁盘分配配置 [root@centos ~]# fdisk -l Disk /dev/sda: 53.7 GB, 53687091200 bytes, 104857600 sectors Units = sectors of 1 * 512 = 512 bytes Sector size (logical/physical): 512 bytes / 512 bytes I/O size (minimum/optimal): 512 bytes / 512 bytes Disk label type: dos Disk identifier: 0x00093029 Device Boot Start End Blocks Id System /dev/sda1 * 2048 411647 204800 83 Linux /dev/sda2 411648 4605951 2097152 82 Linux swap / Solaris /dev/sda3 4605952 41943039 18668544 83 Linux [root@centos ~]# fdisk /dev/sda Welcome to fdisk (util-linux 2.23.2). Changes will remain in memory only, until you decide to write them. Be careful before using the write command. Command (m for help): p Disk /dev/sda: 53.7 GB, 53687091200 bytes, 104857600 sectors Units = sectors of 1 * 512 = 512 bytes Sector size (logical/physical): 512 bytes / 512 bytes I/O size (minimum/optimal): 512 bytes / 512 bytes Disk label type: dos Disk identifier: 0x00093029 Device Boot Start End Blocks Id System /dev/sda1 * 2048 411647 204800 83 Linux /dev/sda2 411648 4605951 2097152 82 Linux swap / Solaris /dev/sda3 4605952 41943039 18668544 83 Linux Command (m for help): d Partition number (1-3, default 3): 3 Partition 3 is deleted Command (m for help): n Partition type: p primary (2 primary, 0 extended, 2 free) e extended Select (default p): p Partition number (3,4, default 3): 3 First sector (4605952-104857599, default 4605952): Using default value 4605952 Last sector, +sectors or +size{K,M,G} (4605952-104857599, default 104857599): Using default value 104857599 Partition 3 of type Linux and of size 47.8 GiB is set Command (m for help): w The partition table has been altered! Calling ioctl() to re-read partition table. WARNING: Re-reading the partition table failed with error 16: Device or resource busy. The kernel still uses the old table. The new table will be used at the next reboot or after you run partprobe(8) or kpartx(8) Syncing disks.3)reboot 重启虚拟机,将刚刚的设置进行保存应用 4)xfs_growfs /dev/sda3 刷新存储空间,实现对内存扩容 5)lsblk 输出磁盘结构 df -PTh输出磁盘使用情况 (成功将同磁盘的新增空间,扩容到已有空间)
如果分区的时候sda2 是/ sda3 是 swap 则删除 sad2 和 sda3 然后先建立主分区2 开始空间默认 最大空间 减出去swap的空间 然后建立主分区3 给swap 即可 |

【本文地址】
今日新闻 |
推荐新闻 |