OxyPlot 导出图片及 WPF 元素导出为图片的方法 |
您所在的位置:网站首页 › excel怎么保存成图片 › OxyPlot 导出图片及 WPF 元素导出为图片的方法 |
OxyPlot 导出图片及 WPF 元素导出为图片的方法
|
OxyPlot 导出图片及 WPF 元素导出为图片的方法
目录 OxyPlot 导出图片及 WPF 元素导出为图片的方法 一、OxyPlot 自带导出方法 二、导出 WPF 界面元素的方法 三、通过附加属性来使用 独立观察员 2022 年 2 月 26 日 最近有个需求,就是将 OxyPlot 图形导出图片。经过尝试,本文记录三种方法:1、OxyPlot 自带导出方法;2、网上找的导出 WPF 界面元素的方法;3、基于方法 2 的附加属性调用方式。下面将逐一介绍。 一、OxyPlot 自带导出方法同事说这个用 OxyPlot 官方提供的导出方法即可,我在 Demo 中试了一下,是可以的,代码如下: /// /// 曲线数据源(OxyPlot) /// public PlotModel PlotModel { get; set; } = new PlotModel(); ExportPngCmd ??= new RelayCommand(o => true, async o => { var pngExporter = new PngExporter { Width = (int)PlotModel.Width, Height = (int)PlotModel.Height, }; //string exportPath = Path.Combine(AppDomain.CurrentDomain.BaseDirectory, "Export"); string exportPath = Path.Combine(Environment.GetFolderPath(Environment.SpecialFolder.DesktopDirectory), "Export"); if (!Directory.Exists(exportPath)) { Directory.CreateDirectory(exportPath); } pngExporter.ExportToFile(PlotModel, Path.Combine(exportPath, $"{DateTime.Now:yyyyMMdd_HHmmss}.png")); await ConfirmBoxHelper.ShowMessage(DialogVm, "导出完成", 3); });各种导出方法可以在 OxyPlot 官方文档(https://oxyplot.readthedocs.io/en/latest/export/index.html)中查看
这里用到的是导出到 PNG 文件的方法,不过用的 NuGet 包最新版(2.1.0)中,PngExporter 中并没有 Background 属性:
所以如果图表没有设置背景色的话,导出背景为透明的,可以设置上: PlotModel.Background = OxyColor.Parse("#FFFFFF"); 总的来说,这个方法简单快捷,而且对 MVVM 友好。不过也有缺点,就是如果有些元素(比如说标题、坐标轴文字)不是使用 OxyPlot 图表控件来生成的话,则导出的图片就不会包含它们了:
我在实际项目中确实遇到了这个问题,所以需要寻找其它方法,我们接着看。 二、导出 WPF 界面元素的方法首先给出能够导出任意 WPF 界面元素(FrameworkElement)为图片的方法,来源于网络,地址在方法注释中已给出,略作修改,代码如下: using System; using System.IO; using System.Windows; using System.Windows.Media; using System.Windows.Media.Imaging; namespace WPFTemplateLib.WpfHelpers { /// /// 导出图片帮助类 /// public class ExportPicHelper { /// /// 保存为图片 /// (修改自:https://blog.csdn.net/dhl11/article/details/108621634) /// /// 可视化元素,可以是 Grid、StackPanel 等类型的所有可视化元素 /// 文件路径 /// 错误消息 /// 是否成功 public static bool SaveToImage(FrameworkElement frameworkElement, string filePath, out string errorMsg) { try { errorMsg = string.Empty; FileStream fs = new FileStream(filePath, FileMode.Create); RenderTargetBitmap bmp = new RenderTargetBitmap( (int)frameworkElement.ActualWidth, (int)frameworkElement.ActualHeight, 1 / 96, 1 / 96, PixelFormats.Default); bmp.Render(frameworkElement); BitmapEncoder encoder = new TiffBitmapEncoder(); encoder.Frames.Add(BitmapFrame.Create(bmp)); encoder.Save(fs); fs.Close(); return true; } catch (Exception ex) { Console.WriteLine($" 保存图片异常:{ex}"); errorMsg = ex.Message; return false; } } } }用这个方法首先要给界面元素起个名字,我这里给图表区用户控件元素起了个 “Plot” 名称:
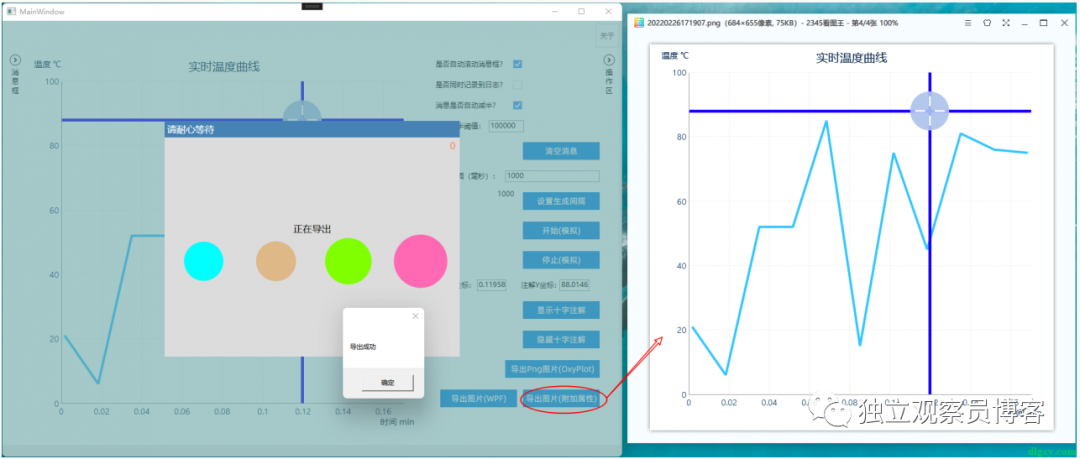
这样在后台代码中就可以用来导出了: private void ExportPicBtn_OnClick(object sender, RoutedEventArgs e) { ExportPicture(Plot); } /// /// 导出图片 /// /// xaml 里面的某个可视化元素对象 private void ExportPicture(FrameworkElement element) { SaveFileDialog saveFileDialog = new SaveFileDialog { Filter = "PNG 文件 (*.png)|*.png|JPG 文件 (*.jpg)|*.jpg|BMP 文件 (*.bmp)|*.bmp|GIF 文件 (*.gif)|*.gif|TIF 文件 (*.tif)|*.tif" }; if (saveFileDialog.ShowDialog() == true) { string dir = System.IO.Path.GetDirectoryName(saveFileDialog.FileName); if (!Directory.Exists(dir)) { Directory.CreateDirectory(dir); } string filePath = saveFileDialog.FileName; if (File.Exists(filePath)) { File.Delete(filePath); } bool success = ExportPicHelper.SaveToImage(element, filePath, out string errorMsg); if (success) { MessageBox.Show($"导出成功"); } else { MessageBox.Show($" 导出失败 {errorMsg}"); } } }可以看到想要导出的内容都导出成功了:
优点是显而易见的,缺点就是导出逻辑要写在后台代码中,对 MVVM 模式不友好。下面来看看本人修改的使用附加属性的方案,尝试解决这个问题。 三、通过附加属性来使用还是先给出代码: using System; using System.IO; using System.Windows; using WPFTemplateLib.WpfHelpers; namespace WPFTemplateLib.Attached { /// /// 导出图片附加属性类 /// public class ExportPicAttached : DependencyObject { #region 是否开始导出 public static bool GetIsExporting(DependencyObject obj) { return (bool)obj.GetValue(IsExportingProperty); } public static void SetIsExporting(DependencyObject obj, bool value) { obj.SetValue(IsExportingProperty, value); } /// /// 是否正在导出(运行时设置为 true 则将附加的元素导出为图片) /// public static readonly DependencyProperty IsExportingProperty = DependencyProperty.RegisterAttached("IsExporting", typeof(bool), typeof(ExportPicAttached), new PropertyMetadata(false, OnIsExportingValueChanged)); private static void OnIsExportingValueChanged(DependencyObject d, DependencyPropertyChangedEventArgs e) { FrameworkElement element = d as FrameworkElement; if (element == null) return; if ((e.NewValue as bool?) == false) return; try { string exportPath = GetExportPath(d); if (string.IsNullOrEmpty(exportPath)) { exportPath = Path.Combine(Environment.GetFolderPath(Environment.SpecialFolder.DesktopDirectory), "Export"); } if (!Directory.Exists(exportPath)) { Directory.CreateDirectory(exportPath); } string filePath = Path.Combine(exportPath, $"{DateTime.Now:yyyyMMddHHmmss}.png"); bool success = ExportPicHelper.SaveToImage(element, filePath, out string errorMsg); if (success) { MessageBox.Show($"导出成功"); } else { Console.WriteLine($" 导出失败:{errorMsg}"); MessageBox.Show($" 导出失败 {errorMsg}"); } } catch (Exception ex) { Console.WriteLine($" 导出异常:{ex}"); MessageBox.Show($" 导出异常:{ex.Message}"); } finally { // 此处设置为 false 没什么用,还是需要业务层在设置为 true 前先设置为 false 才行。 SetIsExporting(d, false); } } #endregion #region 导出文件夹 public static string GetExportPath(DependencyObject obj) { return (string)obj.GetValue(ExportPathProperty); } public static void SetExportPath(DependencyObject obj, string value) { obj.SetValue(ExportPathProperty, value); } /// /// 导出文件夹路径 /// public static readonly DependencyProperty ExportPathProperty = DependencyProperty.RegisterAttached("ExportPath", typeof(string), typeof(ExportPicAttached), new PropertyMetadata(string.Empty)); #endregion } }ExportPicAttached 类中包含两个附加属性,一个是导出文件夹路径 ExportPath,一个是是否开始导出 IsExporting。当 IsExporting 被设置为 true 则开始导出,如果导出文件夹路径没被设定,则导出到桌面文件夹,然后就是调用方案二中出现的 ExportPicHelper.SaveToImage 方法。 使用方法就是在要导出的元素上设置上这两个附加属性,然后把值进行绑定:
在 ViewModel 中,先设定导出路径,然后把 IsExporting 置为 true 即可开始导出:
也是能正常导出的:
这个方案结合了前两个方案的优点,既能导出所有想要的内容,又对 MVVM 友好。 缺点就是导出的控制有点奇怪,需要先将 IsExporting 置为 false,不然第二次就导出不了了。尝试了在附加属性逻辑中自动置为 false,但是好像值传递不到 VM 中的相关绑定属性中,有了解解决方法的朋友们请不吝赐教。
全文完,感谢阅读,祝大家天天开心。 WPF让 WPF 的 RadioButton 支持再次点击取消选中的功能 WPF DataGrid 如何将被选中行带到视野中 WPF 触屏事件后触发鼠标事件的问题及 DataGrid 误触问题 WPF DataGrid 通过自定义表头模拟首行固定 WPF ComboBox 使用 ResourceBinding 动态绑定资源键并支持语言切换 【翻译】WPF 中附加行为的介绍 Introduction to Attached Behaviors in WPF WPF 使用 Expression Design 画图导出及使用 Path 画图 WPF MVVM 弹框之等待框 解决 WPF 绑定集合后数据变动界面却不更新的问题(使用 ObservableCollection) WPF 消息框 TextBox 绑定新数据时让光标和滚动条跳到最下面 真・WPF 按钮拖动和调整大小 WPF MVVM 模式下的弹窗 WPF 让一组 Button 实现 RadioButton 的当前样式效果 WPF 原生绑定和命令功能使用指南 WPF 用户控件的自定义依赖属性在 MVVM 模式下的使用备忘 在WPF的MVVM模式中使用OCX组件 第三方库使用WPF 表格控件 ReoGrid 的简单使用 OxyPlot.WPF 公共属性一览 OxyPlot.Wpf 图表控件使用备忘 |


【本文地址】
今日新闻 |
推荐新闻 |