java缓存模块,ehcache/guava cache/自定义spring的CacheManager/自定义缓存 |
您所在的位置:网站首页 › enablecaching注解 › java缓存模块,ehcache/guava cache/自定义spring的CacheManager/自定义缓存 |
java缓存模块,ehcache/guava cache/自定义spring的CacheManager/自定义缓存
|
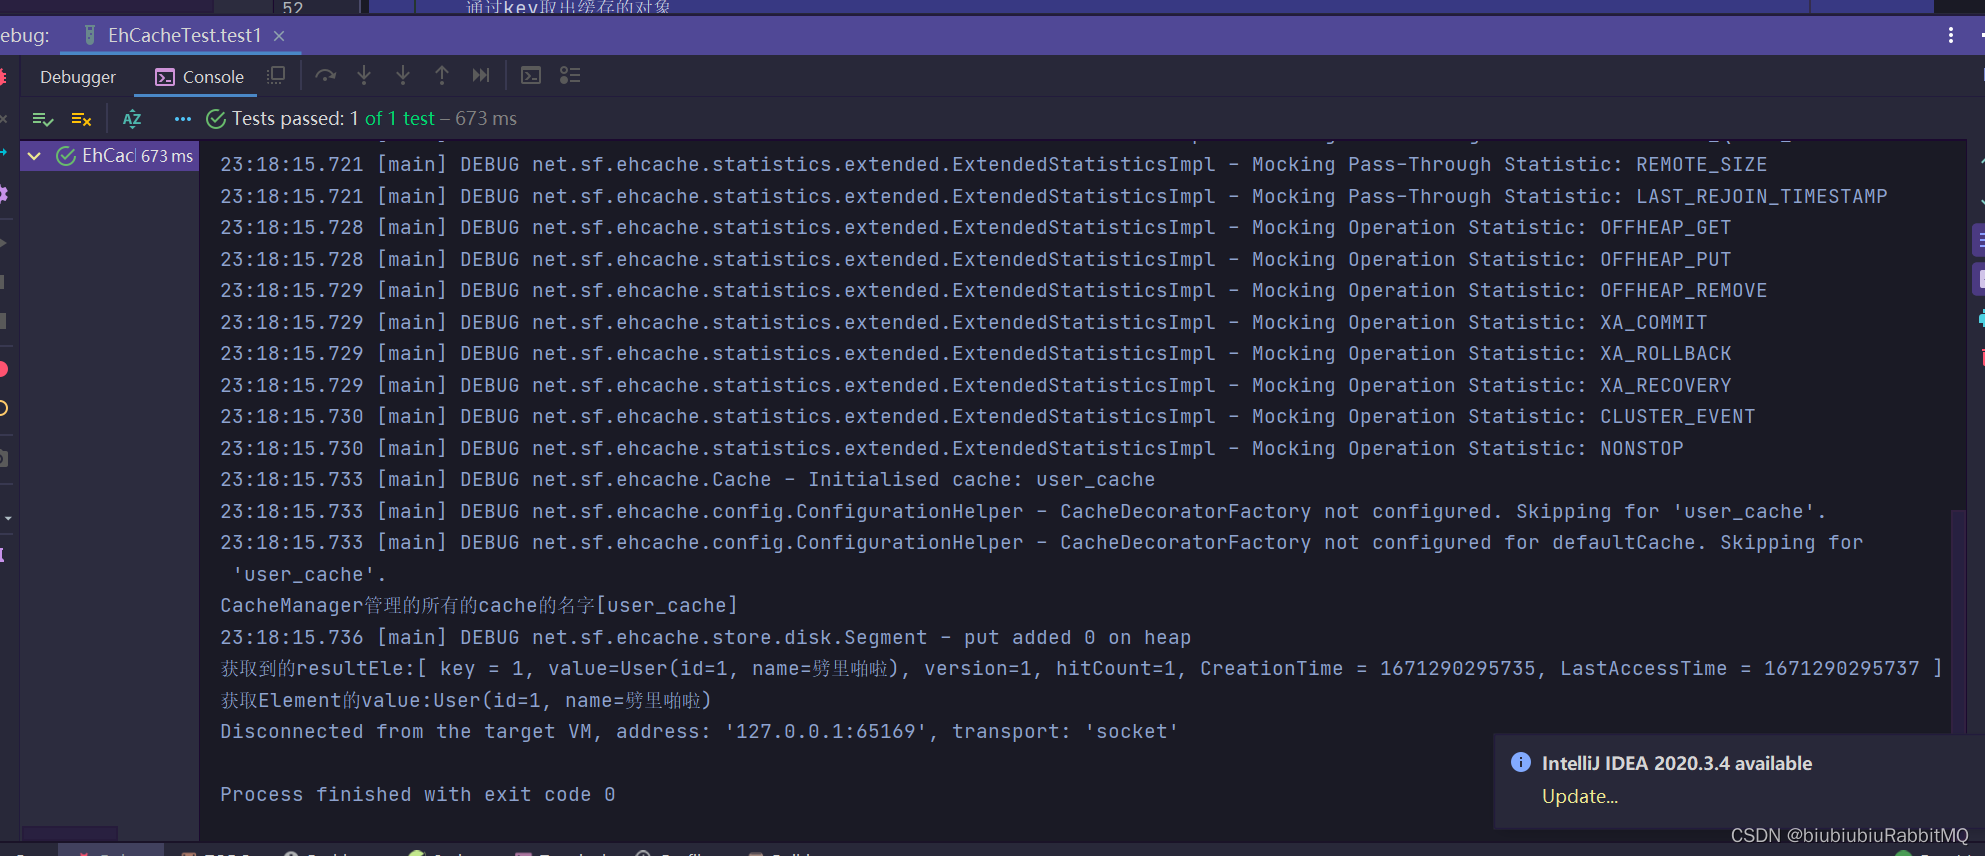
如ehcache,guava cache,redis 也有将ehcache,guava cache分级为单机缓存 将redis分为分布式缓存 ehcache官网:https://www.ehcache.org/ 这里主要说下ehcache和guava cache 单独使用ehcache(当然真正企业开发并不会单独使用ehcache,而是会和Spring或者SpringBoot集成使用) ehcache依赖: net.sf.ehcache ehcache 2.10.6 注意ehcache的原生API在实际开发中一般不使用,而是和Spring或者SpringBoot集成使用,但是原理还是ehcache,只不过在Spring和SpringBoot中对它进行了包装,学习ehcache原生API可以帮助理解 这里是建了个Maven工程,引入的依赖,包含了Spring,SpringBoot org.springframework.boot spring-boot-dependencies 2.2.2.RELEASE pom import org.springframework.boot spring-boot-starter-web org.springframework.boot spring-boot-starter-jdbc org.springframework.boot spring-boot-starter-aop org.springframework.boot spring-boot-starter-cache net.sf.ehcache ehcache org.springframework.boot spring-boot-starter-test test javax.cache cache-api 1.1.1 org.projectlombok lombok com.google.guava guava 29.0-jre org.springframework spring-test 5.2.2.RELEASE com.alibaba fastjson 1.2.78 junit junit 4.12 test使用原生ehcache的API ehcache.xml配置 Test 相对路径: String absPath="./src/main/resources/ehcache.xml"; @Test public void test2(){ System.out.println(System.getProperty("java.io.tmpdir")); } /** * 单独使用ehcache的api进行编程 */ @Test public void test1(){ String absPath = "D:\\cache-demo\\src\\main\\resources\\ehcache.xml"; /* 用来管理多个Cache,user_cache、item_cache、store_cache... */ CacheManager cacheManager = CacheManager.create(absPath); /* 获取到CacheManager管理的所有的cache */ String[] cacheNames = cacheManager.getCacheNames(); System.out.println("CacheManager管理的所有的cache的名字"+ Arrays.toString(cacheNames)); /* 获取cache的名字(我们指定的)获取具体的cache */ Cache userCache = cacheManager.getCache("user_cache"); /* 往userCache放入一个user */ User user = new User(); user.setId(1001L); user.setName("劈里啪啦"); Element element = new Element(user.getId(),user); userCache.put(element); /* 通过key取出缓存的对象 */ Element resultEle = userCache.get(1001L); System.out.println("获取到的resultEle:" +resultEle); System.out.println("获取Element的value:" + resultEle.getObjectValue()); }
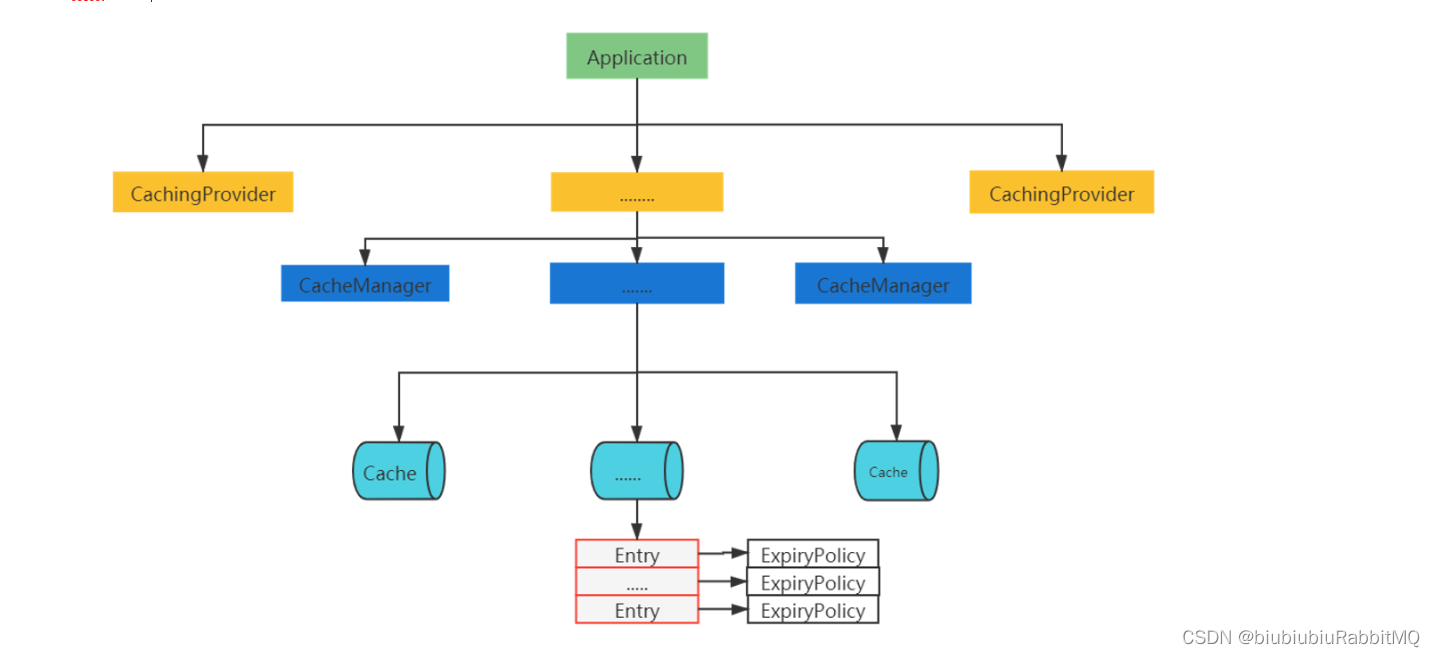
关于jsr107缓存规范 依赖 javax.cache cache-api 1.1.1 jcp介绍: The Java Community Process(SM) Program - JSRs: Java Specification Requests - detail JSR# 107 项目地址: GitHub - jsr107/jsr107spec: JSR107 Cache Specification api结构
如何理解上面这张图:就是说一个应用程序下面,有很多个CahingProvider,每个CachingProvider里又包含很多CacheManager,每个CacheManager里有包含很多Cache 对于jsr107缓存规范只做了解,过于复杂 下面是Spring的缓存抽象,设计就相对简单了
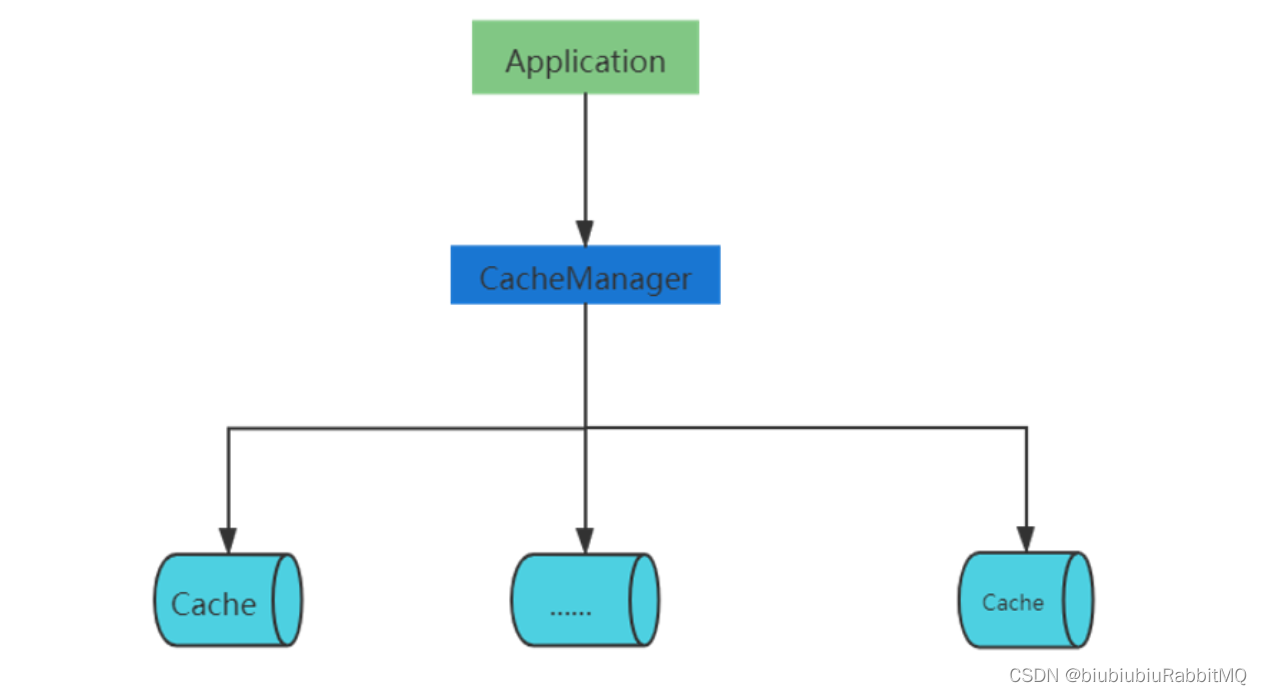
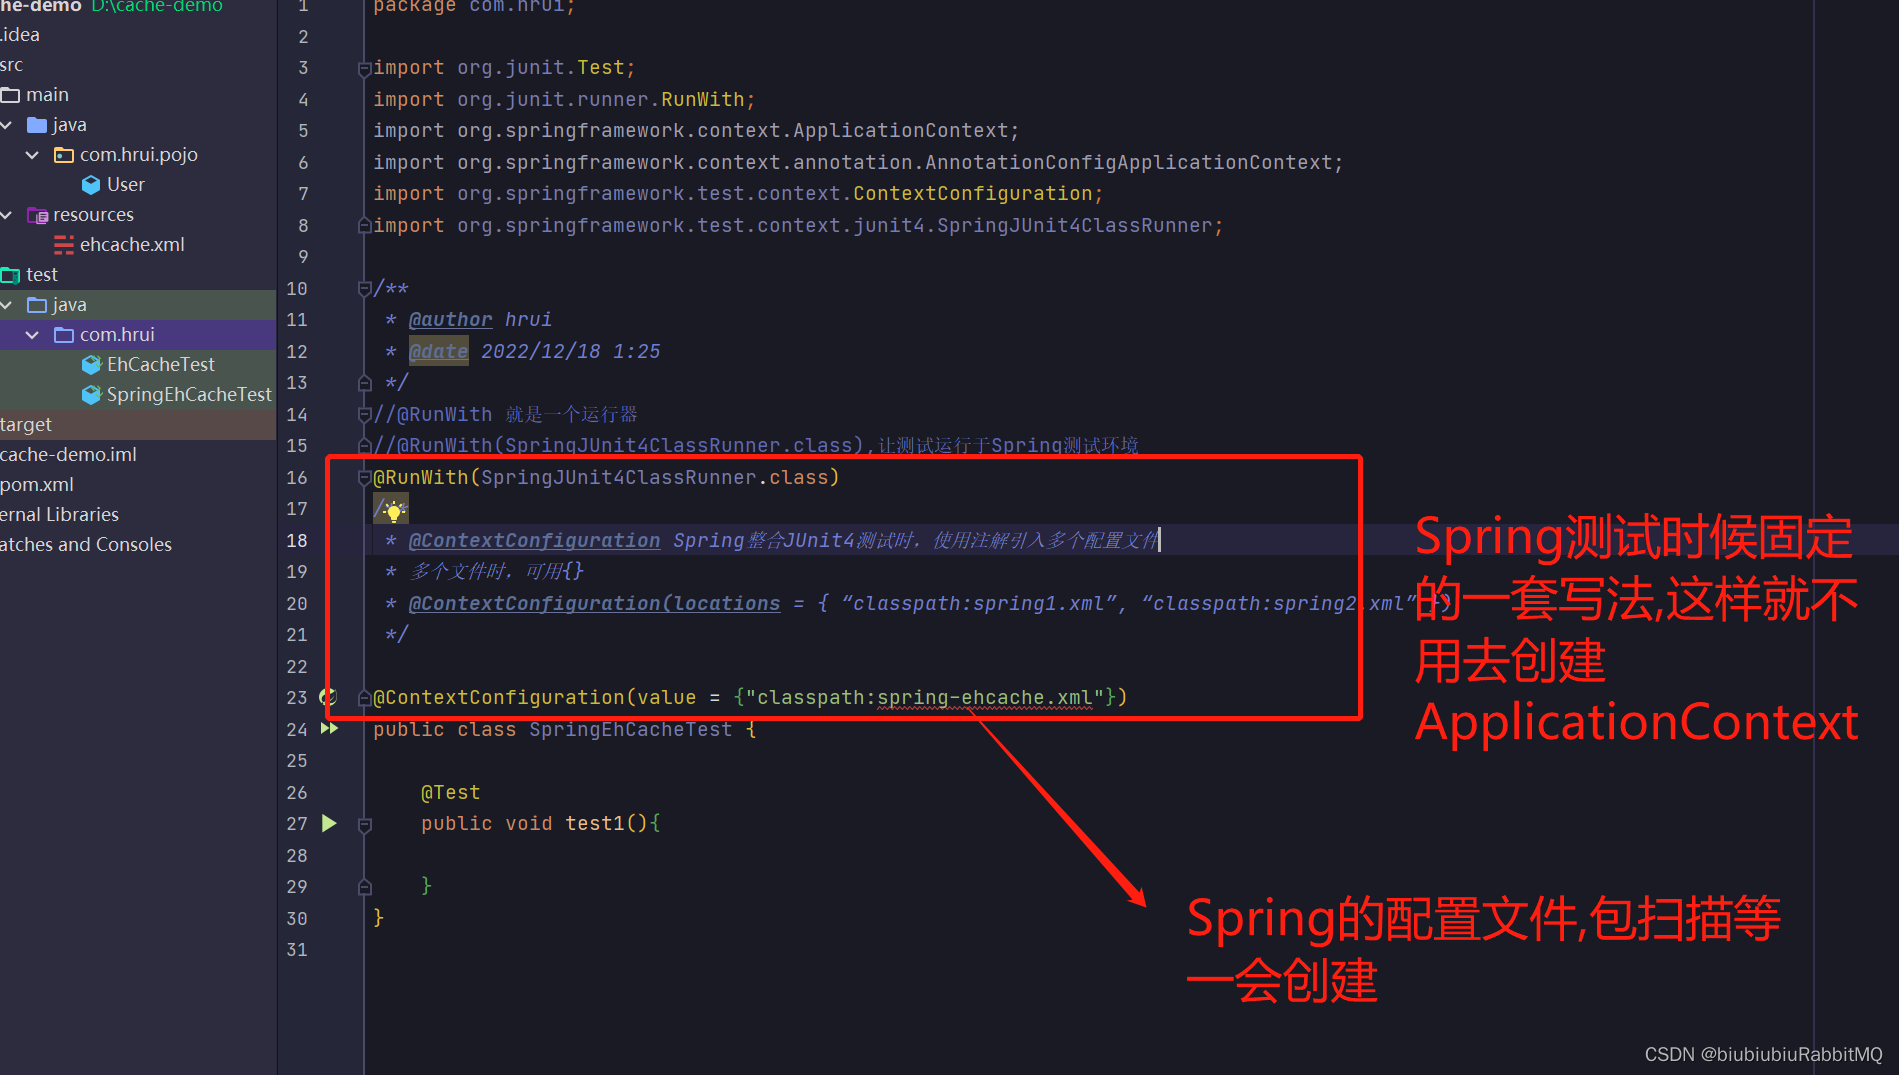
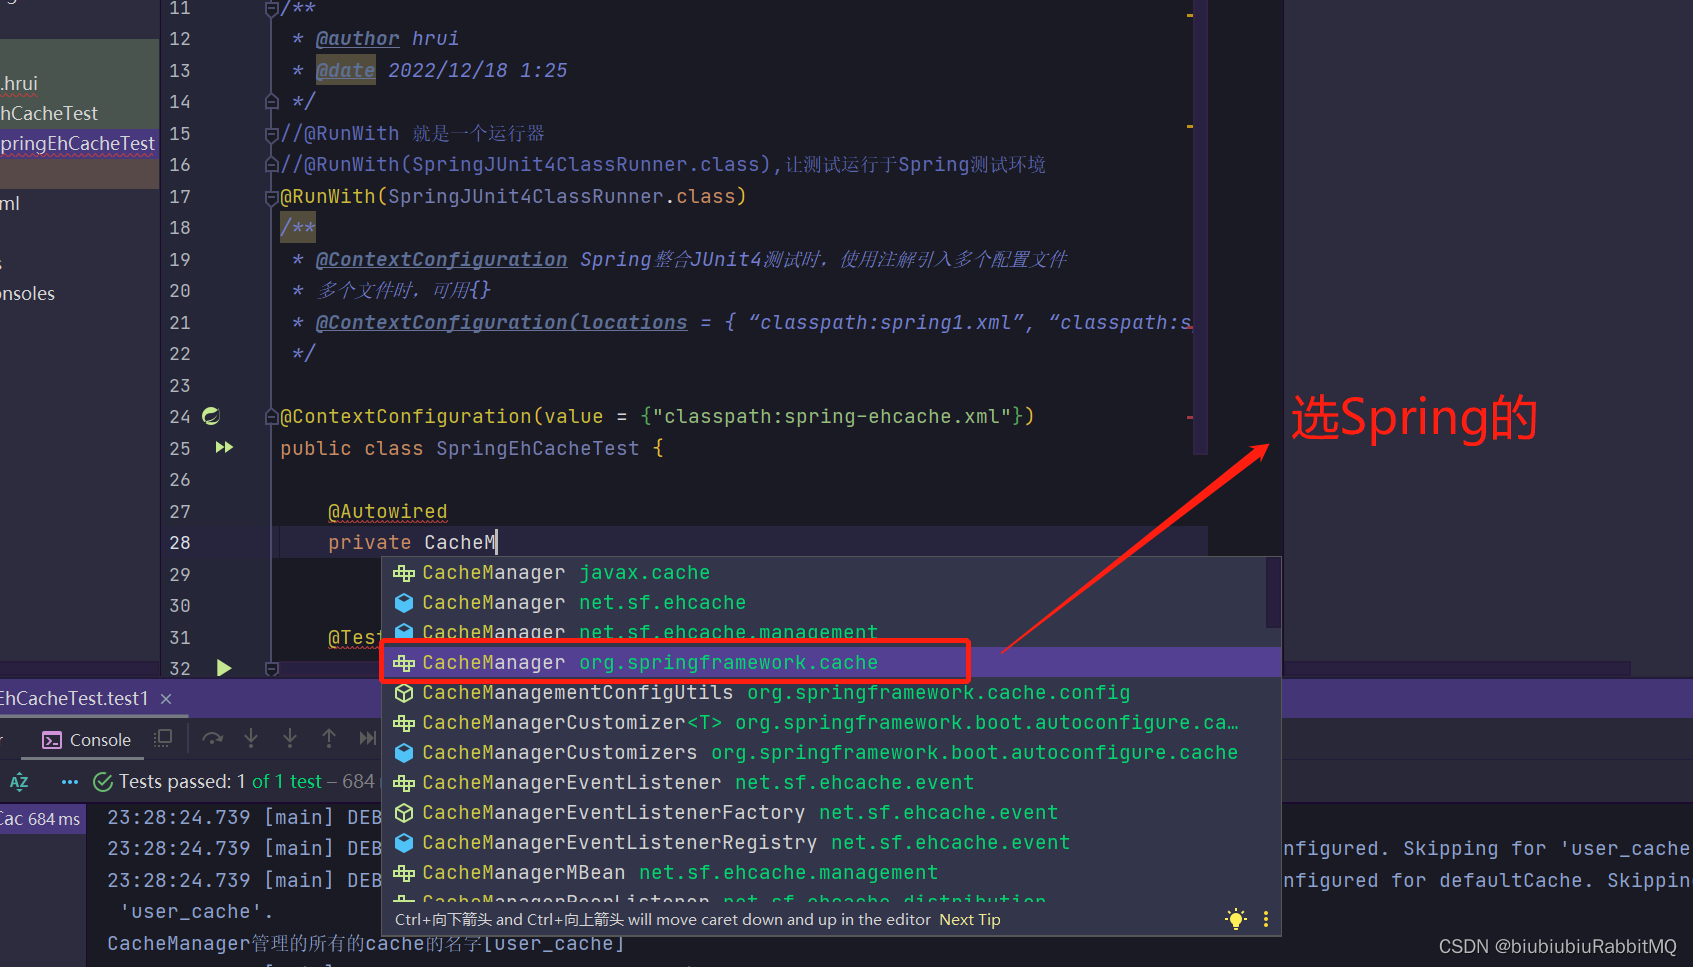
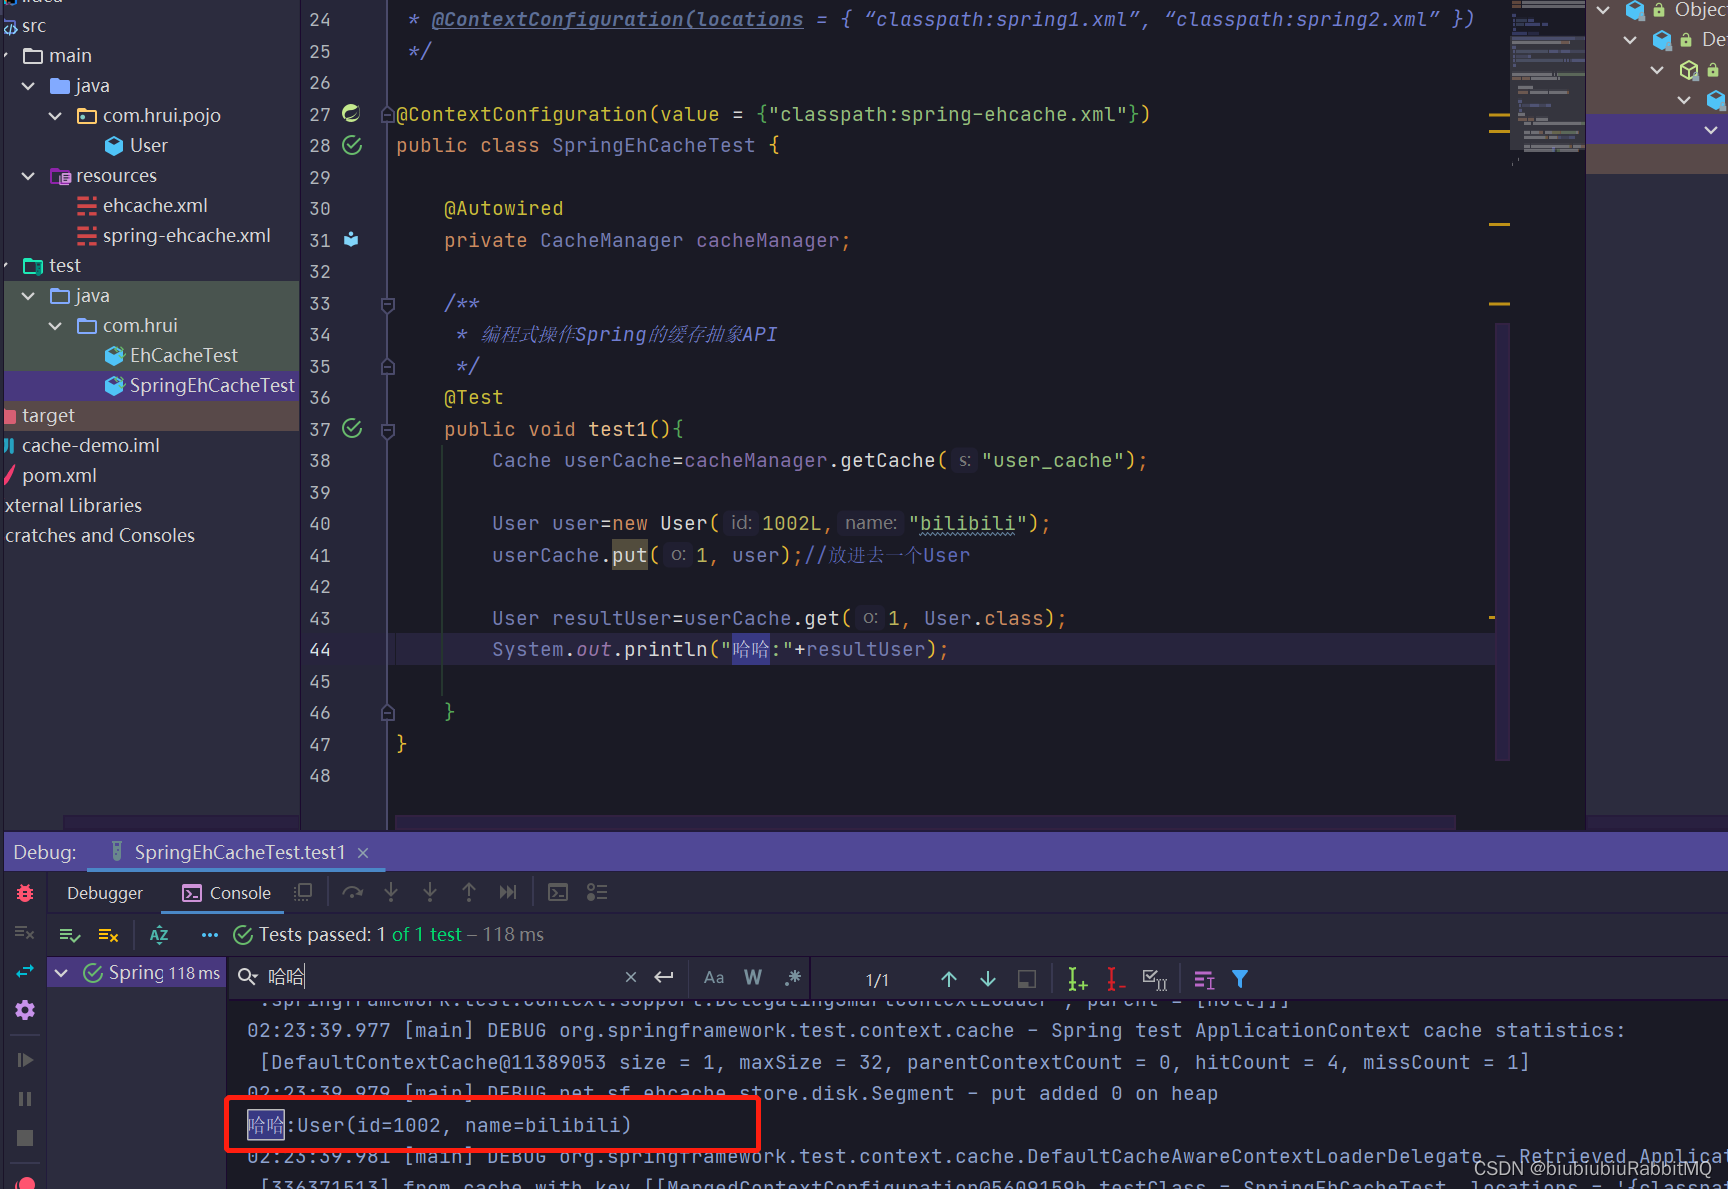
就是说一个应用里面有一个CacheManager,管理着多个Cache ehcache与Spring集成以及编程式操作缓存 Spring依赖一开始就已经引入了 Spring集成ehCache两种方式: 1.编程式使用 2.注解方式使用 注意在Spring集成ehcache的这张图
新建一个测试类 1.编程式使用
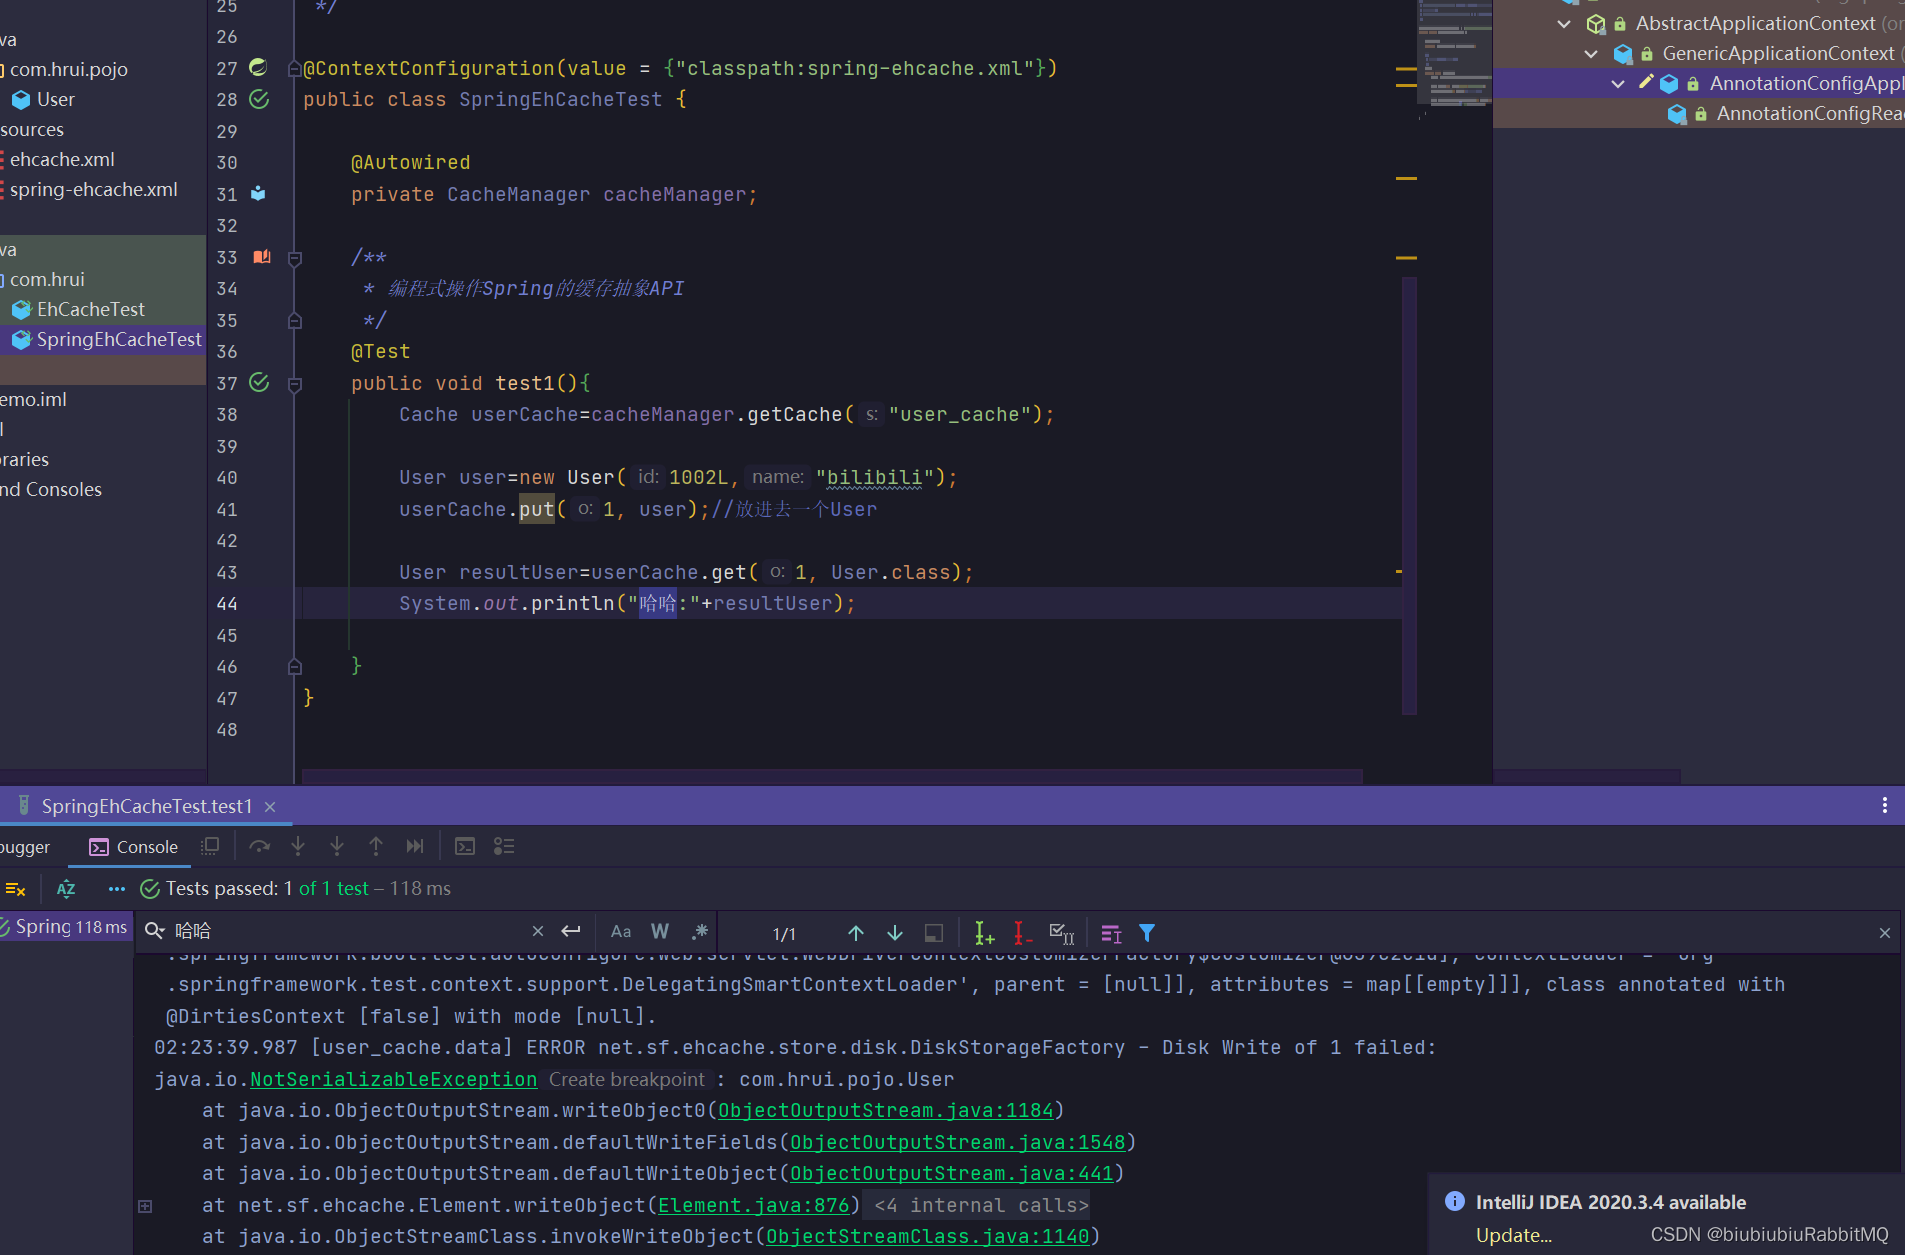
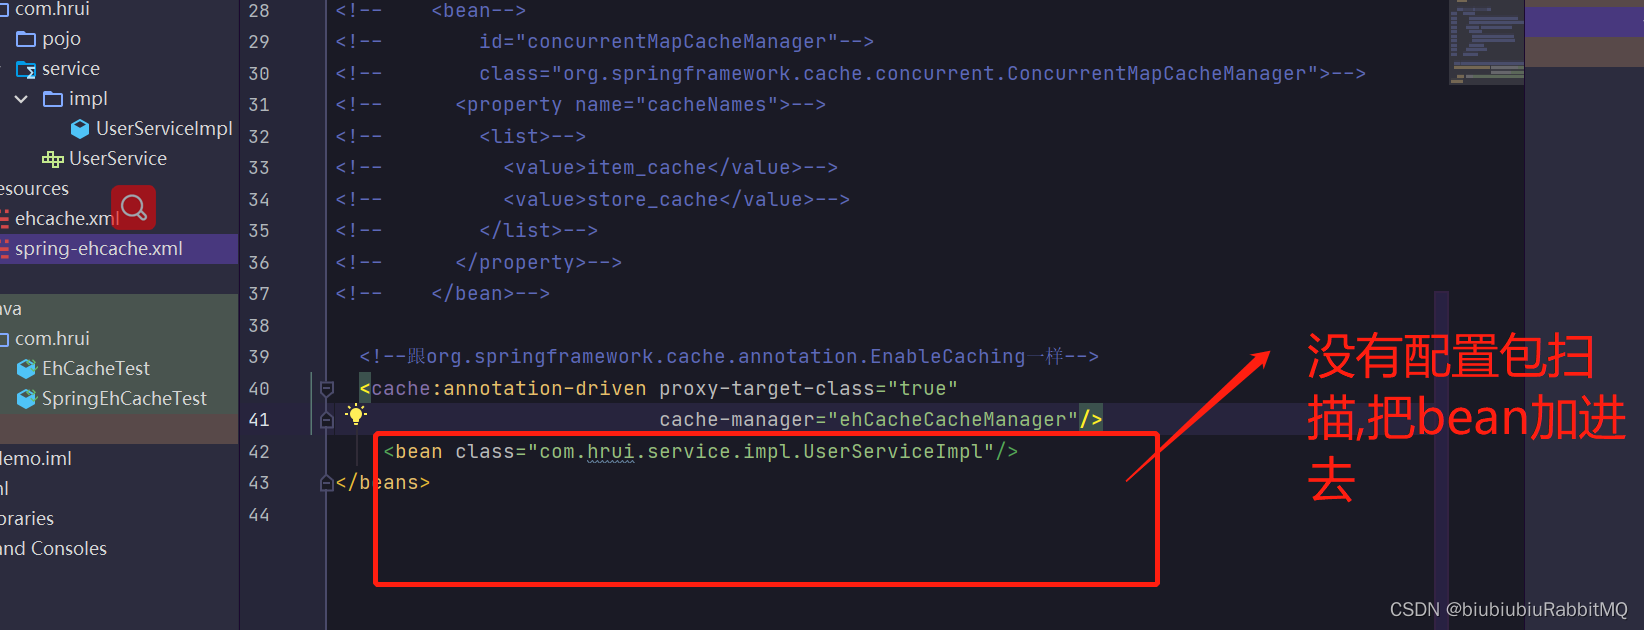
spring-ehcache.xml 现在可以开始玩了
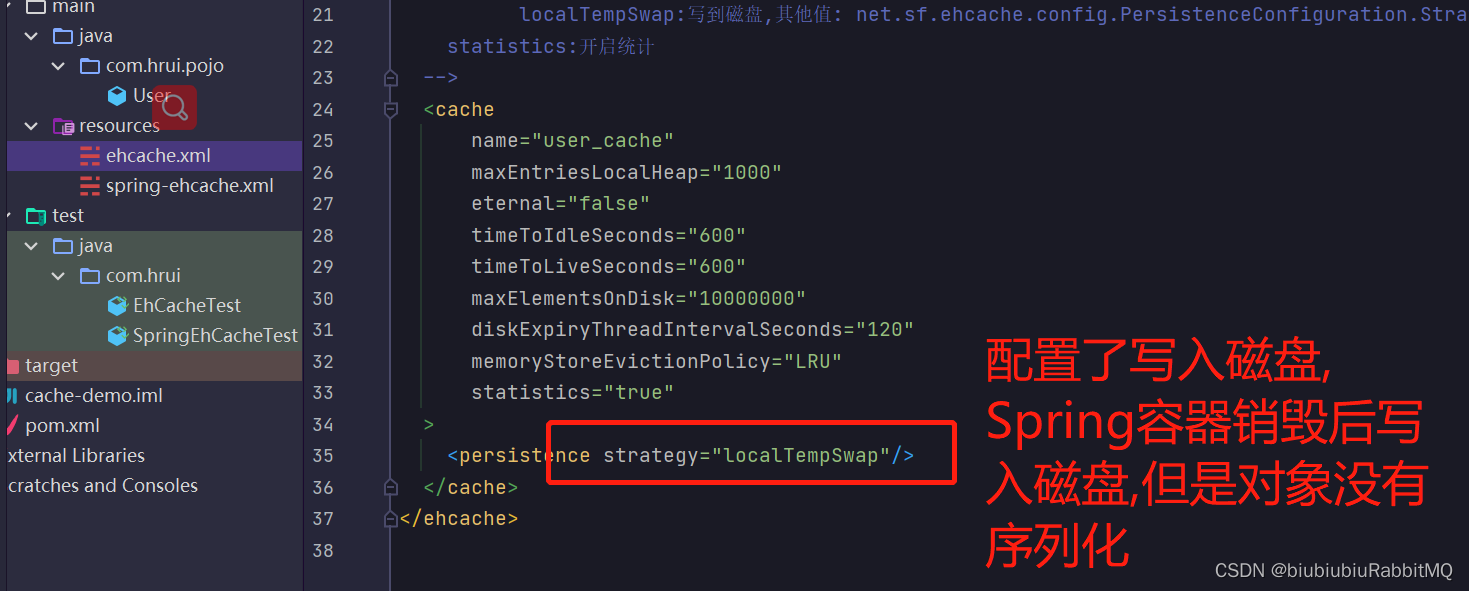
打印了,但是控制台最后也报错了,说没有实现序列化
原因是
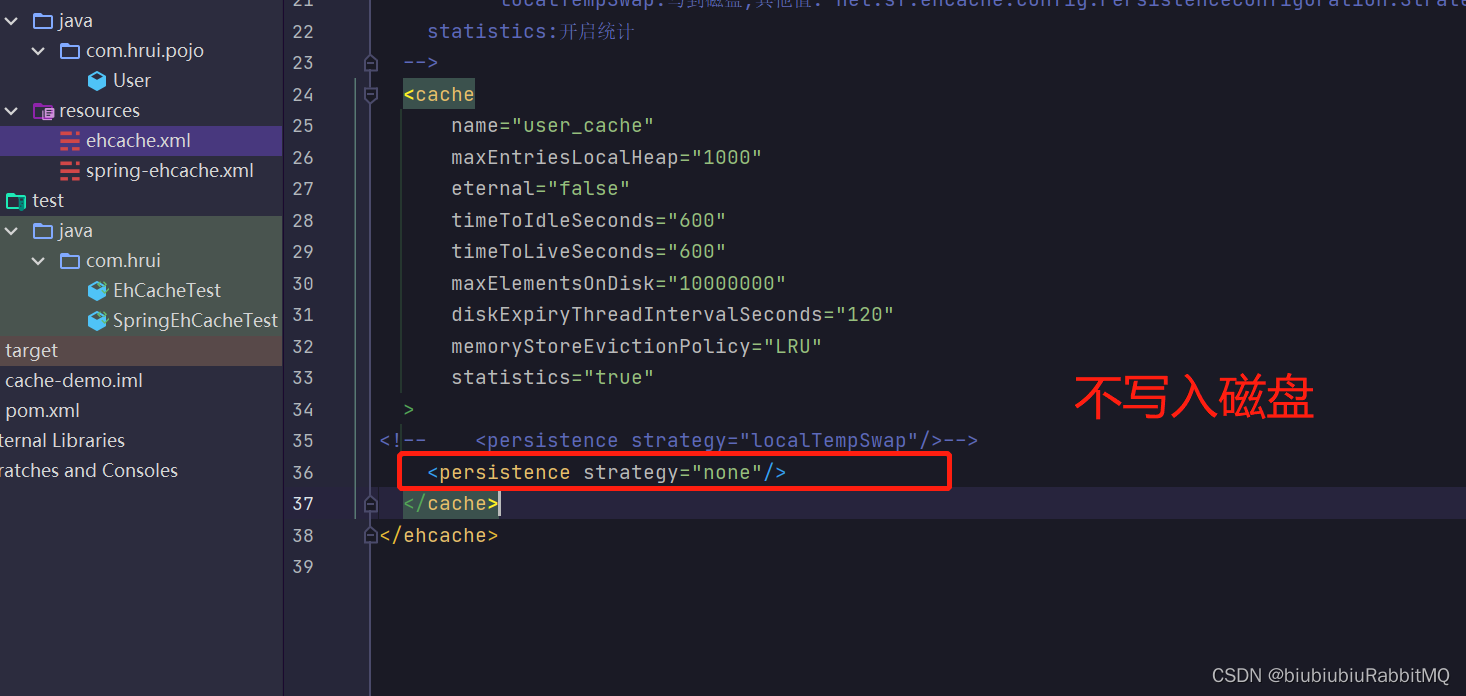
解决方式:1个改成不写入磁盘
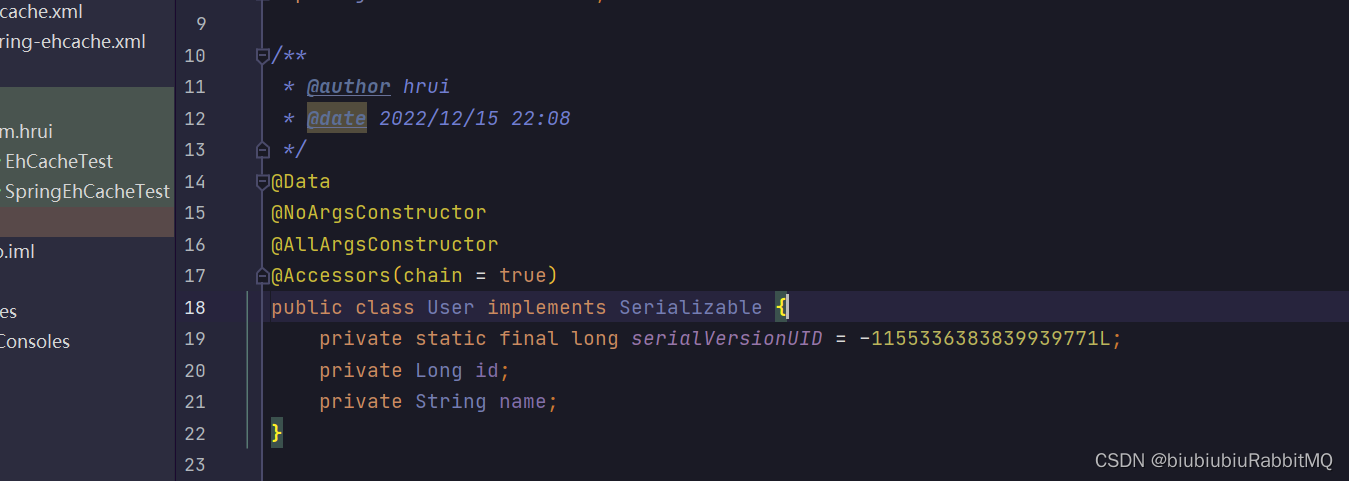
2,那就是实现序列化
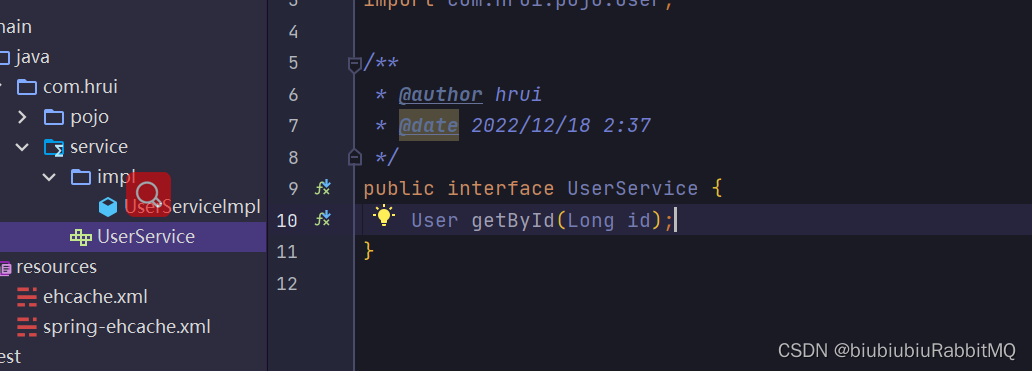
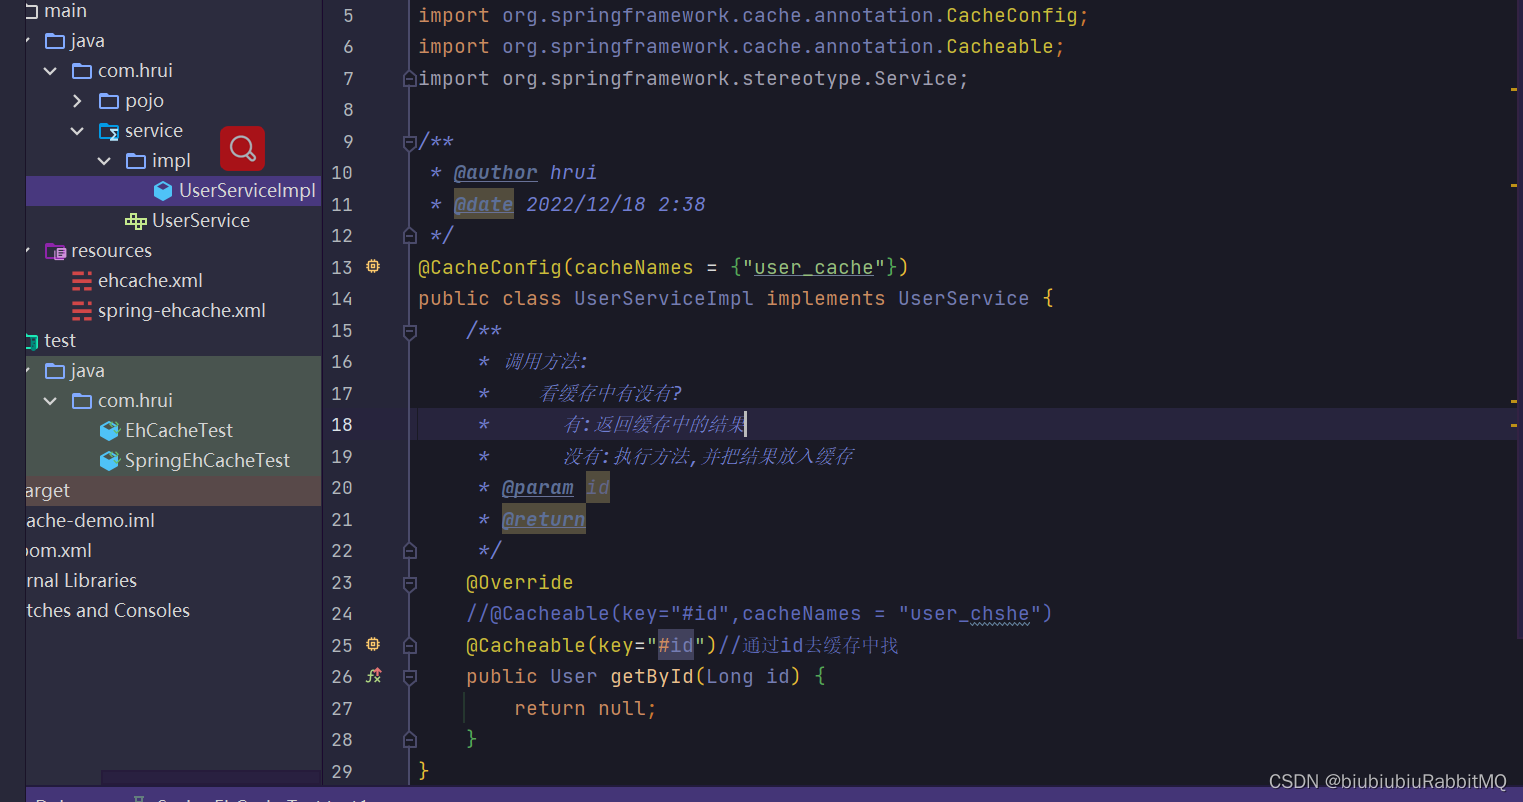
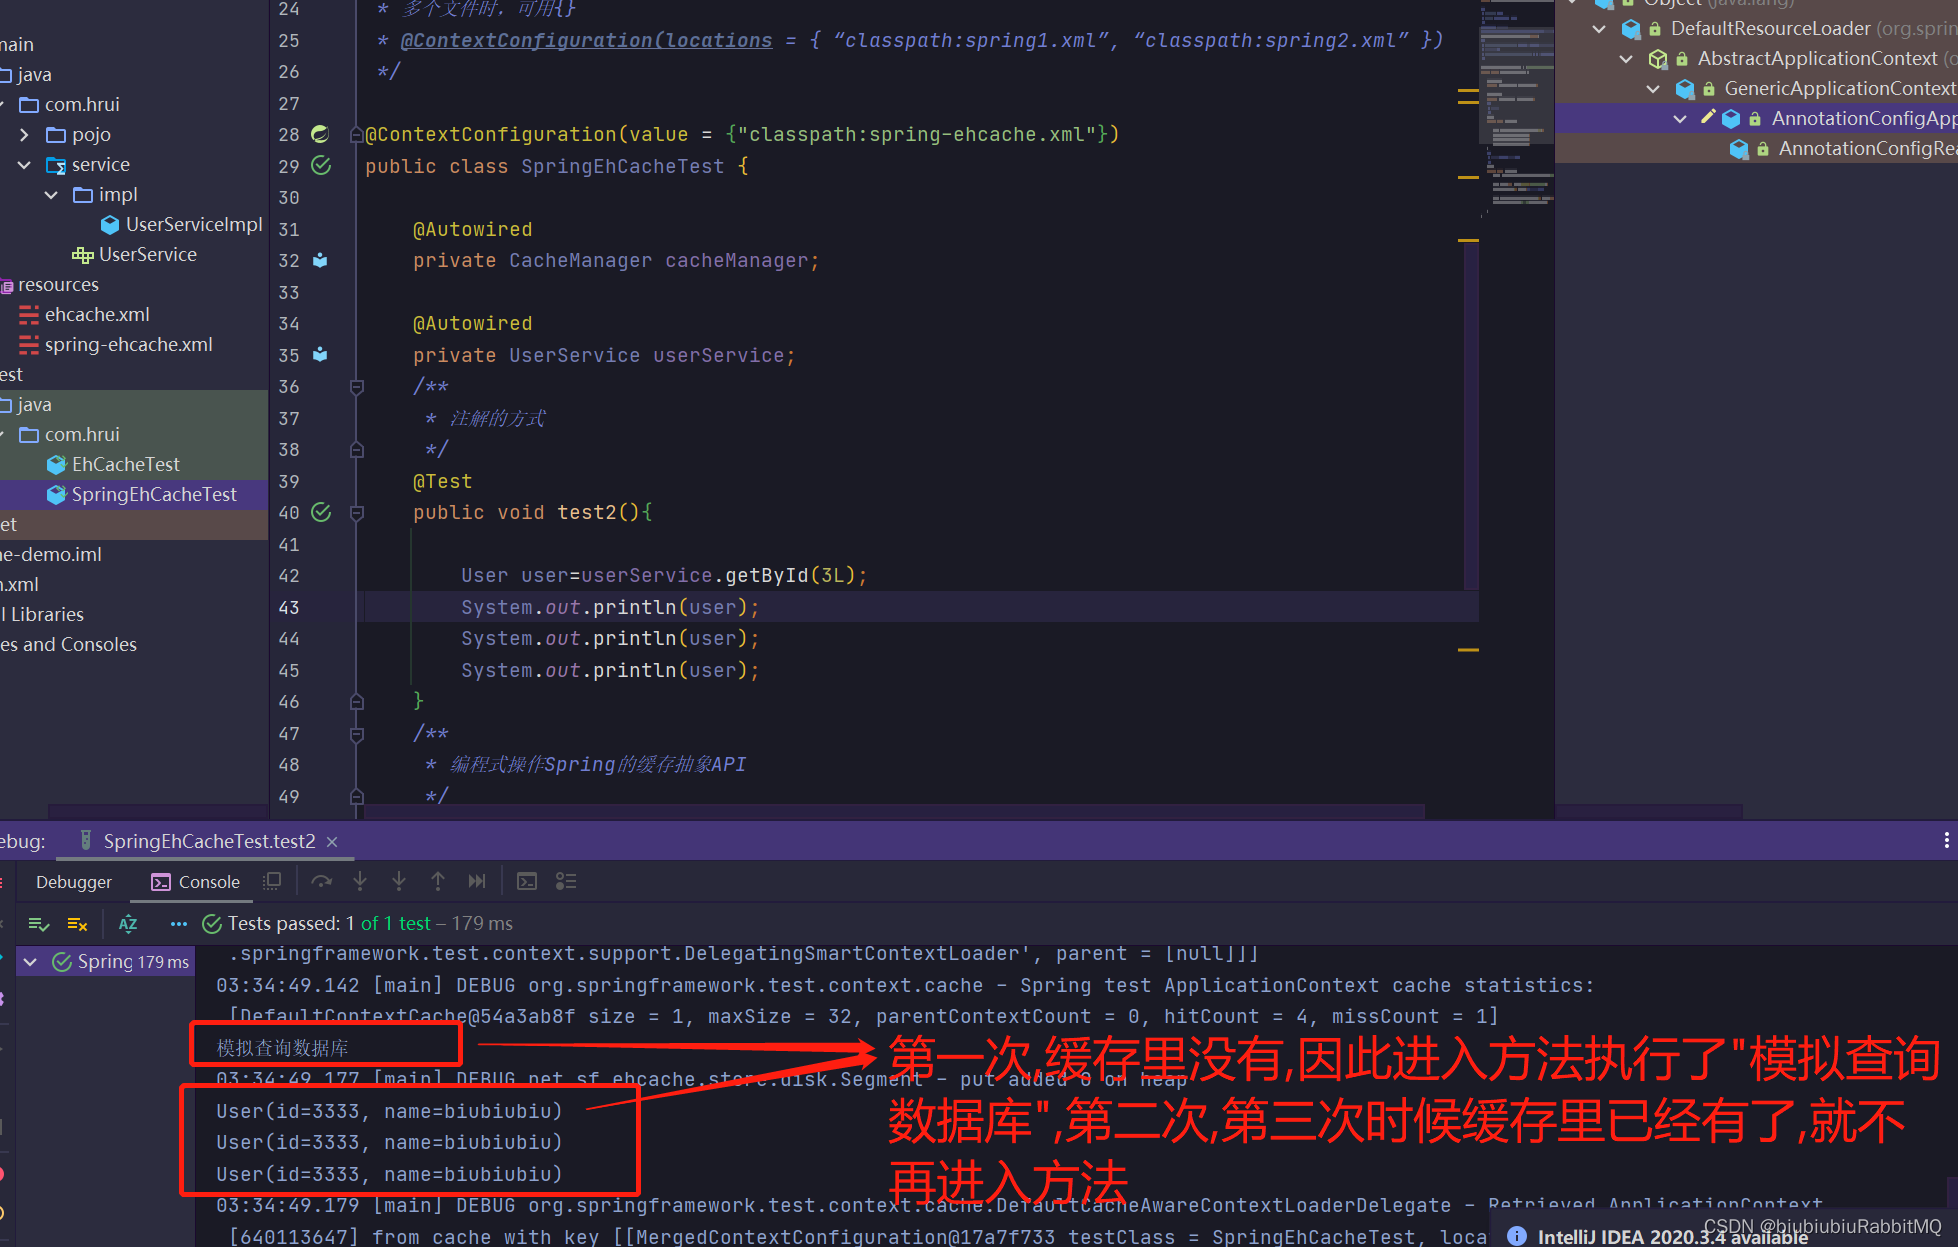
2.注解方式使用 使用@Cacheable 比如顶一个接口
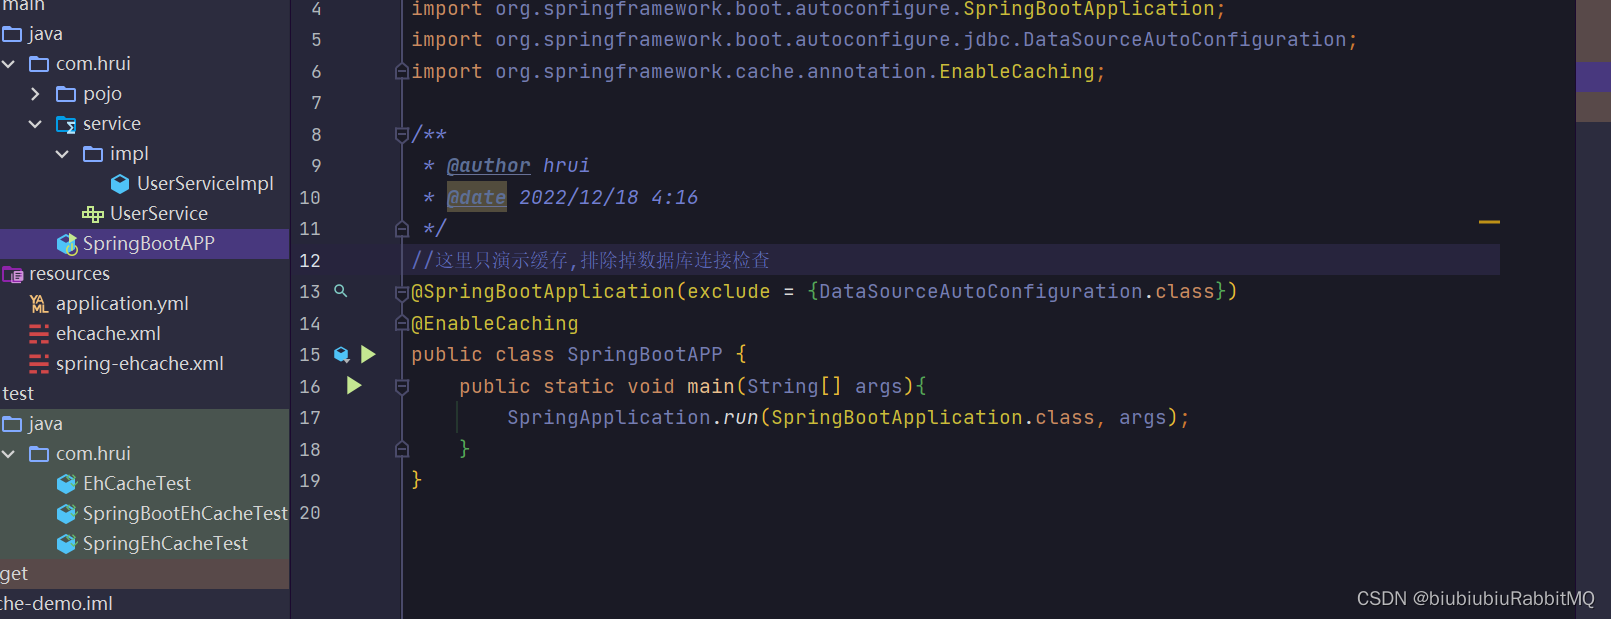
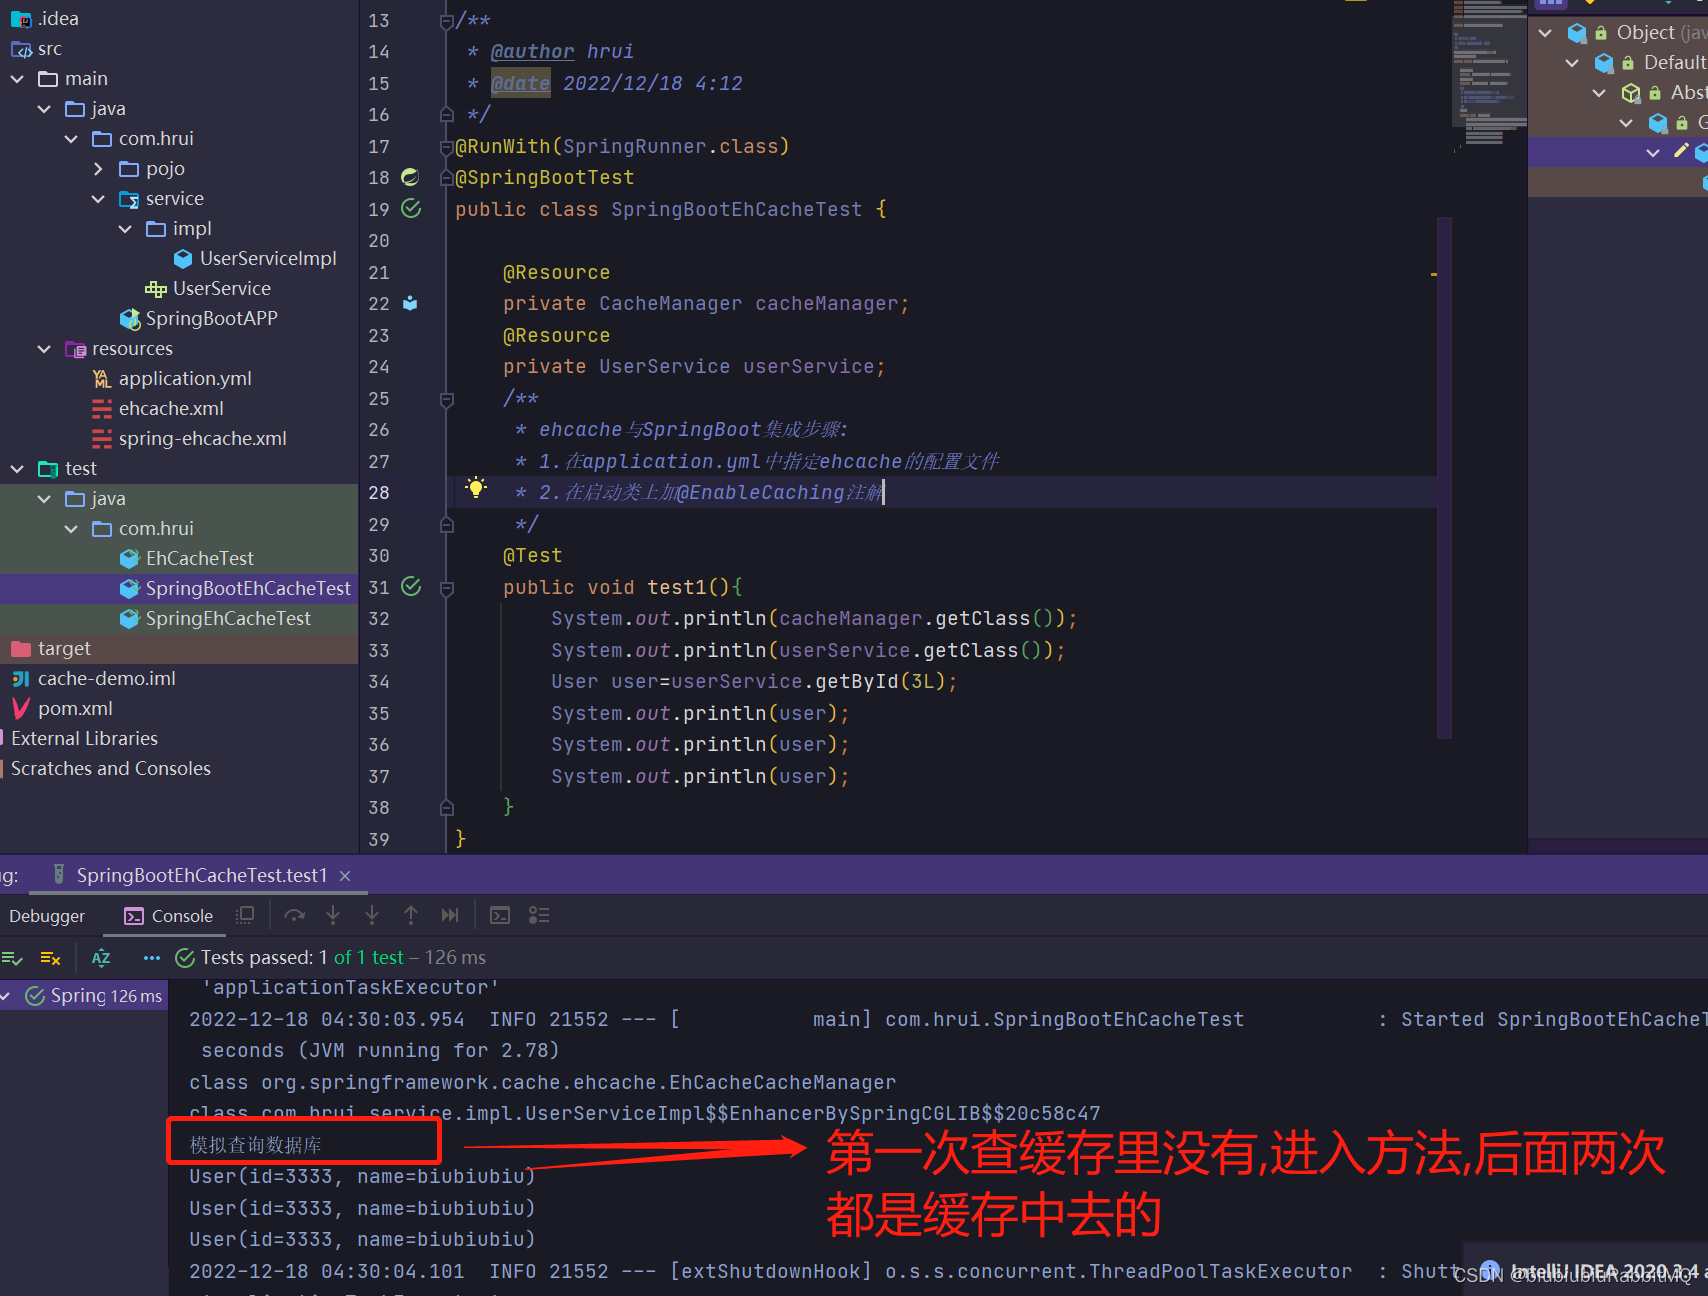
下面就是实际开发中会用到的 SpringBoot集成ehcache 依赖一开始就已引入 直接测试 写个启动类,且加上@EnableCaching注解
在yml里的配置
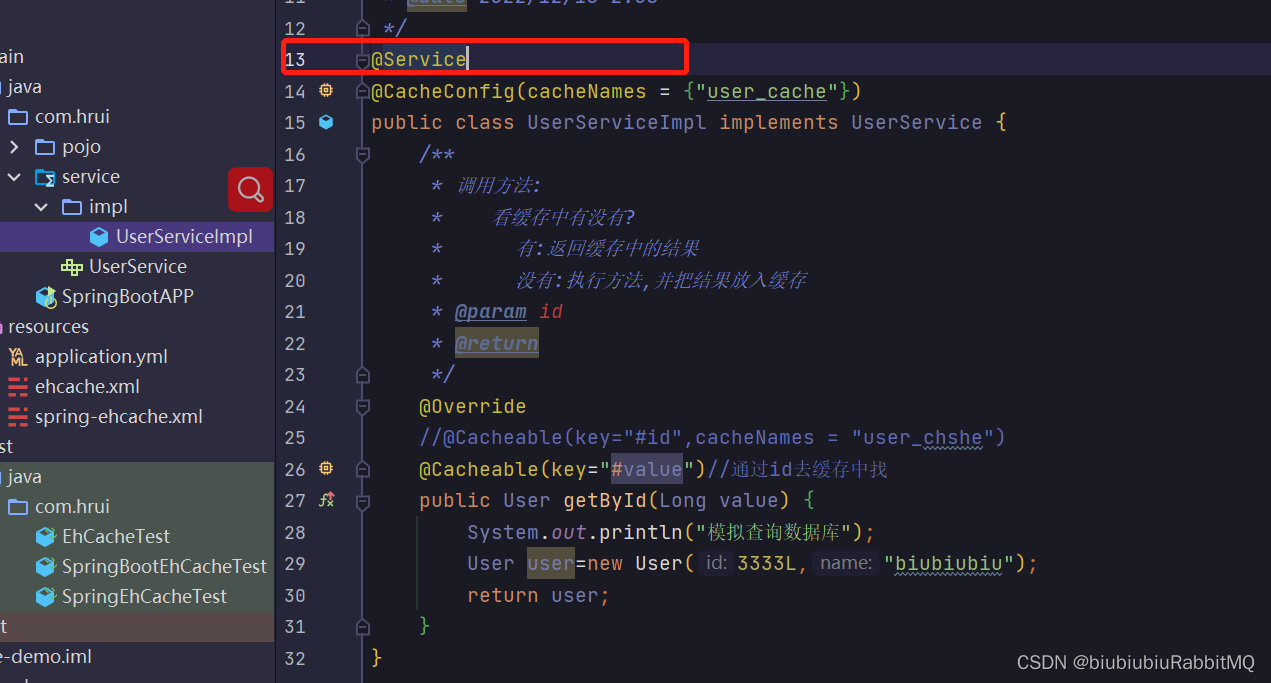
现在用的是SpringBoot,将UserServiceImpl上加上@Service注解
SpringBoot中编程式使用ehcashe和Spring是一样的 拿到cacheManager目的是为了编程式使用 SpringBoot中简化:注解式使用 -------------------------------------------------------------------------------------------- 关于guava的cache com.google.guava guava 29.0-jre单独使用guava的cache,guava的cache分为两种: 第一种:Cache--实现类是LoadingCache的内部类com.google.common.cache.LocalCache.LocalLoadingCache 特点:缓存中获取不到值得时候,会根据指定得loader进行加载,加载后自动放入缓存 第二种:Cache--实现类com.google.common.cache.LocalCache.LocalManualCache 特点类似ehcache 先来演示第一种:单独使用guava的cache,guava的cache.第一种:Cache--实现类是LoadingCache的内部类com.google.common.cache.LocalCache.LocalLoadingCache public class GuavaCacheLoadingCacheTest { /** * 单独使用guava的cache,guava的cache分为两种: * 第一种:Cache--实现类是LoadingCache的内部类com.google.common.cache.LocalCache.LocalLoadingCache * 特点:缓存中获取不到值得时候,会根据指定得loader进行加载,加载后自动放入缓存 */ @Test public void test1() throws InterruptedException { LoadingCache loadingCache= CacheBuilder.newBuilder() //指定并发级别 .concurrencyLevel(8) //初始化大小,配合concurrencyLevel做分段锁 .initialCapacity(60) //最多可以防止多少个元素 .maximumSize(10) //从写入开始计算,10s过期 .expireAfterWrite(3, TimeUnit.SECONDS) //统计命中率 .recordStats() //缓存中的元素被驱逐出去后会自动回调的到这里 .removalListener(new RemovalListener() { @Override public void onRemoval(RemovalNotification removalNotification) { Long key= removalNotification.getKey(); RemovalCause cause=removalNotification.getCause(); System.out.println("Key:"+key+"被移出缓存,原因:"+cause); } }) //缓存中获取不到值得时候,会回调到这里 .build(new CacheLoader() { //这里的key就是将来LoadingCache.get(key)获取不到而传进来的参数 @Override public User load(Long key) throws Exception { //可以在这里进行数据的加载 System.out.println("去存储中加载"); User user=new User(key,"视而不见"); return user; } }); for(long i=0;i |


【本文地址】
今日新闻 |
推荐新闻 |