使用 Elasticsearch |
您所在的位置:网站首页 › elasticsearch客户端报错 › 使用 Elasticsearch |
使用 Elasticsearch
|
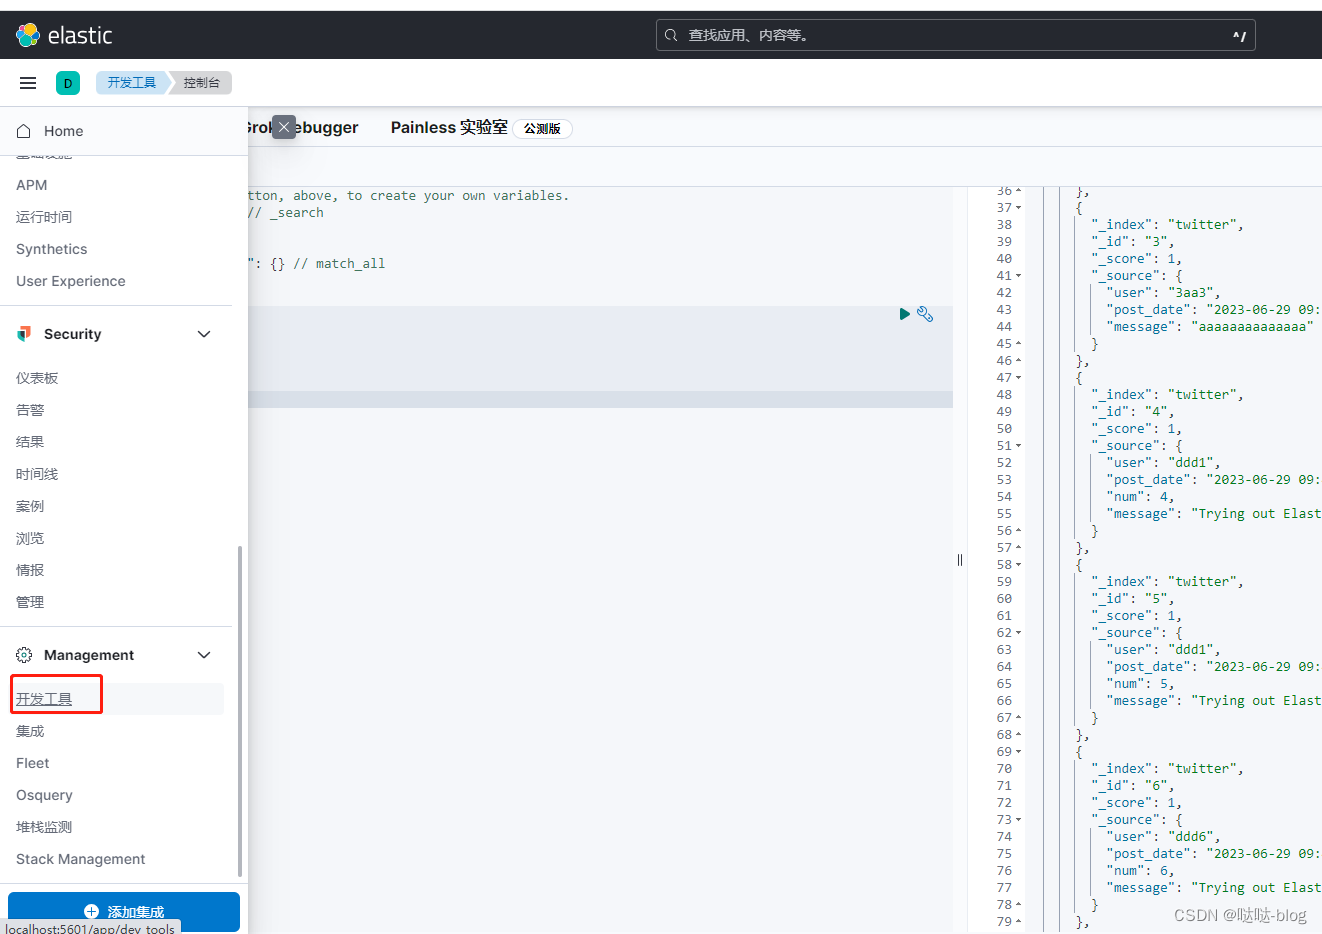
了解如何创建索引,添加,删除,更新文档 参考文档 开始使用 Elasticsearch 1 本文用到Elasticsearch和Kibana 可以看之前的两篇先安装好 Elasticsearch 安装 Kibana安装 Elasticsearch 里的接口都是通过 REST 接口来实现的。 GET 读取数据 POST 插入数据 PUT 或 PATCH 更新数据,或如果是一个新的 id,则插入数据 DELETE 删除数据http://localhost:5601/app/dev_tools
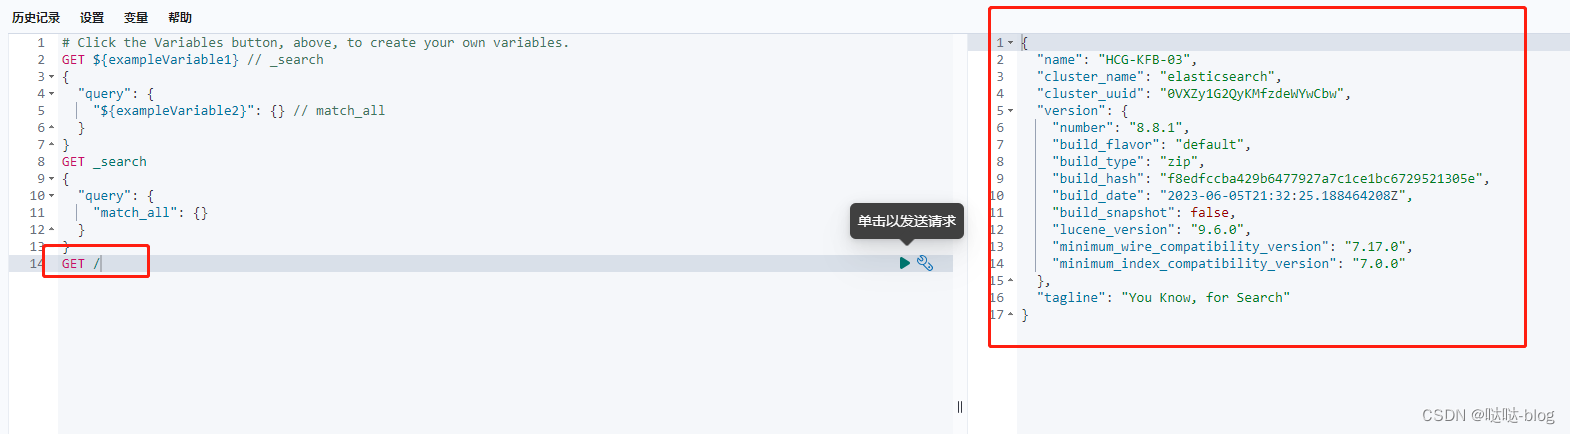
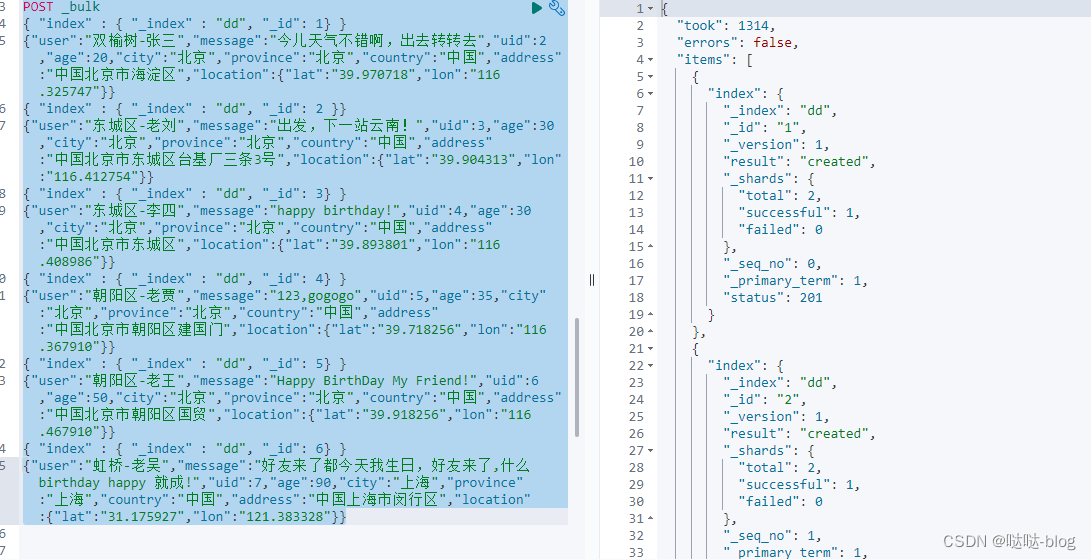
同样可以 复制curl至页面就会变成 GET / 查看当前索引的 mapping: GET dada/_mapping { "dada": { "mappings": { "properties": { "cc": { "type": "text", "fields": { "keyword": { "type": "keyword", "ignore_above": 256 } } }, "uid": { "type": "text", "fields": { "keyword": { "type": "keyword", "ignore_above": 256 } } }, "user": { "type": "text", "fields": { "keyword": { "type": "keyword", "ignore_above": 256 } } } } } } }Elasticsearch 的数据类型: text: 全文搜索字符串 keyword: 用于精确字符串匹配和聚合 date 及 date_nanos: 格式化为日期或数字日期的字符串 byte, short, integer, long: 整数类型 boolean: 布尔类型 float,double,half_float: 浮点数类型 分级的类型:object 及 nested。创建一个索引 test,并且含有 id 及 message 字段。id 字段为 keyword 类型,而 message 字段为 text 类型,那么我们可以使用如下的方法来创建: PUT test { "mappings": { "properties": { "id": { "type": "keyword" }, "message": { "type": "text" } } } } #--------返回结果-------- { "acknowledged": true, "shards_acknowledged": true, "index": "test" }追加一个新的字段 age,并且它的类型为 long 类型: PUT test/_mapping { "properties": { "age": { "type": "long" } } } #--------返回结果-------- { "acknowledged": true } #查看结果 GET test/_mapping #--------返回结果-------- { "test": { "mappings": { "properties": { "age": { "type": "long" }, "id": { "type": "keyword" }, "message": { "type": "text" } } } } }_refresh用于使新文档在搜索时可见。 反过来,_flush用于在硬盘上持久化内存段。 _flush不会影响Elasticsearch中文档的可见性,因为搜索是在内存段中进行的,而_refresh会影响它们的可见性。 #存在就会修改 PUT dada/_doc/2 { "user":"222", "uid":2, "cc":"222" } #存在就会返回报错 PUT dada/_create/2 { "user":"222", "uid":2, "cc":"222" } #效果一样 PUT dada/_doc/2?op_type=create { "user":"22222", "uid":2, "cc":"222" } #--------返回报错-------- { "error": { "root_cause": [ { "type": "version_conflict_engine_exception", "reason": "[2]: version conflict, document already exists (current version [2])", "index_uuid": "gFA5LQXRQIef2WBv3d_aWw", "shard": "0", "index": "dada" } ], "type": "version_conflict_engine_exception", "reason": "[2]: version conflict, document already exists (current version [2])", "index_uuid": "gFA5LQXRQIef2WBv3d_aWw", "shard": "0", "index": "dada" }, "status": 409 }查询只看_source部分 GET dada/_doc/2 #正常返回 { "_index": "dada", "_id": "2", "_version": 2, "_seq_no": 6, "_primary_term": 1, "found": true, "_source": { "user": "222", "uid": 2, "cc": "222" } } #--------_source------- GET dada/_source/2 #返回 { "user": "222", "uid": 2, "cc": "222" } 自动 ID 生成使用 POST POST dada/_doc/ { "user":"55", "uid":5, "cc":"55" } #-----返回的结果:----- { "_index": "dada", "_id": "u_g9C4kB2SZh9y2Iu2Gc", "_version": 1, "result": "created", "_shards": { "total": 2, "successful": 1, "failed": 0 }, "_seq_no": 7, "_primary_term": 1 } 只读部分数据 GET dada/_doc/2?_source=user,uid #-----返回的结果------ { "_index": "dada", "_id": "2", "_version": 2, "_seq_no": 6, "_primary_term": 1, "found": true, "_source": { "user": "222", "uid": 2 } } GET dada/_source/2?_source=user,uid #-----返回的结果------ { "user": "222", "uid": 2 } 一次请求查找多个文档 _mget GET _mget { "docs":[ { "_index":"dada", "_id":2 }, { "_index":"test", "_id":"vPhIC4kB2SZh9y2IU2G6" } ] } #-----------返回的结果------------ { "docs": [ { "_index": "dada", "_id": "2", "_version": 2, "_seq_no": 6, "_primary_term": 1, "found": true, "_source": { "user": "222", "uid": 2, "cc": "222" } }, { "_index": "test", "_id": "vPhIC4kB2SZh9y2IU2G6", "_version": 1, "_seq_no": 0, "_primary_term": 1, "found": true, "_source": { "age": 20, "id": 11, "message": "lalalalaaaa" } } ] }也可以只获得部分字段 GET _mget { "docs":[ { "_index":"dada", "_id":2, "_source":["user","uid"] }, { "_index":"test", "_id":"vPhIC4kB2SZh9y2IU2G6" } ] } #---------返回的结果--------- { "docs": [ { "_index": "dada", "_id": "2", "_version": 2, "_seq_no": 6, "_primary_term": 1, "found": true, "_source": { "user": "222", "uid": 2 } }, { "_index": "test", "_id": "vPhIC4kB2SZh9y2IU2G6", "_version": 1, "_seq_no": 0, "_primary_term": 1, "found": true, "_source": { "age": 20, "id": 11, "message": "lalalalaaaa" } } ] } GET _mget { "docs":[ { "_index":"dada", "_id":2, "_source":["user","uid"] }, { "_index":"dada", "_id":1 } ] } #--------可简写:--------- GET dada/_mget { "ids":["1","2"] } #------------返回结果------------ { "docs": [ { "_index": "dada", "_id": "1", "_version": 1, "_seq_no": 0, "_primary_term": 1, "found": true, "_source": { "user": "GB", "uid": "sss", "cc": "aa" } }, { "_index": "dada", "_id": "2", "_version": 2, "_seq_no": 6, "_primary_term": 1, "found": true, "_source": { "user": "222", "uid": 2, "cc": "222" } } ] } 修改一个文档在上面我们看到了可以使用 POST 的命令来修改改一个文档。通常我们使用 POST 来创建一个新的文档。在使用 POST 的时候,我们甚至不用去指定特定的 id,系统会帮我们自动生成。但是我们修改一个文档时,我们通常会使用 PUT 来进行操作,并且,我们需要指定一个特定的 id 来进行修改: PUT修改时,每一项都会改 PUT test/_doc/1 { "age":110, "id":1212 } 使用POST 只改需要改的字段,其他字段会保留下来 POST test/_update/1 { "doc": { "age":22222, "id":20 } } 先查询后修改 script通过查询的方式来进行查询,让后进行修改。ES 也提供了相应的 REST 接口。 会把所有age为22222的都修改 POST test/_update_by_query { "query": { "match": { "age": "22222" } }, "script": { "source": "ctx._source.id=params.id;ctx._source.message=params.message", "lang": "painless", "params":{ "id":888, "message":"new哈哈哈", "oth":"????" } } }可以通过 update 接口,使用 script 的方法来进行修改。这个方法也是需要知道文档的 id POST test/_update/vPhIC4kB2SZh9y2IU2G6 { "script": { "source": "ctx._source.id=params.id;ctx._source.message=params.message", "lang": "painless", "params":{ "id":999, "message":"new999哈哈哈", "oth":"??999??" } } } #------返回结果-------- { "_index": "test", "_id": "vPhIC4kB2SZh9y2IU2G6", "_version": 2, "result": "updated", "_shards": { "total": 2, "successful": 1, "failed": 0 }, "_seq_no": 9, "_primary_term": 1 }在我们使用上面的方法更新文档时,如果当前的文档 id 不存在,那么我们甚至可以使用 upsert 属性来创建一个文档: POST test/_update/3 { "script": { "source": "ctx._source.id=params.id;ctx._source.message=params.message", "lang": "painless", "params":{ "id":999, "message":"new999哈哈哈", "oth":"??999??" } }, "upsert":{ "id":3, "message":"3333333" } }我们甚至可以使用 _update 接口使用 ctx[‘_op’] 来达到删除一个文档的目的,比如: 当检测文档的 字段id 是否为 888,如果为 888 的话,那么该文档将被删除,否则将不做任何事情。 POST test/_update/1 { "script": { "source":""" if(ctx._source.id == 888){ ctx.op = 'delete' }else { ctx.op = 'none' } """ } } #------返回--------- { "_index": "test", "_id": "1", "_version": 7, "result": "deleted", "_shards": { "total": 2, "successful": 1, "failed": 0 }, "_seq_no": 11, "_primary_term": 1 }使用 script 的一些高级操作,比如我们可以通过如下的方法来添加一个崭新的字段,新增加了一个叫做 newfield 的字段: POST test/_update/2 { "script" : { "source": "ctx._source.newfield=4", "lang": "painless" } } #---------------------- { "_index": "test", "_id": "2", "_score": 1, "_source": { "id": 888, "message": "new哈哈哈", "age": 22222, "newfield": 4 } } # --------------也可以删除字段------------- POST test/_update/2 { "script" : { "source": "ctx._source.remove(\"newfield\")", "lang": "painless" } }在这里请注意的是:一旦一个字段被创建,那么它就会存在于更新的 mapping 中。即便针对 id 为 1 的文档删除了 newfield,但是 newfield 还将继续存在于 twitter 的 mapping 中。我们可以使用如下的命令来查看 twitter 的 mapping: GET test/_mapping #---------返回结果----------- { "test": { "mappings": { "properties": { "age": { "type": "long" }, "id": { "type": "keyword" }, "message": { "type": "text" }, "newfield": { "type": "long" } } } } } UPSERT 一个文档术语 “upsert” 宽松地表示更新或插入,即更新文档(如果存在),否则,插入新文档。 doc_as_upsert 参数检查具有给定ID的文档是否已经存在,并将提供的 doc 与现有文档合并。 如果不存在具有给定 id 的文档,则会插入具有给定文档内容的新文档。 下面的示例使用 doc_as_upsert 合并到 id 为 10 的文档中,或者如果不存在则插入一个新文档: POST test/_update/10 { "doc":{ "age":"10", "id":"10", "newfield":"55", "message":"messssss" }, "doc_as_upsert":true } 检查一个文档是否存在 HEAD test/_doc/10 # ---成功返回--- 200 - OK #------不存在----- 404 - Not Found 删除一个文档 DELETE test/_doc/11 #成功返回 { "_index": "test", "_id": "11", "_version": 2, "result": "deleted", "_shards": { "total": 2, "successful": 1, "failed": 0 }, "_seq_no": 17, "_primary_term": 1 }在不在id的情况下,先查询后删除,以下是把message等于14的都删除 HEAD test/_doc/14 #-- 200 - OK POST test/_delete_by_query { "query":{ "match":{ "message":"14" } } } HEAD test/_doc/14 #--- 404 - Not Found 检查一个索引是否存在 HEAD tt 200 - OK 删除一个索引删除一个索引 是非常直接的。我们可以直接使用如下的命令来进行删除: DELETE tt #删除成功返回 { "acknowledged": true } 批处理命令上面我们已经了解了如何使用 REST 接口来创建一个 index,并为之创建(Create),读取(Read),修改(Update),删除文档(Delete)(CRUD)。因为每一次操作都是一个 REST 请求,对于大量的数据进行操作的话,这个显得比较慢。ES 创建一个批量处理的命令给我们使用。这样我们在一次的 REST 请求中,我们就可以完成很多的操作。这无疑是一个非常大的好处。下面,我们来介绍一下这个 _bulk 命令。 我们使用如下的命令来进行 bulk 操作: POST _bulk { "index" : { "_index" : "twitter", "_id": 1} } {"user":"双榆树-张三","message":"今儿天气不错啊,出去转转去","uid":2,"age":20,"city":"北京","province":"北京","country":"中国","address":"中国北京市海淀区","location":{"lat":"39.970718","lon":"116.325747"}} { "index" : { "_index" : "twitter", "_id": 2 }} {"user":"东城区-老刘","message":"出发,下一站云南!","uid":3,"age":30,"city":"北京","province":"北京","country":"中国","address":"中国北京市东城区台基厂三条3号","location":{"lat":"39.904313","lon":"116.412754"}} { "index" : { "_index" : "twitter", "_id": 3} } {"user":"东城区-李四","message":"happy birthday!","uid":4,"age":30,"city":"北京","province":"北京","country":"中国","address":"中国北京市东城区","location":{"lat":"39.893801","lon":"116.408986"}} { "index" : { "_index" : "twitter", "_id": 4} } {"user":"朝阳区-老贾","message":"123,gogogo","uid":5,"age":35,"city":"北京","province":"北京","country":"中国","address":"中国北京市朝阳区建国门","location":{"lat":"39.718256","lon":"116.367910"}} { "index" : { "_index" : "twitter", "_id": 5} } {"user":"朝阳区-老王","message":"Happy BirthDay My Friend!","uid":6,"age":50,"city":"北京","province":"北京","country":"中国","address":"中国北京市朝阳区国贸","location":{"lat":"39.918256","lon":"116.467910"}} { "index" : { "_index" : "twitter", "_id": 6} } {"user":"虹桥-老吴","message":"好友来了都今天我生日,好友来了,什么 birthday happy 就成!","uid":7,"age":90,"city":"上海","province":"上海","country":"中国","address":"中国上海市闵行区","location":{"lat":"31.175927","lon":"121.383328"}}在上面的命令中,我们使用了 bulk 指令来完成我们的操作。在输入命令时,我们需要特别的注意:千万不要添加除了换行以外的空格,否则会导致错误。在上面我们使用的 index 用来创建一个文档。为了说明问题的方便,我们在每一个文档里,特别指定了每个文档的 id。当执行完我们的批处理 bulk 命令后,我们可以看到: 上面我们已经使用了 index 来创建6条文档记录。我也可以尝试其它的命令,比如 create: POST _bulk { "create" : { "_index" : "dd", "_id": 1} } {"user":"双榆树-张三","message":"今儿天气不错啊,出去转转去","uid":2,"age":20,"city":"北京","province":"北京","country":"中国","address":"中国北京市海淀区","location":{"lat":"39.970718","lon":"116.325747"}} { "index" : { "_index" : "dd", "_id": 2 }} {"user":"东城区-老刘","message":"出发,下一站云南!","uid":3,"age":30,"city":"北京","province":"北京","country":"中国","address":"中国北京市东城区台基厂三条3号","location":{"lat":"39.904313","lon":"116.412754"}} { "index" : { "_index" : "dd", "_id": 3} } {"user":"东城区-李四","message":"happy birthday!","uid":4,"age":30,"city":"北京","province":"北京","country":"中国","address":"中国北京市东城区","location":{"lat":"39.893801","lon":"116.408986"}} { "index" : { "_index" : "dd", "_id": 4} } {"user":"朝阳区-老贾","message":"123,gogogo","uid":5,"age":35,"city":"北京","province":"北京","country":"中国","address":"中国北京市朝阳区建国门","location":{"lat":"39.718256","lon":"116.367910"}} { "index" : { "_index" : "dd", "_id": 5} } {"user":"朝阳区-老王","message":"Happy BirthDay My Friend!","uid":6,"age":50,"city":"北京","province":"北京","country":"中国","address":"中国北京市朝阳区国贸","location":{"lat":"39.918256","lon":"116.467910"}} { "index" : { "_index" : "dd", "_id": 6} } {"user":"虹桥-老吴","message":"好友来了都今天我生日,好友来了,什么 birthday happy 就成!","uid":7,"age":90,"city":"上海","province":"上海","country":"中国","address":"中国上海市闵行区","location":{"lat":"31.175927","lon":"121.383328"}}
我们可以使用 delete 来删除一个已经创建好的文档: POST _bulk { "delete" : { "_index" : "dd", "_id": 1 }}
|
 还可以复制为Curl
 在实际的使用中,我们必须注意的是:一个好的起点是批量处理 1,000 到 5,000 个文档,总有效负载在 5MB 到 15MB 之间。如果我们的 payload 过大,那么可能会造成请求的失败。 通过 POST dd/_search 查询
 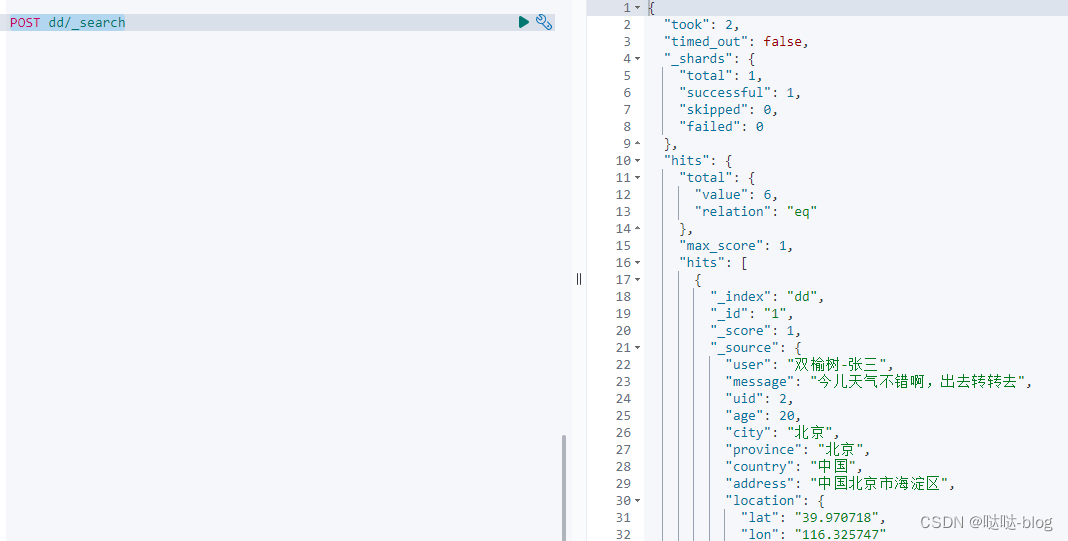 统计 GET dd/_count
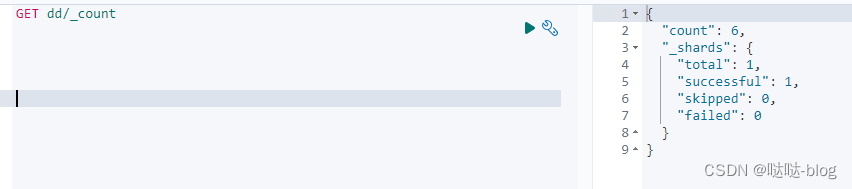
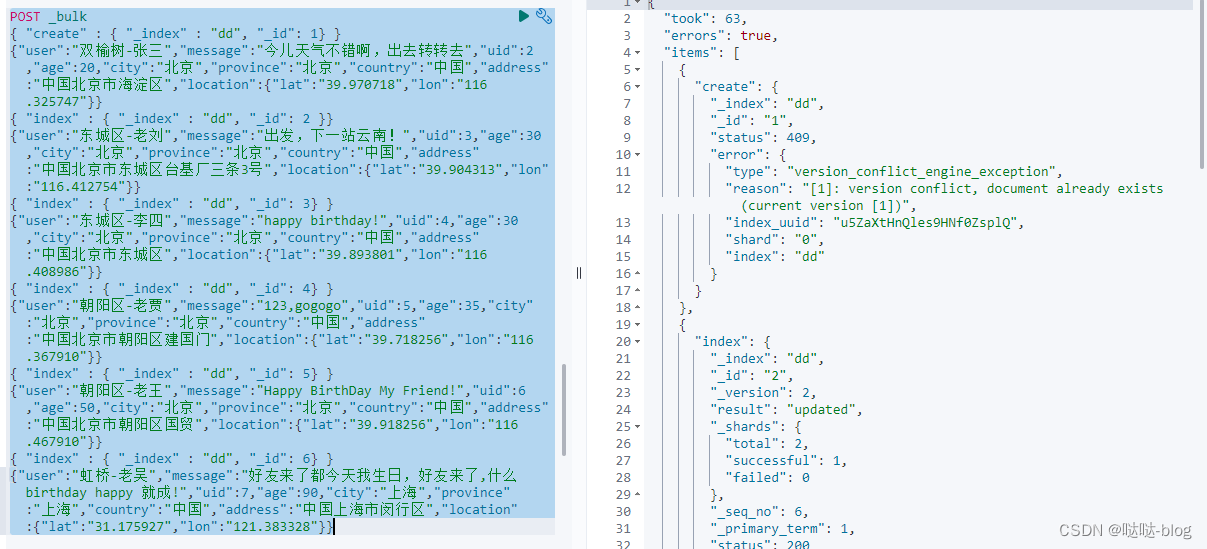 从上面的信息,我们可以看出来 index 和 create 的区别。index 总是可以成功,它可以覆盖之前的已经创建的文档,但是 create 则不行,如果已经有以那个 id 为名义的文档,就不会成功。
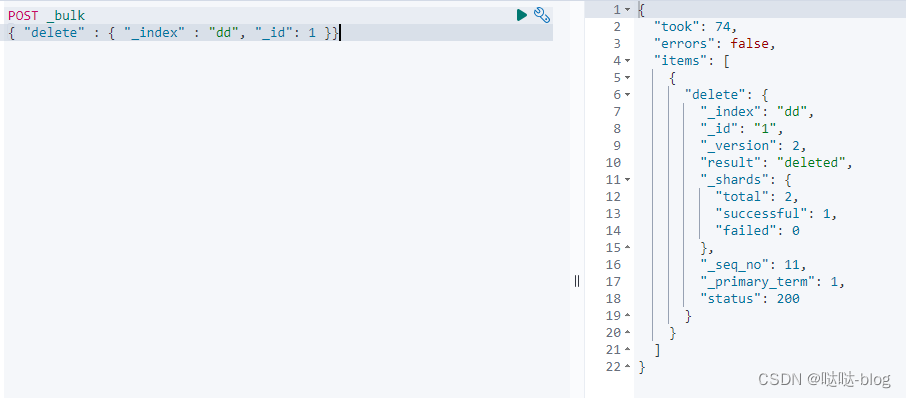 可以看到 id 为1的文档已经被删除了。我可以通过如下的命令来查看一下:
 批量修改
批量修改【本文地址】
今日新闻 |
推荐新闻 |