|
使用mybatis-plus自动生成代码是开发过程中提效必不可少的,下面就一起来详细的配置自动生成代码的过程
创建maven项目
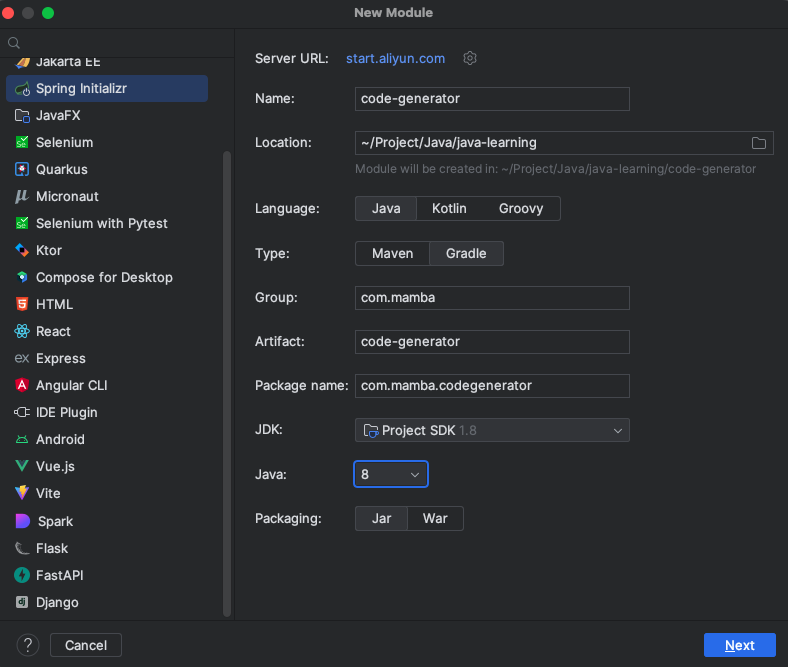
添加依赖
org.springframework.boot
spring-boot-starter-web
org.springframework.boot
spring-boot-starter-test
test
org.projectlombok
lombok
true
com.mysql
mysql-connector-j
runtime
com.baomidou
mybatis-plus-boot-starter
3.4.2
com.baomidou
mybatis-plus-generator
3.4.1
org.apache.velocity
velocity-engine-core
2.3
com.github.xiaoymin
knife4j-openapi2-spring-boot-starter
4.1.0
com.github.pagehelper
pagehelper-spring-boot-starter
1.4.1
依赖说明
连接数据库相关: mysql依赖、mybatis-plus依赖
自动生成代码相关:代码自动生成模版依赖、代码自动生成器依赖
其他依赖:分页插件依赖、Knife4j依赖、lombok依赖
项目结构
一般项目结构有两种:
独立模块聚合模块
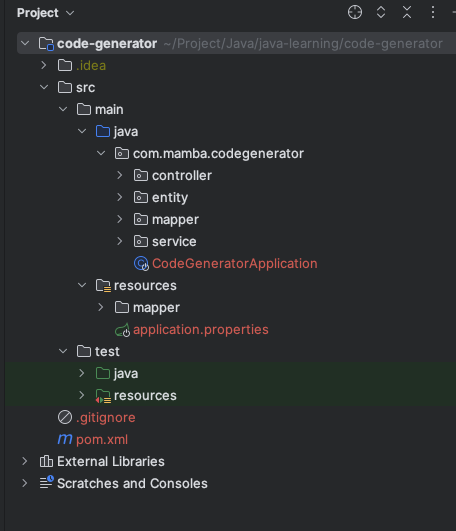
独立模块
独立模块目录如下,没有第二层机构
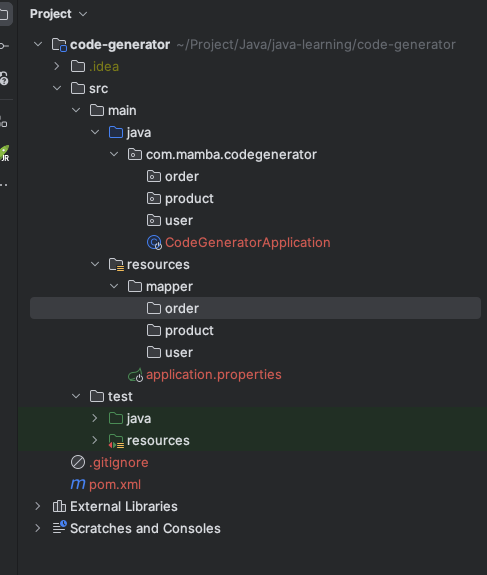
聚合模块
聚合模块目录如下,有第二层机构,包底下细分user、order、product模块
代码自动生成配置
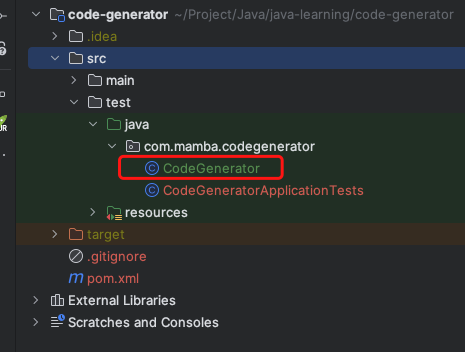
1. test中新建CodeGenerator类
2. 添加配置的代码
import com.baomidou.mybatisplus.annotation.FieldFill;
import com.baomidou.mybatisplus.annotation.IdType;
import com.baomidou.mybatisplus.core.exceptions.MybatisPlusException;
import com.baomidou.mybatisplus.generator.AutoGenerator;
import com.baomidou.mybatisplus.generator.config.*;
import com.baomidou.mybatisplus.generator.config.po.TableFill;
import com.baomidou.mybatisplus.generator.config.rules.DateType;
import com.baomidou.mybatisplus.generator.config.rules.NamingStrategy;
import org.apache.commons.lang3.StringUtils;
import java.util.ArrayList;
import java.util.HashMap;
import java.util.Map;
import java.util.Scanner;
/**
* @author csn
* @date 2023/4/4
*/
public class CodeGenerator {
// 数据库链接
private static final String DATABASE_URL = "jdbc:mysql://localhost:3306/security?useUnicode=true&characterEncoding=utf-8&serverTimezone=GMT%2B8";
// 数据库用户名
private static final String DATABASE_USERNAME = "root";
// 数据库密码
private static final String DATABASE_PASSWORD = "12345678";
// 包名(根据自己项目修改)
private static final String PACKAGE_NAME = "com.mamba.codegenerator";
// 模块名称(如果项目中有多个模块需要设置(如:用户模块、商品模块、订单模块),只有一个模块就不用设置(为空就好))
private static final String SECOND_MODULE = "user";
// 作者
private static final String AUTHOR = "csn";
// 表前缀(org_user表需要去掉前缀时这里填写"org_")
private static final String TABLE_PREFIX = "";
// 生成代码文件的路径
private static final String PARENT = PACKAGE_NAME + (StringUtils.isNotBlank(SECOND_MODULE) ? "." + SECOND_MODULE : "");
// 生成xml文件的路径
private static final String XML_PATH = "/src/main/resources/mapper" + (StringUtils.isNotBlank(SECOND_MODULE) ? "/" + SECOND_MODULE : "");
public static void main(String[] args) {
// 代码生成器
AutoGenerator mpg = new AutoGenerator();
// 全局配置
GlobalConfig gc = new GlobalConfig();
String projectPath = System.getProperty("user.dir");
// 设置代码生成路径
gc.setOutputDir(projectPath + "/src/main/java/");
// 是否覆盖以前文件
gc.setFileOverride(true);
// 是否打开生成目录
gc.setOpen(false);
// 设置项目作者名称
gc.setAuthor(AUTHOR);
// 设置主键策略
gc.setIdType(IdType.AUTO);
// 生成基本ResultMap
gc.setBaseResultMap(true);
// 生成基本ColumnList
gc.setBaseColumnList(true);
// 去掉服务默认前缀
gc.setServiceName("%sService");
// 设置时间类型
gc.setDateType(DateType.ONLY_DATE);
// 设置Swagger2
gc.setSwagger2(true);
mpg.setGlobalConfig(gc);
// 数据源配置
DataSourceConfig dsc = new DataSourceConfig();
// 数据库链接
dsc.setUrl(DATABASE_URL);
// 数据库驱动
dsc.setDriverName("com.mysql.cj.jdbc.Driver");
// 数据库用户名
dsc.setUsername(DATABASE_USERNAME);
// 数据库密码
dsc.setPassword(DATABASE_PASSWORD);
mpg.setDataSource(dsc);
// 包配置
PackageConfig pc = new PackageConfig();
pc.setParent(PARENT);
pc.setMapper("mapper");
pc.setXml("mapper");
pc.setEntity("entity");
pc.setService("service");
pc.setServiceImpl("service.impl");
pc.setController("controller");
Map packageInfo = new HashMap();
String path = gc.getOutputDir() + PARENT.replace(".", "/") + "/";
String xmlPath = projectPath + XML_PATH;
System.out.println("XML_PATH:" + xmlPath);
packageInfo.put(ConstVal.XML_PATH, xmlPath);
packageInfo.put(ConstVal.ENTITY_PATH, path + "entity");
packageInfo.put(ConstVal.SERVICE_PATH, path + "service");
packageInfo.put(ConstVal.SERVICE_IMPL_PATH, path + "service/impl");
packageInfo.put(ConstVal.MAPPER_PATH, path + "mapper");
packageInfo.put(ConstVal.CONTROLLER_PATH, path + "controller");
pc.setPathInfo(packageInfo);
mpg.setPackageInfo(pc);
// 策略配置
StrategyConfig sc = new StrategyConfig();
sc.setNaming(NamingStrategy.underline_to_camel);
sc.setColumnNaming(NamingStrategy.underline_to_camel);
// 自动lombok
sc.setEntityLombokModel(true);
sc.setRestControllerStyle(true);
sc.setControllerMappingHyphenStyle(true);
// 设置逻辑删除
sc.setLogicDeleteFieldName("deleted");
// 设置自动填充配置
TableFill gmt_create = new TableFill("create_time", FieldFill.INSERT);
TableFill gmt_modified = new TableFill("update_time", FieldFill.INSERT_UPDATE);
ArrayList tableFills = new ArrayList();
tableFills.add(gmt_create);
tableFills.add(gmt_modified);
sc.setTableFillList(tableFills);
// 乐观锁
sc.setVersionFieldName("version");
// 驼峰命名
sc.setRestControllerStyle(true);
// 设置表名前缀
sc.setTablePrefix(TABLE_PREFIX);
// 设置需要生成的表名
sc.setInclude(scanner("表名,如果同时输入多个表名,中间用英文逗号分割(例如:user,order,product)").split(","));
mpg.setStrategy(sc);
// 自定义配置模板
TemplateConfig templateConfig = new TemplateConfig();
templateConfig.setController("templates/controller.java");
mpg.setTemplate(templateConfig);
// 生成代码
mpg.execute();
}
public static String scanner(String tip) {
Scanner scanner = new Scanner(System.in);
System.out.println("请输入" + tip + ":");
if (scanner.hasNext()) {
String ipt = scanner.next();
if (StringUtils.isNotBlank(ipt)) {
return ipt;
}
}
throw new MybatisPlusException("请输入正确的" + tip + "!");
}
}
3. 自定义模块
一般自动生成的文件可能不是自己想要的,这时候就要自定义模版了
这里自定义了controller类的模版controller.java.vm

具体代码如下
package ${package.Controller};
import ${package.Service}.${table.serviceName};
import ${package.Entity}.${entity};
#if(${restControllerStyle})
import org.springframework.web.bind.annotation.RestController;
#else
import org.springframework.stereotype.Controller;
#end
import io.swagger.annotations.Api;
import io.swagger.annotations.ApiOperation;
import org.springframework.http.HttpStatus;
import com.github.pagehelper.PageHelper;
import java.util.List;
import org.springframework.http.ResponseEntity;
/**
*
* @author ${author}
* @since ${date}
*/
#if(${restControllerStyle})
@RestController
#else
@Controller
#end
@Api(tags = "${table.comment}管理")
public class ${table.controllerName} {
@Resource
private ${table.serviceName} ${table.entityPath}Service;
@ApiOperation("${table.comment}-添加")
@PostMapping("/${table.entityPath}")
public ResponseEntity add(@RequestBody ${entity} ${table.entityPath}){
${table.entityPath}Service.save(${table.entityPath});
return ResponseEntity.status(HttpStatus.CREATED).body(${table.entityPath}Service.getById(${table.entityPath}.getId()));
}
@ApiOperation("${table.comment}-删除")
@DeleteMapping("/${table.entityPath}/{id}" )
public Boolean delete(@PathVariable Integer id){
${table.entityPath}Service.removeById(id);
return true;
}
@ApiOperation("${table.comment}-修改")
@PutMapping("/${table.entityPath}/{id}" )
public ${entity} update(@PathVariable Integer id,@RequestBody ${entity} ${table.entityPath}){
${table.entityPath}Service.updateById(${table.entityPath});
return ${table.entityPath}Service.getById(id);
}
@ApiOperation("${table.comment}-详情")
@GetMapping("/${table.entityPath}/{id}" )
public ${entity} detail(@PathVariable Integer id){
return ${table.entityPath}Service.getById(id);
}
@ApiOperation("${table.comment}-列表")
@GetMapping("/${table.entityPath}" )
public PageInfo list(@RequestParam(defaultValue = "1") Integer pageIndex,@RequestParam(defaultValue = "10") Integer pageSize){
PageHelper.startPage(pageIndex,pageSize);
List list= ${table.entityPath}Service.list();
return new PageInfo(list);
}
}
自定义模版配置到代码中
// 自定义配置模板
TemplateConfig templateConfig = new TemplateConfig();
templateConfig.setController("templates/controller.java");
mpg.setTemplate(templateConfig);
代码中注释已经很详细了,按着配置就好了
独立模块中SECOND_MODULE留空,聚合模块中SECOND_MODULE写具体的包名
注意:不支持同时生成聚合模块中,不同模块的代码
启动

输入要生成的文件的表名
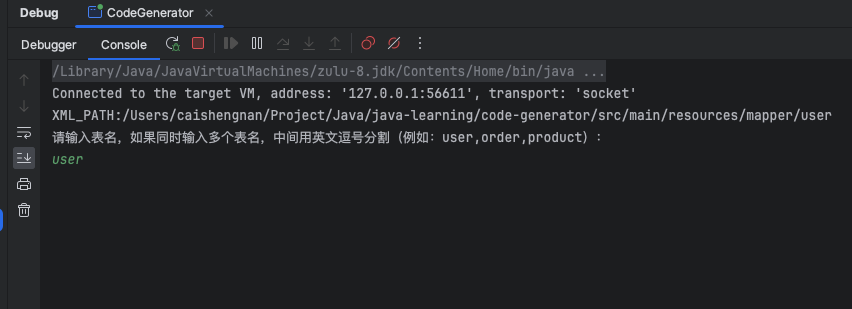
按回车即可生成文件
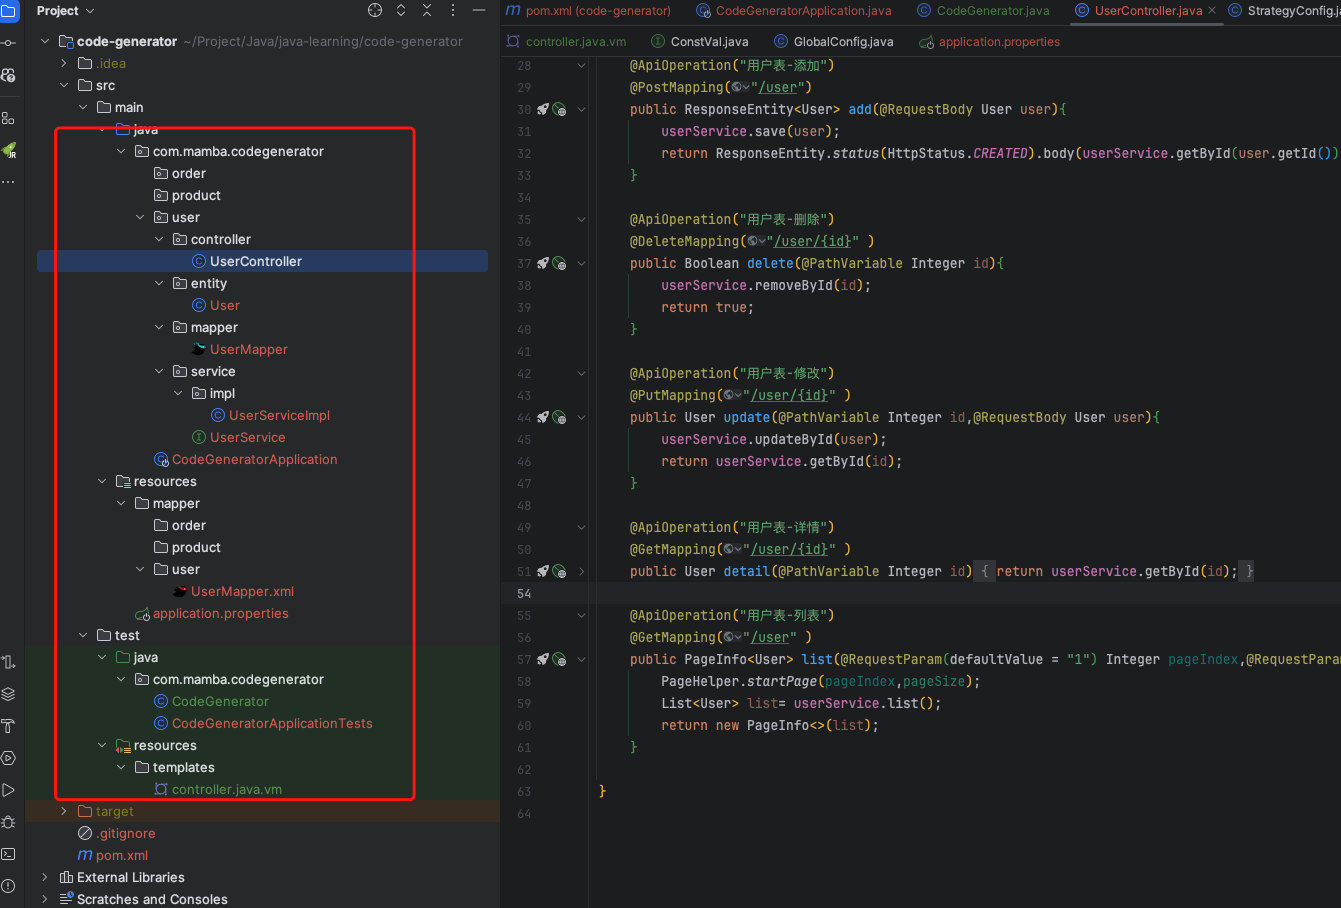
大功告成 END!
|