ModelBox实战开发:RK3568实现摄像头虚拟背景 |
您所在的位置:网站首页 › com摄像头 › ModelBox实战开发:RK3568实现摄像头虚拟背景 |
ModelBox实战开发:RK3568实现摄像头虚拟背景
|
摘要:本文将使用ModelBox端云协同AI开发套件(RK3568)实现摄像头虚拟背景AI应用的开发。
本文分享自华为云社区《ModelBox开发案例 - RK3568实现摄像头虚拟背景【玩转华为云】》,作者:AI练习生 。 本文将使用ModelBox端云协同AI开发套件(RK3568)实现摄像头虚拟背景AI应用的开发。 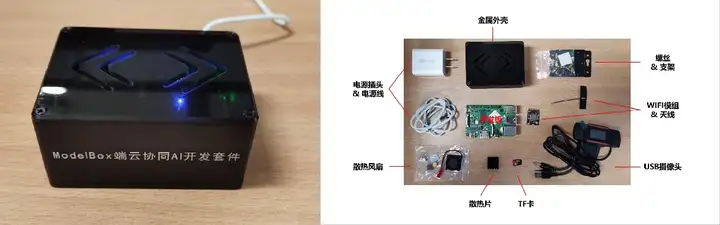
最终运行效果如下: 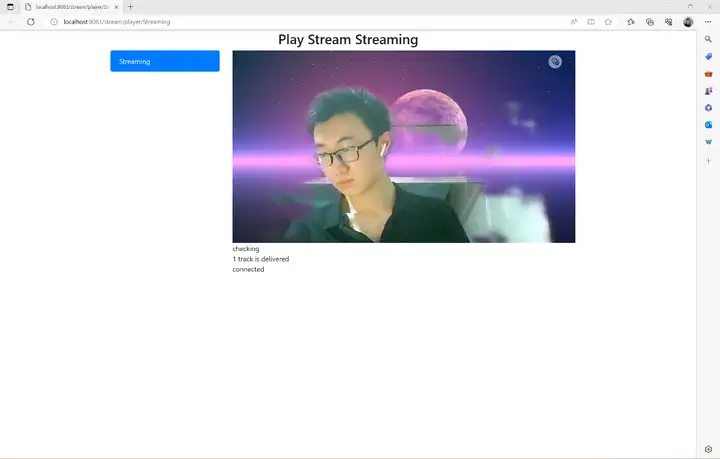 RK3568
本应用采用RK开发套件完成,需要具备RK3568开发板。本硬件可以通过以下链接购买:https://marketplace.huaweicloud.com/contents/2b73a21b-91c5-4c58-a61a-5a5460afeaf7 ,规格包含:RK3568开发板×1、A2 WiFi模块×1、外壳×1、电源线和电源插头×1、散热片×1。 模型训练Notebook:
Notebook:
onnx结构:
Notebook:
rknn结构:
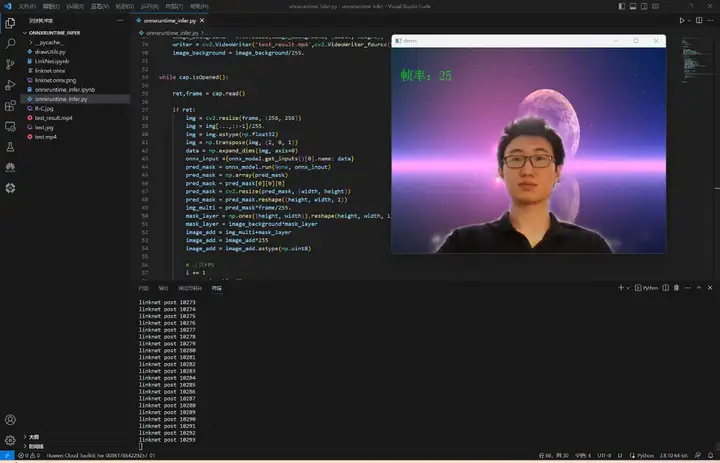
我们准备了(1080p, 30fps)的视频,使用原生的onnxruntime进行推理,帧率最高是7: 实现代码: """ OpenCV 读取摄像头视频视频流,使用原生的onnxruntime推理 """ # 导入OpenCV import cv2 import time import drawUtils import numpy as np import onnxruntime # cap = cv2.VideoCapture(0) cap = cv2.VideoCapture('test.mp4') if not cap.isOpened(): print('文件不存在或编码错误') else: i = 0 fps = 30 start_time = time.time() font = cv2.FONT_HERSHEY_PLAIN image_background = cv2.imread('R-C.jpg') width = int(cap.get(cv2.CAP_PROP_FRAME_WIDTH)) height = int(cap.get(cv2.CAP_PROP_FRAME_HEIGHT)) onnx_model = onnxruntime.InferenceSession('linknet.onnx') image_background = cv2.resize(image_background, (width, height)) writer = cv2.VideoWriter('test_result.mp4',cv2.VideoWriter_fourcc(*'X264'),fps,(width,height)) image_background = image_background/255. while cap.isOpened(): ret,frame = cap.read() if ret: img = cv2.resize(frame, (256, 256)) img = img[...,::-1]/255. img = img.astype(np.float32) img = np.transpose(img, (2, 0, 1)) data = np.expand_dims(img, axis=0) onnx_input ={onnx_model.get_inputs()[0].name: data} pred_mask = onnx_model.run(None, onnx_input) pred_mask = np.array(pred_mask) pred_mask = pred_mask[0][0][0] pred_mask = cv2.resize(pred_mask, (width, height)) pred_mask = pred_mask.reshape((height, width, 1)) img_multi = pred_mask*frame/255. mask_layer = np.ones((height, width)).reshape(height, width, 1)-pred_mask mask_layer = image_background*mask_layer image_add = img_multi+mask_layer image_add = image_add*255 image_add = image_add.astype(np.uint8) # 计算FPS i += 1 now = time.time() fps_text = int(1 / ( now - start_time)) start_time = now print('linknet post ' + str(i)) # 添加中文(首先导入模块) img_add = drawUtils.cv2AddChineseText(image_add, '帧率:'+str(fps_text), (20,50), textColor=(0, 255, 0), textSize=30) # 显示画面 # cv2.imshow('demo',img_add) writer.write(img_add) # 退出条件 if cv2.waitKey(1) & 0xFF == ord('q'): break else: break cap.release() cv2.destroyAllWindows()修改使用编为0摄像头(默认为PC自带的摄像头)进行实时检测:
本案例所需资源(代码、模型、测试数据等)均可从网盘链接下载。 2)运行应用将virtual_background文件夹拖到工程目录workspace目录下面,开启性能统计:
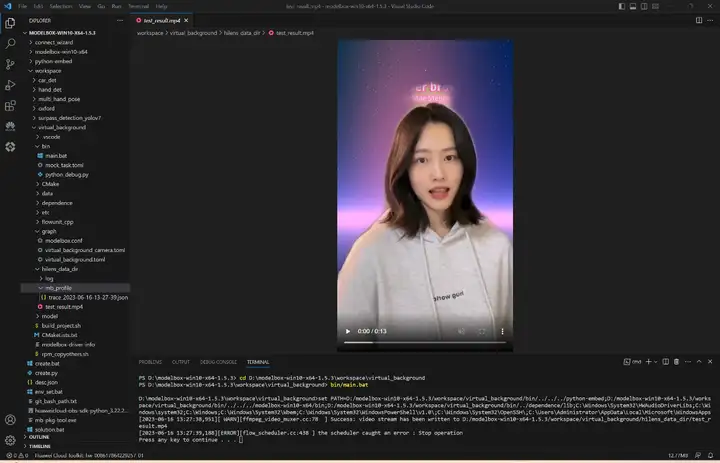
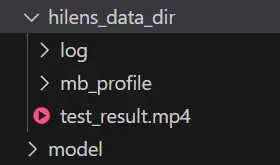
切换到工程目录,执行bin/main.bat运行应用,生成的视频和性能统计文件都在hilens_data_dir文件夹下面:
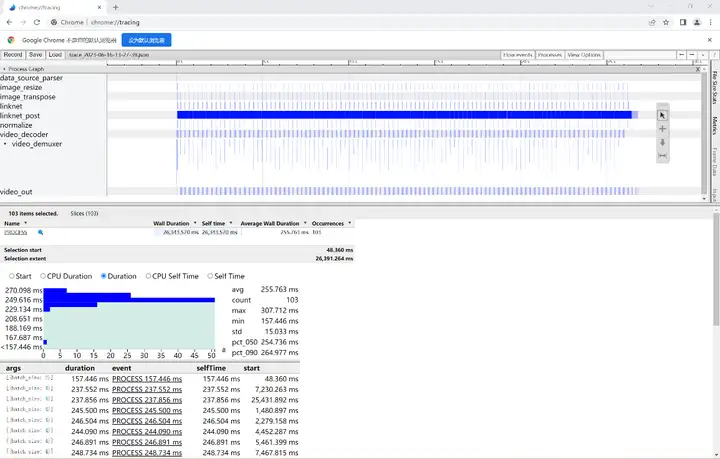
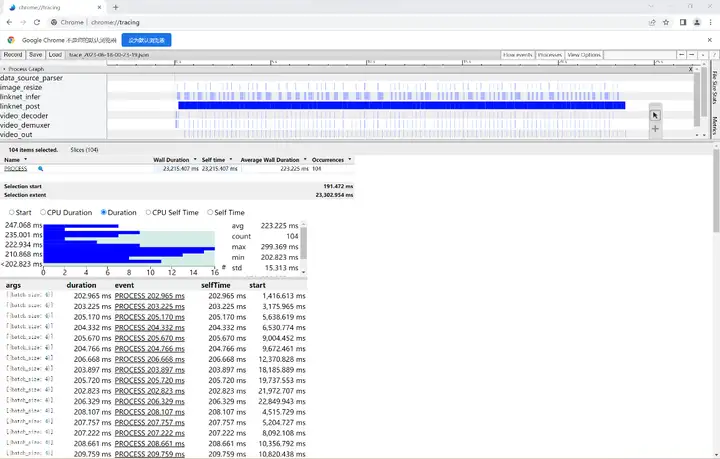
在Chrome浏览器chrome://tracing中加载性能统计文件:
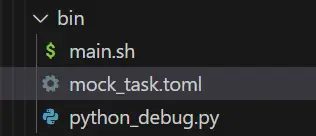
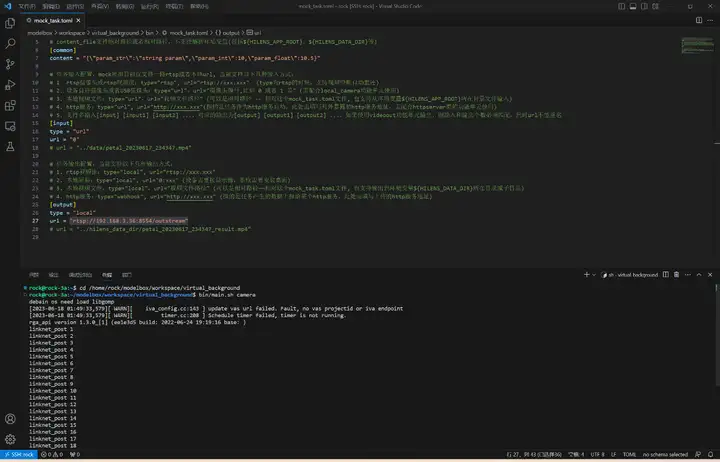
该AI应用输入1080p的视频,batch_size=4耗时约为256ms,平均每帧处理速度为64ms,fps=1000/64≈16,接下来我们给出该AI应用在ModelBox中的完整开发过程(以开发套件为例)。 4)摄像头检测打开工程目录bin/mock_task.toml文件,修改其中的任务输入和任务输出,配置为如下内容: # 用于本地mock文件读取任务,脚本中已经配置了IVA_SVC_CONFIG环境变量, 添加了此文件路径 ########### 请确定使用linux的路径类型,比如在windows上要用 D:/xxx/xxx 不能用D:\xxx\xxx ########### # 任务的参数为一个压缩并转义后的json字符串 # 直接写需要转义双引号, 也可以用 content_file 添加一个json文件,如果content和content_file都存在content会被覆盖 # content_file支持绝对路径或者相对路径,不支持解析环境变量(包括${HILENS_APP_ROOT}、${HILENS_DATA_DIR}等) [common] content = "{\"param_str\":\"string param\",\"param_int\":10,\"param_float\":10.5}" # 任务输入配置,mock模拟目前仅支持一路rtsp或者本地url, 当前支持以下几种输入方式: # 1. rtsp摄像头或rtsp视频流:type="rtsp", url="rtsp://xxx.xxx" (type为rtsp的时候,支持视频中断自动重连) # 2. 设备自带摄像头或者USB摄像头:type="url",url="摄像头编号,比如 0 或者 1 等" (需配合local_camera功能单元使用) # 3. 本地视频文件:type="url",url="视频文件路径" (可以是相对路径 -- 相对这个mock_task.toml文件, 也支持从环境变量${HILENS_APP_ROOT}所在目录文件输入) # 4. http服务:type="url", url="http://xxx.xxx"(指的是任务作为http服务启动,此处需填写对外暴露的http服务地址,需配合httpserver类的功能单元使用) # 5. 支持多输入[input] [input1] [input2] ...,对应的输出为[output] [output1] [output2] ...,如果使用videoout功能单元输出,则输入和输出个数必须匹配,同时url不能重名 [input] type = "url" url = "0" #url = "../data/test.mp4" # 任务输出配置,当前支持以下几种输出方式: # 1. rtsp视频流:type="local", url="rtsp://xxx.xxx" # 2. 本地屏幕:type="local", url="0:xxx" (设备需要接显示器,系统需要安装桌面) # 3. 本地视频文件:type="local",url="视频文件路径" (可以是相对路径——相对这个mock_task.toml文件, 也支持输出到环境变量${HILENS_DATA_DIR}所在目录或子目录) # 4. http服务:type="webhook", url="http://xxx.xxx" (指的是任务产生的数据上报给某个http服务,此处需填写上传的http服务地址) [output] type = "local" url = "0" #url = "../hilens_data_dir/test_result.mp4"执行.\bin\main.bat camera运行应用,将会自动弹出实时的人像分割画面:
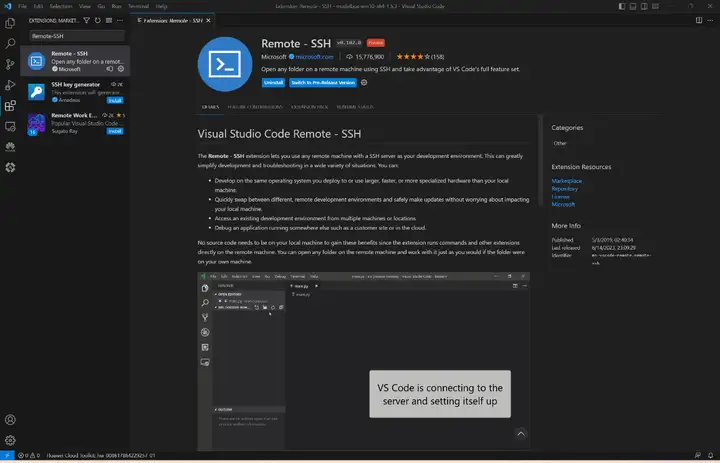
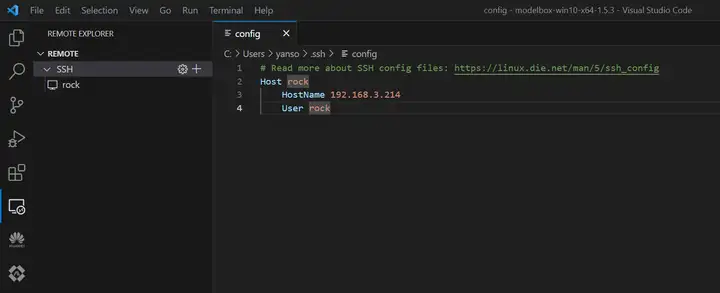
如果你对项目开发感兴趣,可以通过本章进一步了解。 1)远程连接开发板我们推荐在PC端使用VS Code远程连接开发板来对设备进行操作,安装Remote-SSH:
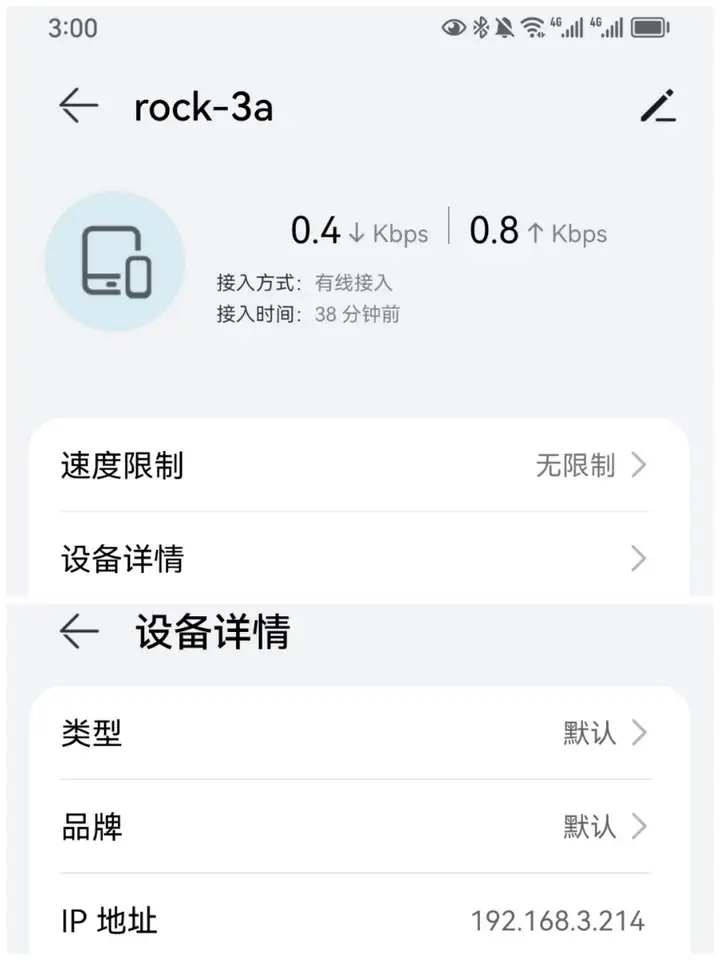
可以在APP应用智慧生活上查看设备的ip地址:
电脑和设备处于同一WiFi下,在VS Code中使用Remote-SSH远程登陆:
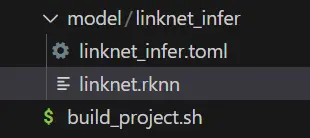
在SDK目录下使用create.py脚本创建工程,我决定工程取名为virtual_background: rock@rock-3a:~$ cd /home/rock/modelbox rock@rock-3a:~/modelbox$ ./create.py -t server -n virtual_background sdk version is modelbox-rk-aarch64-1.5.3 success: create virtual_background in /home/rock/modelbox/workspace 创建推理功能单元 rock@rock-3a:~/modelbox$ ./create.py -t infer -n linknet_infer -p virtual_background sdk version is modelbox-rk-aarch64-1.5.3 success: create infer linknet_infer in /home/rock/modelbox/workspace/virtual_background/model/linknet_infer可以看到推理功能单元创建在了项目工程的model目录下面:
将我们转换好的模型linknet.rknn拖到linknet_infer目录下,接着编辑.toml配置文件,主要修改模型的路径与输入输出,由于我们模型有一个来自rknpu的uint8的类型输入和一个float类型的输出,所以对配置文件编辑如下: # Copyright (C) 2020 Huawei Technologies Co., Ltd. All rights reserved. [base] name = "linknet_infer" device = "rknpu" version = "1.0.0" description = "your description" entry = "./linknet.rknn" # model file path, use relative path type = "inference" virtual_type = "rknpu2" # inference engine type: rockchip now support rknpu, rknpu2(if exist) group_type = "Inference" # flowunit group attribution, do not change is_input_contiguous = "false" # rk do not support memory combine, fix, do not change # Input ports description [input] [input.input1] # input port number, Format is input.input[N] name = "Input" # input port name type = "uint8" # input port data type ,e.g. float or uint8 device = "rknpu" # input buffer type: use rknpu for zero-copy, cpu also allow # Output ports description [output] [output.output1] # output port number, Format is output.output[N] name = "Output" # output port name type = "float" # output port data type ,e.g. float or uint8可以看到该模型有1个输入节点,1个输出节点。需要注意其中的virtual_type配置与npu类别有关,RK3568需配置为rknpu2;输入节点的device配置建议设为与该推理功能单元的上一个功能单元相同。 ModelBox内置了rknn推理引擎和推理逻辑,开发者只需要准备好模型文件、编辑好配置文件,即可使用该模型进行推理,无需编写推理代码。 另外,本案例使用的人像分割模型是由Pytorch框架训练得到,我们事先使用rknn-toolkit2工具将它转换为RK3568支持的模型格式,感兴趣的话可以在RK3568模型转换查看模型转换过程。 创建后处理功能单元我们需要一个后处理功能单元来对模型推理结果进行解码,依然是万能的create.py脚本: rock@rock-3a:~/modelbox$ ./create.py -t python -n linknet_post -p virtual_background sdk version is modelbox-rk-aarch64-1.5.3 success: create python linknet_post in /home/rock/modelbox/workspace/virtual_background/etc/flowunit/linknet_post可以看到在项目工程的etc/flowunit目录下面已经生成了该功能单元,存放.toml配置文件与.py功能代码文件:
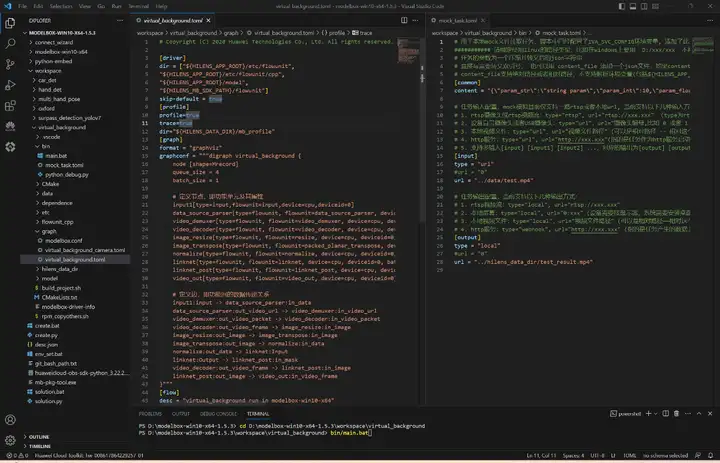
接下来补充该功能单元的逻辑代码,如果对此不感兴趣,可以将我们资源包中的代码CtrlC+V速通本节。 首先补充后处理功能单元的配置文件,对于后处理功能单元,我们需要知道模型推理的shape,因此需要对config字段进行配置。此外,我们还需要修改输入输出,接收一个float类型的推理结果与一个uint8类型的原图,输出融合后的新图: # Copyright (c) Huawei Technologies Co., Ltd. 2022. All rights reserved. # Basic config [base] name = "linknet_post" # The FlowUnit name device = "cpu" # The flowunit runs on cpu version = "1.0.0" # The version of the flowunit type = "python" # Fixed value, do not change description = "description" # The description of the flowunit entry = "linknet_post@linknet_postFlowUnit" # Python flowunit entry function group_type = "Generic" # flowunit group attribution, change as Input/Output/Image/Generic ... # Flowunit Type stream = false # Whether the flowunit is a stream flowunit condition = false # Whether the flowunit is a condition flowunit collapse = false # Whether the flowunit is a collapse flowunit collapse_all = false # Whether the flowunit will collapse all the data expand = false # Whether the flowunit is a expand flowunit # The default Flowunit config [config] mask_h = 256 mask_w = 256 # Input ports description [input] [input.input1] # Input port number, the format is input.input[N] name = "in_mask" # Input port name type = "float" # Input port type [input.input2] # Input port number, the format is input.input[N] name = "in_image" # Input port name type = "uint8" # Input port type # Output ports description [output] [output.output1] # Output port number, the format is output.output[N] name = "out_image" # Output port name type = "uint8" # Output port type后处理代码: # Copyright (c) Huawei Technologies Co., Ltd. 2022. All rights reserved. #!/usr/bin/env python # -*- coding: utf-8 -*- import _flowunit as modelbox import numpy as np import cv2 class linknet_postFlowUnit(modelbox.FlowUnit): # Derived from modelbox.FlowUnit def __init__(self): super().__init__() self.image_background = cv2.imread('data/R-C.jpg') self.image_background = cv2.cvtColor(self.image_background,cv2.COLOR_BGR2RGB) self.image_background = self.image_background/255. def open(self, config): # Open the flowunit to obtain configuration information self.mask_h = config.get_int('mask_h', 256) self.mask_w = config.get_int('mask_w', 256) self.index = 0 return modelbox.Status.StatusCode.STATUS_SUCCESS def process(self, data_context): # Process the data in_mask = data_context.input("in_mask") in_image = data_context.input("in_image") out_image = data_context.output("out_image") # linknet_post process code. # Remove the following code and add your own code here. for buffer_mask, buffer_image in zip(in_mask, in_image): # 获取输入Buffer的属性信息 width = buffer_image.get('width') height = buffer_image.get('height') channel = buffer_image.get('channel') # 将输入Buffer转换为numpy对象 image_background = cv2.resize(self.image_background, (width, height)) mask_data = np.array(buffer_mask.as_object(), copy=False) mask_data = mask_data.reshape(self.mask_h, self.mask_w) mask_data = cv2.resize(mask_data, (width, height)) mask_data = mask_data.reshape(height, width, 1) image_data = np.array(buffer_image.as_object(), dtype=np.uint8, copy=False) image_data = image_data.reshape(height, width, channel) img_multi = mask_data*image_data/255. mask_layer = np.ones((height, width)) mask_layer = mask_layer.reshape(height, width, 1) mask_layer = mask_layer-mask_data mask_layer = image_background*mask_layer image_add = img_multi+mask_layer image_add = image_add*255 image_add = image_add.astype(np.uint8) # frame计数 self.index += 1 print("linknet_post " + str(self.index)) # 将业务处理返回的结果数据转换为Buffer add_buffer = modelbox.Buffer(self.get_bind_device(), image_add) # 设置输出Buffer的Meta信息,此处直接拷贝输入Buffer的Meta信息 add_buffer.copy_meta(buffer_image) # 将输出Buffer放入输出BufferList中 out_image.push_back(add_buffer) return modelbox.Status.StatusCode.STATUS_SUCCESS def close(self): # Close the flowunit return modelbox.Status() def data_pre(self, data_context): # Before streaming data starts return modelbox.Status() def data_post(self, data_context): # After streaming data ends return modelbox.Status() def data_group_pre(self, data_context): # Before all streaming data starts return modelbox.Status() def data_group_post(self, data_context): # After all streaming data ends return modelbox.Status() 搭建流程图修改virtual_background.toml内容: # Copyright (C) 2020 Huawei Technologies Co., Ltd. All rights reserved. [driver] dir = ["${HILENS_APP_ROOT}/etc/flowunit", "${HILENS_APP_ROOT}/etc/flowunit/cpp", "${HILENS_APP_ROOT}/model", "${HILENS_MB_SDK_PATH}/flowunit"] skip-default = true [profile] profile=true trace=true dir="${HILENS_DATA_DIR}/mb_profile" [graph] format = "graphviz" graphconf = """digraph virtual_background { node [shape=Mrecord] queue_size = 1 batch_size = 1 # 定义节点,即功能单元及其属性 input1[type=input, flowunit=input, device=cpu, deviceid=0] data_source_parser[type=flowunit, flowunit=data_source_parser, device=cpu, deviceid=0] video_demuxer[type=flowunit, flowunit=video_demuxer, device=cpu, deviceid=0] video_decoder[type=flowunit, flowunit=video_decoder, device=rknpu, deviceid=0, pix_fmt="rgb"] image_resize[type=flowunit, flowunit=resize, device=rknpu, deviceid=0, image_width=256, image_height=256] linknet_infer[type=flowunit, flowunit=linknet_infer, device=rknpu, deviceid=0] linknet_post[type=flowunit, flowunit=linknet_post, device=cpu, deviceid=0] video_out[type=flowunit, flowunit=video_out, device=rknpu, deviceid=0] # 定义边,即功能间的数据传递关系 input1:input -> data_source_parser:in_data data_source_parser:out_video_url -> video_demuxer:in_video_url video_demuxer:out_video_packet -> video_decoder:in_video_packet video_decoder:out_video_frame -> image_resize:in_image image_resize:out_image -> linknet_infer:Input linknet_infer:Output -> linknet_post:in_mask video_decoder:out_video_frame -> linknet_post:in_image linknet_post:out_image -> video_out:in_video_frame }""" [flow] desc = "virtual_background run in modelbox-rk-aarch64"其中,profile字段设为true启用性能统计功能。 运行应用应用的输入和输出可以在项目工程的bin/mock_task.toml中进行配置:
配置应用的输入输出,接下来就可以进入项目进行构建和运行了:
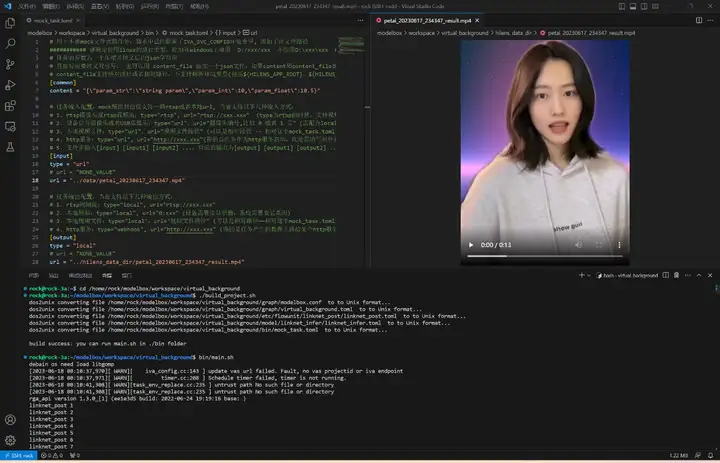
执行bin/main.sh运行应用,生成的视频和性能统计文件在hilens_data_dir文件夹:
可以右键下载查看性能统计文件:
可以看到模型推理确实很快,平均每4次推理耗时223ms,fps约等于18帧每秒。 开发板摄像头检测创建virtual_background_cameral.toml文件,编辑内容如下: # Copyright (C) 2020 Huawei Technologies Co., Ltd. All rights reserved. [driver] dir = ["${HILENS_APP_ROOT}/etc/flowunit", "${HILENS_APP_ROOT}/etc/flowunit/cpp", "${HILENS_APP_ROOT}/model", "${HILENS_MB_SDK_PATH}/flowunit"] skip-default = true [profile] profile=false trace=false dir="${HILENS_DATA_DIR}/mb_profile" [graph] format = "graphviz" graphconf = """digraph virtual_background { node [shape=Mrecord] queue_size = 1 batch_size = 1 # 定义节点,即功能单元及其属性 input1[type=input, flowunit=input, device=cpu, deviceid=0] data_source_parser[type=flowunit, flowunit=data_source_parser, device=cpu, deviceid=0] local_camera[type=flowunit, flowunit=local_camera, device=rknpu, deviceid=0, pix_fmt="rgb", cam_width=1280, cam_height=720] image_resize[type=flowunit, flowunit=resize, device=rknpu, deviceid=0, image_width=256, image_height=256] linknet_infer[type=flowunit, flowunit=linknet_infer, device=rknpu, deviceid=0] linknet_post[type=flowunit, flowunit=linknet_post, device=cpu, deviceid=0] video_out[type=flowunit, flowunit=video_out, device=rknpu, deviceid=0] # 定义边,即功能间的数据传递关系 input1:input -> data_source_parser:in_data data_source_parser:out_video_url -> local_camera:in_camera_packet local_camera:out_camera_frame -> image_resize:in_image image_resize:out_image -> linknet_infer:Input linknet_infer:Output -> linknet_post:in_mask local_camera:out_camera_frame -> linknet_post:in_image linknet_post:out_image -> video_out:in_video_frame }""" [flow] desc = "virtual_background run in modelbox-rk-aarch64"打开工程目录下bin/mock_task.toml文件,修改任务输入和任务输出:
执行bin/main.sh camera运行应用,使用rtsp推流到本地进行查看:
至此我们就完成了摄像头虚拟背景AI应用的开发以及在Windows和RK3568开发板上的部署,本案例所需资源(代码、模型、测试数据等)均可从网盘链接下载,感兴趣的小伙伴赶快下载玩一玩吧!
点击关注,第一时间了解华为云新鲜技术~ |


【本文地址】
今日新闻 |
推荐新闻 |