【c++】VSCode配置 c++ 环境(小白教程) |
您所在的位置:网站首页 › code运行c › 【c++】VSCode配置 c++ 环境(小白教程) |
【c++】VSCode配置 c++ 环境(小白教程)
|
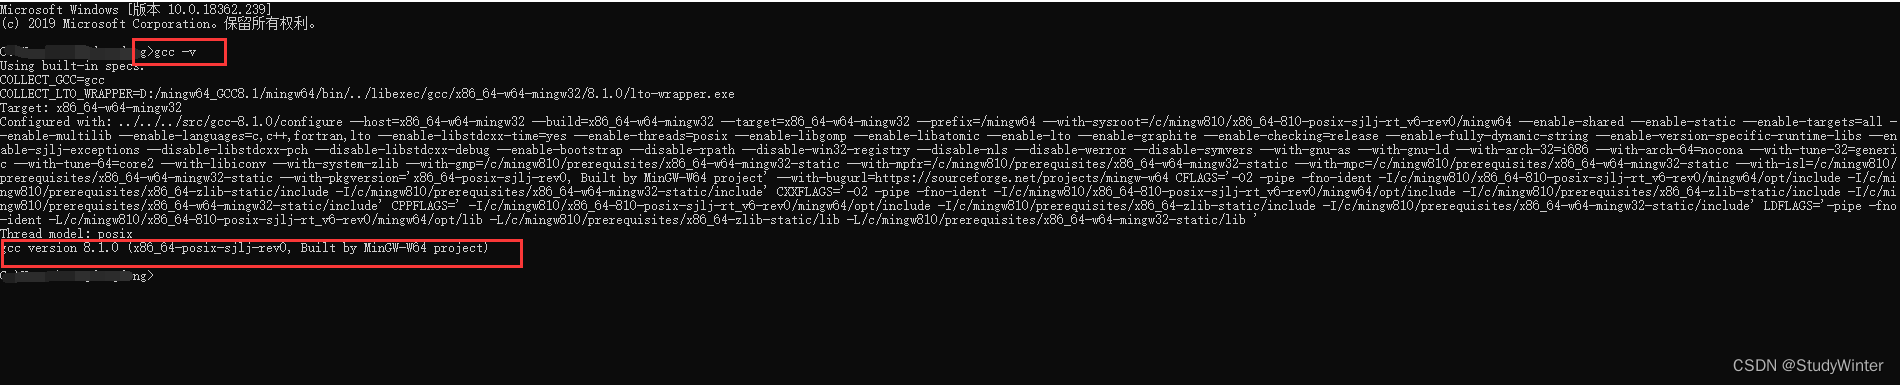
重新写了一个帖子,大家移步这里:【c++】VSCode配置 c++ 环境(重新制作)_StudyWinter的博客-CSDN博客 前言这篇文章是笔者最开始学习使用vs code配置c/c++环境,第一次配置的时候,没有问题,但是评论区有小伙伴配置不成功,笔者又照着这个教程重新配置了一下。没有问题。于是乎,想着再写一篇文章重新说明一下,但是又觉得没必要,这里把重要的点提一下。 1 下载软件MinGW-w64官网下载还是很慢的,这里贴上百度云链接 链接:https://pan.baidu.com/s/1MEc98YJBkVjdF5ruWznlZg 提取码:1q0i 在安装过程中如果网络不好,尝试利用手机热点安装,多试几次。 安装完之后测试
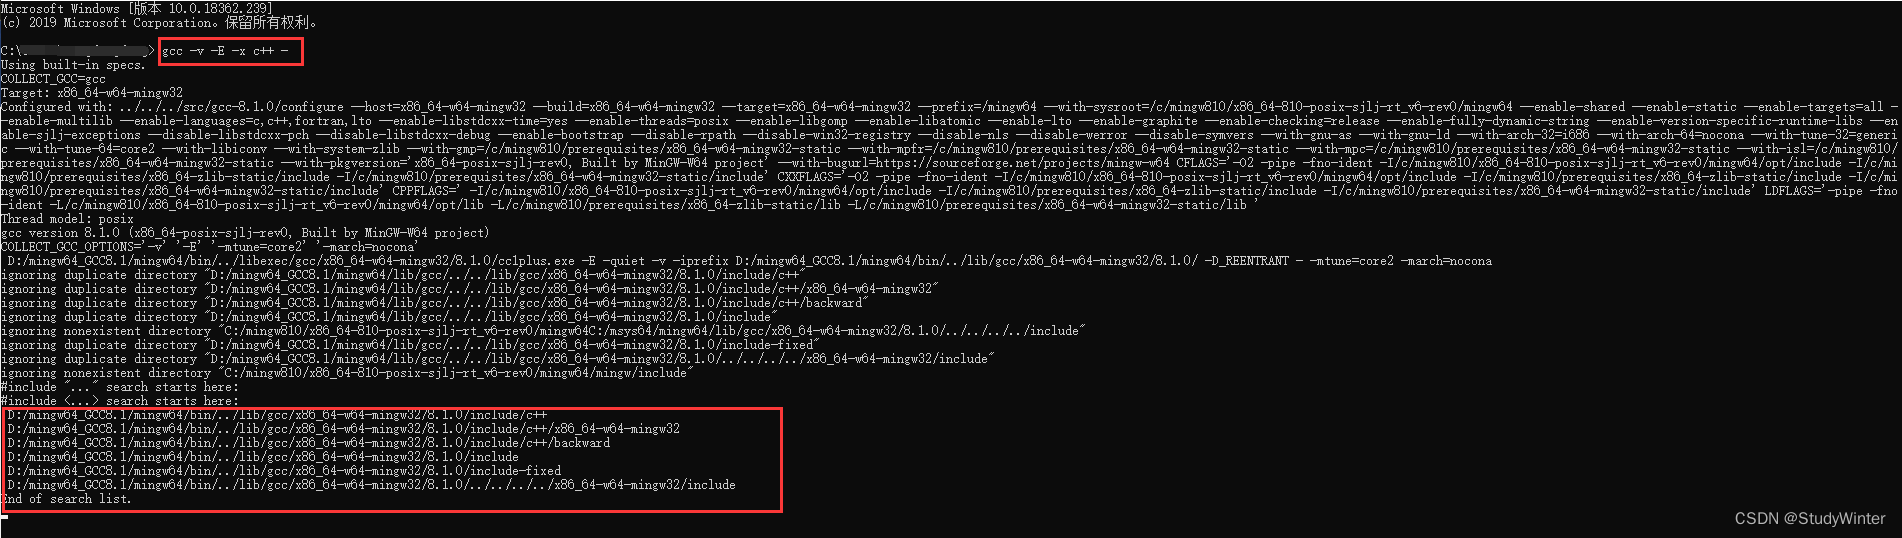
首先查看自己的includepath路径。在cmd下输入 gcc -v -E -x c++ -结果
我们需要的是我框出来这部分的路径。接下是是重要的部分。 将【includePath】和【path】按照自己的路径修该。注意,这两部分是一样的。 上图我框了6行,直接将这前5行粘到后面,需要修改的是第1、2行(应该和顺序无关,方便称呼),即 "D:/mingw64_GCC8.1/mingw64/include/**", "D:/mingw64_GCC8.1/mingw64/bin/../lib/gcc/x86_64-w64-mingw32/8.1.0/../../../../include",第一个路径是需要自己查的。找到自己安装的mingw
然后第二个照着修改成自己的路径即可。 最终修改 { "configurations": [ { "name": "Win32", "includePath": [ "${workspaceRoot}", // 以下7行需要修改 "D:/mingw64_GCC8.1/mingw64/include/**", "D:/mingw64_GCC8.1/mingw64/bin/../lib/gcc/x86_64-w64-mingw32/8.1.0/../../../../include", // 将查询结果直接粘进来 "D:/mingw64_GCC8.1/mingw64/bin/../lib/gcc/x86_64-w64-mingw32/8.1.0/include/c++", "D:/mingw64_GCC8.1/mingw64/bin/../lib/gcc/x86_64-w64-mingw32/8.1.0/include/c++/x86_64-w64-mingw32", "D:/mingw64_GCC8.1/mingw64/bin/../lib/gcc/x86_64-w64-mingw32/8.1.0/include/c++/backward", "D:/mingw64_GCC8.1/mingw64/bin/../lib/gcc/x86_64-w64-mingw32/8.1.0/include", "D:/mingw64_GCC8.1/mingw64/bin/../lib/gcc/x86_64-w64-mingw32/8.1.0/include-fixed" ], "defines": [ "_DEBUG", "UNICODE", "__GNUC__=6", "__cdecl=__attribute__((__cdecl__))" ], "intelliSenseMode": "msvc-x64", "browse": { "limitSymbolsToIncludedHeaders": true, "databaseFilename": "", "path": [ "${workspaceRoot}", // 以下7行需要修改 "D:/mingw64_GCC8.1/mingw64/include/**", "D:/mingw64_GCC8.1/mingw64/bin/../lib/gcc/x86_64-w64-mingw32/8.1.0/../../../../include", // 将查询结果直接粘进来 "D:/mingw64_GCC8.1/mingw64/bin/../lib/gcc/x86_64-w64-mingw32/8.1.0/include/c++", "D:/mingw64_GCC8.1/mingw64/bin/../lib/gcc/x86_64-w64-mingw32/8.1.0/include/c++/x86_64-w64-mingw32", "D:/mingw64_GCC8.1/mingw64/bin/../lib/gcc/x86_64-w64-mingw32/8.1.0/include/c++/backward", "D:/mingw64_GCC8.1/mingw64/bin/../lib/gcc/x86_64-w64-mingw32/8.1.0/include", "D:/mingw64_GCC8.1/mingw64/bin/../lib/gcc/x86_64-w64-mingw32/8.1.0/include-fixed" ] } } ], "version": 4 } 2.2 launch.json根据自己路径修改 "miDebuggerPath { "version": "0.2.0", "configurations": [ { "name": "(gdb) Launch", // 配置名称,将会在启动配置的下拉菜单中显示 "type": "cppdbg", // 配置类型,这里只能为cppdbg "request": "launch", // 请求配置类型,可以为launch(启动)或attach(附加) "program": "${workspaceFolder}/exe/${fileBasenameNoExtension}.exe",// 将要进行调试的程序的路径 "args": [], // 程序调试时传递给程序的命令行参数,一般设为空即可 "stopAtEntry": false, // 设为true时程序将暂停在程序入口处,一般设置为false "cwd": "${workspaceFolder}", // 调试程序时的工作目录,一般为${workspaceFolder}即代码所在目录 "environment": [], "externalConsole": true, // 调试时是否显示控制台窗口,一般设置为true显示控制台 "MIMode": "gdb", // 这里的路径需要修改。改成自己的路径 "miDebuggerPath": "D:/mingw64_GCC8.1/mingw64/bin/gdb.exe", "preLaunchTask": "g++", // 调试会话开始前执行的任务,一般为编译程序,c++为g++, c为gcc "setupCommands": [ { "description": "Enable pretty-printing for gdb", "text": "-enable-pretty-printing", "ignoreFailures": true } ] } ] } 2.3 tasks.json直接粘 { "version": "2.0.0", "command": "g++", "args": [ "-g", "${file}", "-o", "${workspaceFolder}/exe/${fileBasenameNoExtension}.exe" ], // 编译命令参数 "problemMatcher": { "owner": "cpp", "fileLocation": [ "relative", "\\" ], "pattern": { "regexp": "^(.*):(\\d+):(\\d+):\\s+(warning|error):\\s+(.*)$", "file": 1, "line": 2, "column": 3, "severity": 4, "message": 5 } } } 2.4 测试 #include using namespace std; int main(int argc, char const *argv[]) { cout |
【本文地址】
今日新闻 |
推荐新闻 |