GitHub |
您所在的位置:网站首页 › adni数据集简介 › GitHub |
GitHub
|
yolov5-6.1-cocotools
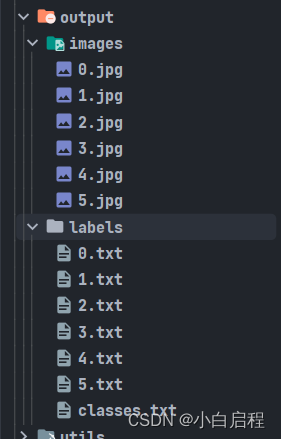
如何使用yolov5对测试集进行检测,然后使用cocotools进行评估 介绍本博客是讲如何使用yolov5对测试集进行检测,然后使用cocotools进行评估。 可以显示每一个类别的ap和总的ap。 5.0版本模型看这个博客 代码: 5.0版链接 6.1版链接 环境pytorch只需要保证能跑起来yolov5 yolov5版本: yolov5 6.1(其他版本使用类似,低于6.1版本模型可以直接使用,测试成功的,高于的没测试,只需要修改模型导入部分代码) coco格式介绍 1. coco数据集格式coco数据集的格式也就是本博客中使用的ground true。 # 整体格式 { "info": {}, # 数据集的一些信息 "licenses": [{}], # 许可相关信息 "images": [{}], # 图片信息list,重要 "annotations": [{}] # 标注信息list,重要 "categories": [{}] # 类别信息list,重要 } # 部分详细格式 info: { "description": "mpj Dataset", # 数据集的介绍 "url": "www.mpj520.com", # 下载地址 "version": "1.0", # 版本 "year": 2022, # 年份 "contributor": "mpj", # 贡献者 "date_created": "2022-12-15 10:34:37.288392" # 时间 } licenses: [ { "url": "http://creativecommons.org/licenses/by-nc-sa/2.0/", "id": 1, "name": "Attribution-NonCommercial-ShareAlike License" } ] images: [ { "id": 0, # 图片的id(唯一索引,会和标注中image_id对应) "file_name": "0.jpg", # 图片名称 "width": 1706, # 宽 "height": 1279, # 高 "date_captured": "2022-12-15 10:34:37.310393", "license": 1 } ] annotations: [ { "image_id": 0, # 图片id(对应于images里面id) "category_id": 1, # 类别id(对应于categories里面id) "bbox": [ # 标签框,左上角坐标+宽高 1342.000163, 720.0002599999999, 306.00010199999997, 211.999366 ], "id": 0, # 标签id "area": 64871.82761993533, # 标签面积 "iscrowd": 0, # 0为polygon格式,1为RLE格式 "segmentation": [], # 分割数据 "attributes": "" } ] categories: [ { "id": 1, # 类别id,最好从1开始 "name": "live", # 子类别名 "supercategory": "live" # 主类别名 } ] 2. coco中预测完格式使用cocotools进行评测时,需要的predict后的数据格式。 整个json文件是一个数组list。 [ { "image_id": 0, "category_id": 2, "bbox": [ 1.0, 680.0, 70.0, 197.0 ], "score": 0.257080078125, # 置信度 "area": 13790.0 }, ... ] 代码和使用 1. 将测试集名字全部转成数字这个代码是讲所有测试集中图片和对应的txt标签名字全部转成数字,方便对于image_id的获得,这个image_id是int格式。 数据集目录格式 data ├── images │ ├── 000000000001.jpg │ ├── 000000000002.jpg │ ├── 000000000003.jpg ├── labels │ ├── 000000000001.txt │ ├── 000000000002.txt │ ├── 000000000003.txt rename_yolo_txt.py # -*- coding: UTF-8 -*- """ @Author: mpj @Date : 2022/12/18 20:33 @version V1.0 """ import os import shutil # 重命名yolo的图片和对应的txt文件名,新名字都是从0开始的数字 # 数据集目录格式 # data # ├── images # │ ├── 000000000001.jpg # │ ├── 000000000002.jpg # │ ├── 000000000003.jpg # ├── labels # │ ├── 000000000001.txt # │ ├── 000000000002.txt # │ ├── 000000000003.txt input_path = './dataset' output_path = './output' # 判断文件夹是否存在 if not os.path.exists(output_path): os.makedirs(output_path) if not os.path.exists(output_path + '/images'): os.makedirs(output_path + '/images') if not os.path.exists(output_path + '/labels'): os.makedirs(output_path + '/labels') # 移动classes.txt文件 if not os.path.exists(input_path + '/labels/classes.txt'): print('classes.txt文件不存在') exit() shutil.copy(input_path + '/labels/classes.txt', output_path + '/labels/classes.txt') # 读取文件夹下的所有文件 images = os.listdir(input_path + '/images') labels = os.listdir(input_path + '/labels') count = 0 for image in images: # 获取文件名,后缀 image_name, image_suffix = os.path.splitext(image) new_image_name = str(count) + image_suffix new_label_name = str(count) + '.txt' # 复制图片和对应的txt文件 shutil.copy(input_path + '/images/' + image, output_path + '/images/' + new_image_name) shutil.copy(input_path + '/labels/' + image_name + '.txt', output_path + '/labels/' + new_label_name) count += 1 print('共处理', count, '张图片')结果
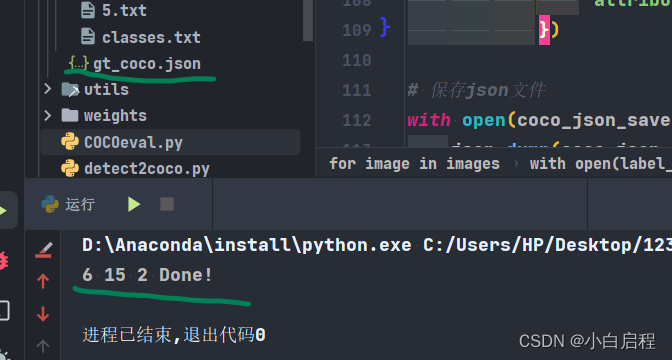
将yolo格式的标签转成cocotools的ground true格式的json文件。 yolo2coco.py # -*- coding: UTF-8 -*- """ @Author: mpj @Date : 2022/12/18 20:45 @version V1.0 """ import datetime import json import os import cv2 # 将yolo格式的数据集转换成coco格式的数据集 # 读取文件夹下的所有文件 images_path = './output/images' labels_path = './output/labels' output_path = './output' coco_json_save = output_path + '/gt_coco.json' # 创建coco格式的json文件 coco_json = { 'info': { "description": "mpj Dataset", "url": "www.mpj520.com", "version": "1.0", "year": 2022, "contributor": "mpj", "date_created": datetime.datetime.utcnow().isoformat(' ') }, "licenses": [ { "url": "http://creativecommons.org/licenses/by-nc-sa/2.0/", "id": 1, "name": "Attribution-NonCommercial-ShareAlike License" } ], 'images': [], 'annotations': [], 'categories': [] } # 判断文件夹是否存在 if not os.path.exists(output_path): os.makedirs(output_path) # 判断classes.txt文件是否存在 if not os.path.exists(labels_path + '/classes.txt'): print('classes.txt文件不存在') exit() # 读取classes.txt文件 classes = [] with open(labels_path + '/classes.txt', 'r') as f: classes = f.readlines() classes = [c.strip() for c in classes] # 创建coco格式的json文件 for i, c in enumerate(classes): coco_json['categories'].append({'id': i + 1, 'name': c, 'supercategory': c}) # 读取images文件夹下的所有文件 images = os.listdir(images_path) for image in images: # 获取图片名和后缀 image_name, image_suffix = os.path.splitext(image) # 获取图片的宽和高 image_path = images_path + '/' + image img = cv2.imread(image_path) height, width, _ = img.shape # 添加图片信息 coco_json['images'].append({ 'id': int(image_name), 'file_name': image, 'width': width, 'height': height, 'date_captured': datetime.datetime.utcnow().isoformat(' '), 'license': 1 }) # 读取图片对应的标签文件 label_path = labels_path + '/' + image_name + '.txt' if not os.path.exists(label_path): continue with open(label_path, 'r') as f: labels = f.readlines() labels = [l.strip() for l in labels] for j, label in enumerate(labels): label = label.split(' ') # 获取类别id category_id = int(label[0]) # 将yolo格式的数据转换成coco格式的数据 x = float(label[1]) * width y = float(label[2]) * height w = float(label[3]) * width h = float(label[4]) * height xmin = x - w / 2 ymin = y - h / 2 xmax = x + w / 2 ymax = y + h / 2 # 添加bbox信息 coco_json['annotations'].append({ 'image_id': int(image_name), 'category_id': category_id + 1, 'bbox': [xmin, ymin, w, h], 'id': len(coco_json['annotations']), 'area': w * h, 'iscrowd': 0, 'segmentation': [], 'attributes': "" }) # 保存json文件 with open(coco_json_save, 'w') as f: json.dump(coco_json, f, indent=2) print(len(coco_json['images']), len(coco_json['annotations']), len(coco_json['categories']), 'Done!')结果
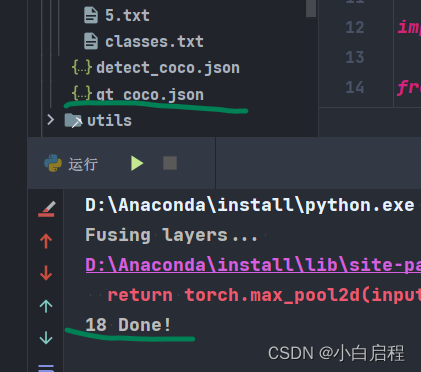
本博客使用的yolov5 6.1代码,如果你是别的版本,这段代码你是需要修改。 低于6.1版本的模型可以直接导入使用,高于的没有测试。 修改有关模型导入,类别这些。 在检测完后,会保存成为cocotools的predict格式的json文件。 detect2coco.py # -*- coding: UTF-8 -*- """ @Author: mpj @Date : 2022/12/17 22:24 @version V1.0 """ import json import os import torch from models.common import DetectMultiBackend from utils.datasets import LoadImages from utils.general import (check_img_size, non_max_suppression, scale_coords) from utils.torch_utils import select_device # 读取文件夹下的所有文件 input_path = './output/images' output_path = './output' device = '' weights = './weights/best.pt' imgsz = 640 source = input_path coco_json_save = output_path + '/detect_coco.json' data = './data/coco.yaml' imgsz = [640, 640] conf_thres = 0.001 iou_thres = 0.6 max_det = 100 device = '' half = False # 创建coco格式的预测结果 coco_json = [] # Load model device = select_device(device) model = DetectMultiBackend(weights, device=device, data=data) stride, names, pt, jit, onnx, engine = model.stride, model.names, model.pt, model.jit, model.onnx, model.engine imgsz = check_img_size(imgsz, s=stride) # check image size # Half half &= (pt or jit or onnx or engine) and device.type != 'cpu' # FP16 supported on limited backends with CUDA if pt or jit: model.model.half() if half else model.model.float() # Dataloader dataset = LoadImages(source, img_size=imgsz, stride=stride, auto=pt) bs = 1 # batch_size # Run inference model.warmup(imgsz=(1 if pt else bs, 3, *imgsz), half=half) # warmup for path, im, im0s, vid_cap, s in dataset: # 获取图片名字 image_name = os.path.basename(path).split('.')[0] im = torch.from_numpy(im).to(device) im = im.half() if half else im.float() # uint8 to fp16/32 im /= 255 # 0 - 255 to 0.0 - 1.0 if len(im.shape) == 3: im = im[None] # expand for batch dim # Inference pred = model(im) # NMS pred = non_max_suppression(pred, conf_thres, iou_thres, max_det=max_det) # Process predictions for i, det in enumerate(pred): # per image if len(det): # Rescale boxes from img_size to im0 size det[:, :4] = scale_coords(im.shape[2:], det[:, :4], im0s.shape).round() # Write results for *xyxy, conf, cls in reversed(det): # 将检测结果保存到coco_json中 coco_json.append({ 'image_id': int(image_name), 'category_id': int(cls) + 1, 'bbox': [float(xyxy[0]), float(xyxy[1]), float(xyxy[2] - xyxy[0]), float(xyxy[3] - xyxy[1])], 'score': float(conf), 'area': float((xyxy[2] - xyxy[0]) * (xyxy[3] - xyxy[1])) }) # 保存json文件 with open(os.path.join(coco_json_save), 'w') as f: # indent=2 保存json文件时,缩进2个空格 json.dump(coco_json, f, indent=2) print(len(coco_json), 'Done!')结果
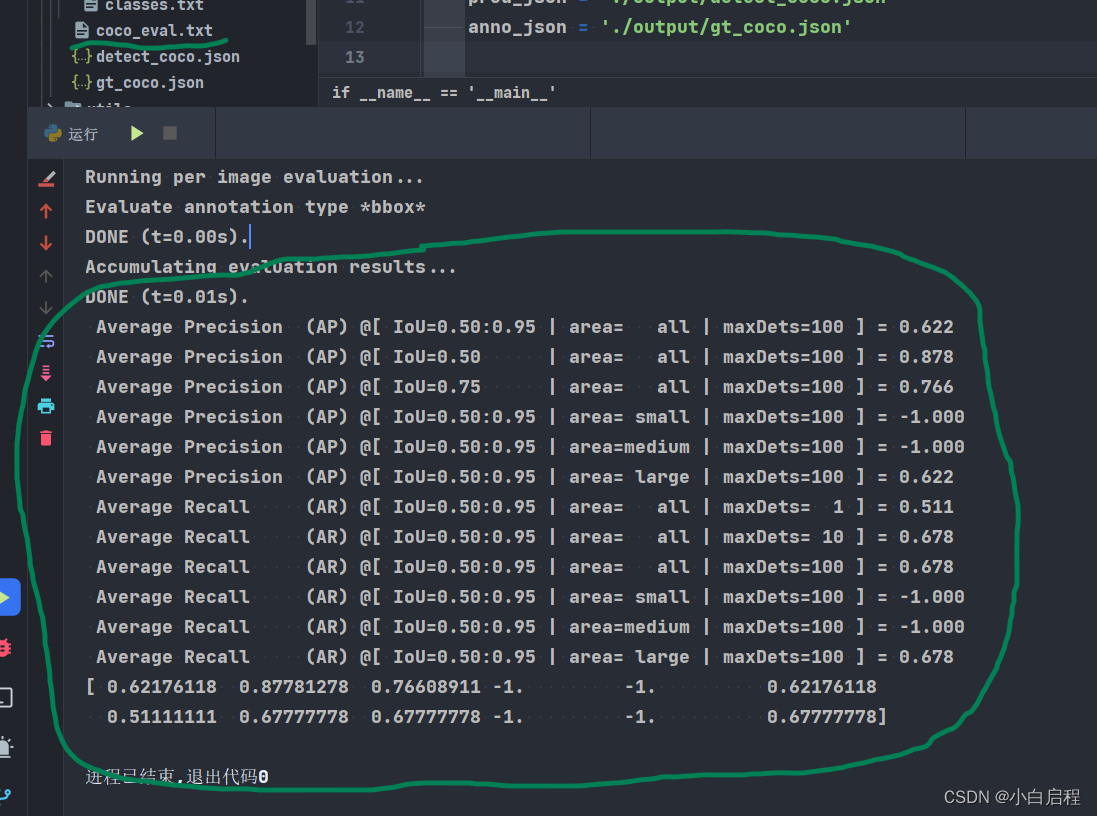
直接使用就行 COCOeval.py # -*- coding: UTF-8 -*- """ @Author: mpj @Date : 2022/12/18 20:46 @version V1.0 """ from pycocotools.coco import COCO from pycocotools.cocoeval import COCOeval if __name__ == '__main__': pred_json = './output/detect_coco.json' anno_json = './output/gt_coco.json' # 使用COCO API加载预测结果和标注 cocoGt = COCO(anno_json) cocoDt = cocoGt.loadRes(pred_json) # 创建COCOeval对象 cocoEval = COCOeval(cocoGt, cocoDt, 'bbox') # 执行评估 cocoEval.evaluate() cocoEval.accumulate() cocoEval.summarize() # 保存结果 with open('./output/coco_eval.txt', 'w') as f: f.write(str(cocoEval.stats)) # 打印结果 print(cocoEval.stats)结果
如果发现cocotools和yolov5的test两个结果差距较大,检查你是用的置信度阈值和NMS阈值是否统一。 我测试的结果是y使用olov5的val.py得到的[email protected]和[email protected]:.95值和cocotools得到的值有出入,在2个点左右 参考https://blog.csdn.net/weixin_44751294/article/details/126580294 |
【本文地址】
今日新闻 |
推荐新闻 |