Arduino OLED库自己U8g2添加字库教程 |
您所在的位置:网站首页 › Arduino使用OLED显示汉字 › Arduino OLED库自己U8g2添加字库教程 |
Arduino OLED库自己U8g2添加字库教程
|
Arduino OLED自己添加字库教程,刚开始接触U8g2字库走了不少弯路,然后U8g2添加字库的过程记录下来做成文档供和我一样的小白们参考,希望能申精。
一、前言 最近在研究用 Arduino 以 U8g2 库驱动 OLED 显示中文,过程中走了很多弯路历经曲折,翻阅很多资料对 于我这样的小白来说这些资料有点深奥,理解不是怎么透彻于是请教群里的高手,非但问题没有帮助解决还受到嘲 笑和讥讽,于是我下定决心自己一定要把这个字库弄成功,最后我翻阅资料和反复试验终于成功的添加了自己的字 库,所以我要将自己的心得和成功的方法献给像我这样的小白。 二、准备硬件和软件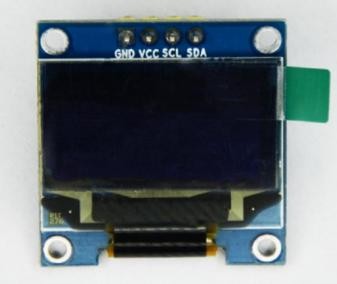 1.准备一块 ssd1306 液晶显示模块,一块 arduino 开发板。 1.准备一块 ssd1306 液晶显示模块,一块 arduino 开发板。2.准备 arduino IDE 3.下载 ssd 1306 的支持库 u8g2:地址自行搜索 或者在 arduino 上安装 u8g2:(1)打开管理库: 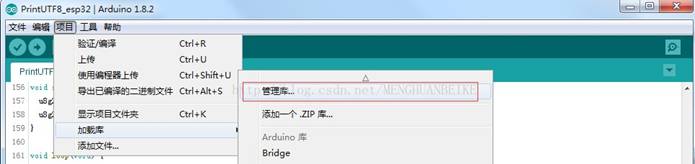 (2)搜索并安装 u8b2
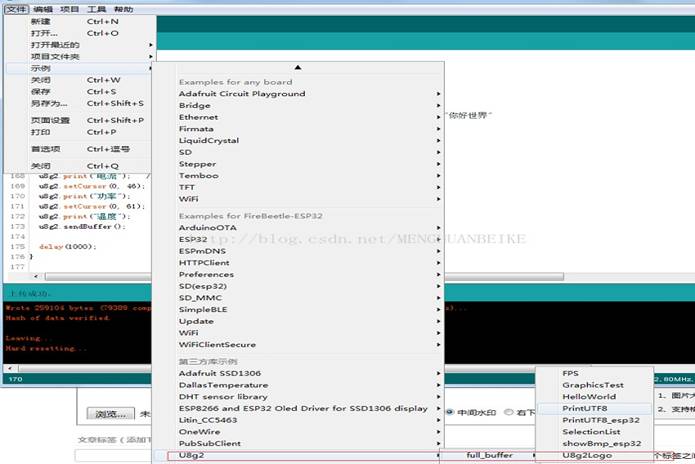
 三、用 arduino 驱动 oled 显示屏 (1)接线。我用的是 Arduino R3,这个 1106 的屏幕是使用 i2c,我只需在 Arduino R3 上选取两个引脚作为 i2c 即可,而 1106 需要 3.3v 供电,再接两根线供电。 (2)打开 u8b2 的例程 PrintUTF8。
 (3)配置工程的引脚和通讯方式。只需要根据屏幕的通讯方式和接的 I2C 引脚配置即可,配置方式是选择对应的 配置去掉注释。我用的是 SSD1106_128X64,用了 I2C 接口,使用 SDA 和 SCL 作为 i2c 的引脚,所以我配置是:
U8G2_SSD1106_128X64_NONAME_F_SW_I2C u8g2(U8G2_R0, /* clock=*/ 23, /* data=*/ 22, /* reset=*/ U8X8_PIN_NONE); // All Boards without Reset of the Display
代码如下:
void setup(void) {
u8g2.begin();
u8g2.enableUTF8Print(); // enable UTF8 support for the Arduino print() function
}
void loop(void) {
u8g2.setFont(u8g2_font_unifont_t_chinese2); // use chinese2 for all the glyphs of "你好世界" u8g2.setFontDirection(0);
u8g2.clearBuffer(); u8g2.setCursor(0, 15); u8g2.print("Hello World!"); u8g2.setCursor(0, 40);
u8g2.print("世界你好"); // Chinese "Hello World"
u8g2.sendBuffer();
delay(1000);
}
显示效果如下:
(3)配置工程的引脚和通讯方式。只需要根据屏幕的通讯方式和接的 I2C 引脚配置即可,配置方式是选择对应的 配置去掉注释。我用的是 SSD1106_128X64,用了 I2C 接口,使用 SDA 和 SCL 作为 i2c 的引脚,所以我配置是:
U8G2_SSD1106_128X64_NONAME_F_SW_I2C u8g2(U8G2_R0, /* clock=*/ 23, /* data=*/ 22, /* reset=*/ U8X8_PIN_NONE); // All Boards without Reset of the Display
代码如下:
void setup(void) {
u8g2.begin();
u8g2.enableUTF8Print(); // enable UTF8 support for the Arduino print() function
}
void loop(void) {
u8g2.setFont(u8g2_font_unifont_t_chinese2); // use chinese2 for all the glyphs of "你好世界" u8g2.setFontDirection(0);
u8g2.clearBuffer(); u8g2.setCursor(0, 15); u8g2.print("Hello World!"); u8g2.setCursor(0, 40);
u8g2.print("世界你好"); // Chinese "Hello World"
u8g2.sendBuffer();
delay(1000);
}
显示效果如下:  如果不能正常显示汉字需要将汉字在 UTF8 编码格式下打开,也可以在 UTF8 编码格式格式下打开以上代码然后点 击保存,我使用的是 Notepad++ 打开并保存代码便可以解决汉字乱码的问题 四、制作自定义的字库 u8b2 官方的库只能显示很少的中文,如果要显示其他中文就要自己制作字库了。制作字库的工具在目录在: u8g2\tools\font\bdfconv bdfconv.exe 这个工具是一个 dos 命令,需要开启 cmd.exe 在命令行输入命令或者用 bat 脚本来生成字库。 bdfconv.exe 命令的使用方法如下: bdfconv [options] filename -h Display this help -v Print log messages -b Font build mode, 0: proportional, 1: common height, 2: monospace, 3: multiple of 8 -f Font format, 0: ucglib font, 1: u8g2 font, 2: u8g2 uncompressed 8x8 font (enforces -b 3) -m 'map' Unicode ASCII mapping -M 'mapfile' Read Unicode ASCII mapping from file 'mapname' -o C output file -n C indentifier (font name) -d Overview picture: Enable generation of bdf.tga and assign BDF font for description -l Overview picture: Set left margin -a Overview picture: Additional font information (background, orange&blue dot) -t Overview picture: Test string (Woven silk pyjamas exchanged for blue quartz.) -r Runtime test map := { "," } mapcmd := | | default := "*" maprange := [ ">" ] Move specified glyph to target code exclude := "~" range := [ "-" ] Select glyphs within specified range addexpr := [ "+" ] mulexpr := [ "*" ] num := | hexnum := "$" { } decnum := { } decdigit := "0" | "1" | "2" | "3" | "4" | "5" | "6" | "7" | "8" | "9" hexdigit := "a" | "b" | "c" | "d" | "e" | "f" | "A" | "B" | "C" | "D" | "E" | "F" | { } zero, one ore more, [ ] zero or once, | alternative example: -m '32-255' select gylphs from encoding 32 to 255 -m '32-255,~64' select gylphs from encoding 32 to 255, exclude '@' -m '32,48-57' select space, '1', '2', ... '9' build modes: -b 0: Most compact, glyph bitmap is minimal -b 1: Like -b 0, but glyph bitmap is extended to the height of the largest glyph within the selected glyph list. Also the width of the gylphs is extended to cover the delta x advance. -b 2: Like -b 1, but glyph width is set to the width of the largest glyph within the selected gylph list. -b 3: Like -b 2, but width and height are forced to be a multiple of 8. 在“bdfconv”目录下有一个脚本 “test_helvb18.bat” , bdfconv.exe -v -f 1 -m "32-127" ../bdf/helvB18.bdf -o helvb18_tf.c -n u8g2_font_helvB18_tf -d ../bdf/helvB18.bdf type helvb18_tf.c 我们可以利用这个脚本来生成字库,这个是直接通过“helvB18.bdf”字库文件生成 ".C"的字库数据,而中文字库 很大,一般都有几 M 大小,显然这种直接生成的方法不好用。还有另外一种字库生成方法是按需提取字库,利用一 个 map 表来提取要生成字库的内容,map 表里面放置的是 unicode 编码(需要哪些中文就填这些中文的 unicode 码)。unicode 编码工具很多我用的是 ”文本与 unicode 转换小工具 V5.02.05” Unicode 码分隔符用$ 在文本区输入想要显示的汉字 Unicode 码进制选十六进制,接着 Unicode 码区会显示十
 六进制码,复制生成的字码将它填在自己要显示的 map 表里面。 我的字码放置在“chinese2.map”(当然这和字码表也可以另建)如下图: 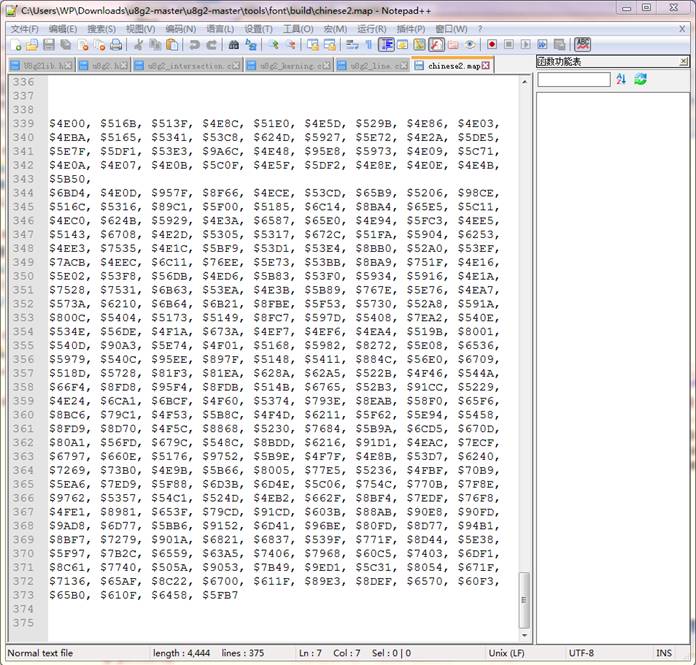 这种生产方式的命令是:
 bdfconv.exe -v ../bdf/unifont.bdf -b 0 -f 1 -M ../build/chinese2.map -d ../bdf/7x13.bdf -n u8g2_font_unifont_zgzt -o u8g2_font_unifont_zgzt.c 从这个命令我们可以知道 map 文件是 “chinese2.map”,全路径是:“u8g2\tools\font\build”,我们可以在 “chinese2.map”文件里面添加我们要显示的中文。生产的字库代码在 u8g2_font_unifont_zgzt.c 文件里面,我 们可以将里面的内容复制,然后打开路径" U8g2\src\clib 下的 u8g2_fonts.c "文件, 将复制的内容粘贴在里面。 注意:我是将字码放在例程的字库里(也就数 chinese2.map 里面)所以产生命令是: bdfconv.exe -v ../bdf/unifont.bdf -b 0 -f 1 -M ../build/chinese2.map -d ../bdf/7x13.bdf -n u8g2_fonts -o u8g2_fonts.c 如下图: 点击保存。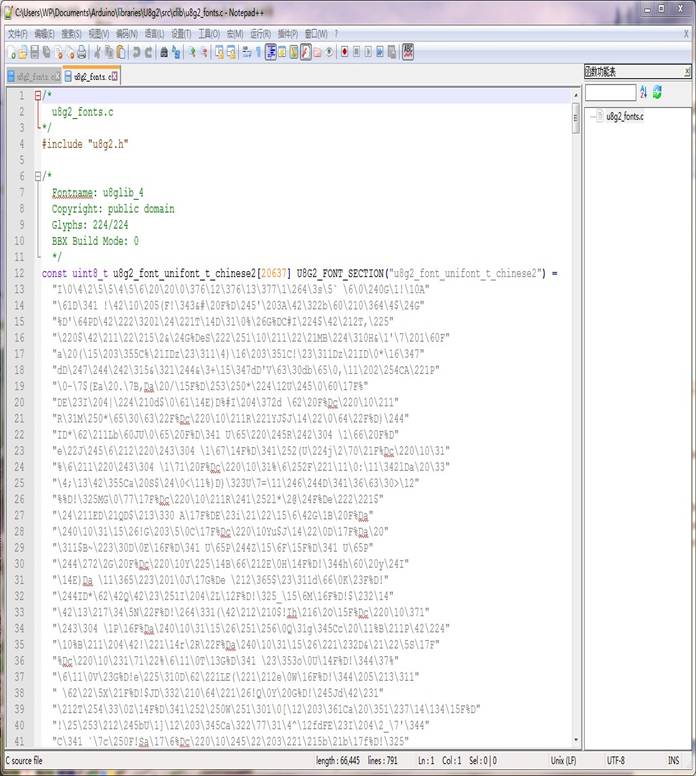 打开 u8b2 的例程 PrintUTF8 程序将生成过字码的汉字填在 u8g2.print("");里就可以显示要显示的汉字了。
以上图文的pdf格式文档下载(内容和本网页上的一模一样,方便大家保存):如果你不想保存就不必下载了:
打开 u8b2 的例程 PrintUTF8 程序将生成过字码的汉字填在 u8g2.print("");里就可以显示要显示的汉字了。
以上图文的pdf格式文档下载(内容和本网页上的一模一样,方便大家保存):如果你不想保存就不必下载了:
 U8g2自己添加字库.pdf
(1.09 MB, 下载次数: 38)
2022-11-13 13:34 上传
点击文件名下载附件
下载积分: 黑币 -5
U8g2自己添加字库.pdf
(1.09 MB, 下载次数: 38)
2022-11-13 13:34 上传
点击文件名下载附件
下载积分: 黑币 -5
|
【本文地址】
今日新闻 |
推荐新闻 |