矩阵点乘和x乘---numpy和tensorflow |
您所在的位置:网站首页 › 45×28乘0点 › 矩阵点乘和x乘---numpy和tensorflow |
矩阵点乘和x乘---numpy和tensorflow
|
点乘和矩阵乘的区别: 1)点乘(即“ * ”) ---- 各个矩阵对应元素做乘法 若 w 为 m1 的矩阵,x 为 mn 的矩阵,那么通过点乘结果就会得到一个 m*n 的矩阵。
w的列数只能为 1 或 与x的列数相等(即n),w的行数与x的行数相等 才能进行乘法运算。 2)矩阵乘 ---- 按照矩阵乘法规则做运算 若 w 为 mp 的矩阵,x 为 pn 的矩阵,那么通过矩阵相乘结果就会得到一个 m*n 的矩阵。 只有 w 的列数 == x的行数 时,才能进行乘法运算
运行结果: 2)矩阵乘 import numpy as np 2 3 w = np.array([[0.4, 1.2]]) 4 x = np.array([range(1,6), range(5,10)]) 5 6 print w 7 print x 8 print np.dot(w,x)结果如下 2、tensorflow 1)点乘 在Python中,实现对应元素相乘,有2种方式,一个是np.multiply(),另外一个是*,这种方式要求连个矩阵的的形状shape相同。见如下Python代码: import numpy as np # 2-D array: 2 x 3 two_dim_matrix_one = np.array([[1, 2, 3], [4, 5, 6]]) another_two_dim_matrix_one = np.array([[7, 8, 9], [4, 7, 1]]) # 对应元素相乘 element-wise product element_wise = two_dim_matrix_one * another_two_dim_matrix_one print('element wise product: %s' %(element_wise)) # 对应元素相乘 element-wise product element_wise_2 = np.multiply(two_dim_matrix_one, another_two_dim_matrix_one) print('element wise product: %s' % (element_wise_2)) 1 import tensorflow as tf 2 3 w = tf.Variable([[0.4], [1.2]], dtype=tf.float32) # w.shape: [2, 1] 4 x = tf.Variable([range(1,6), range(5,10)], dtype=tf.float32) # x.shape: [2, 5] 5 y = w * x # 等同于 y = tf.multiply(w, x) y.shape: [2, 5] 6 7 sess = tf.Session() 8 init = tf.global_variables_initializer() 9 sess.run(init) 10 11 print sess.run(w) 12 print sess.run(x) 13 print sess.run(y)结果: 结果: |
 若 w 为 mn 的矩阵,x 为 mn 的矩阵,那么通过点乘结果就会得到一个 m*n 的矩阵。
 1、numpy 1)点乘
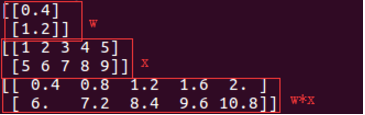

 2)矩阵乘
2)矩阵乘
【本文地址】
今日新闻 |
推荐新闻 |